
To use multiple monitors on a single Linux system use one of the following options:
- A dual headed graphics card with a single X-Window desktop. (preferred option)
i.e. NVidia Quadro Pro or ATI Radion Pro 9800.
or - Xinerama: Two graphics cards and let X span the two desktops.
This tutorial covers the use of NVidia and ATI furnished graphics drivers for dual headed systems as well as Xinerama. This requires the use of a dual headed grahics card, two graphics card or a splitter DVI or SVGA Y-cable from a single digital high-res 2xDVI output.
The X server is the software which runs on your desktop and can connect to client programs to reder their displays. (yes it is opposite of what many find to be intuitive.)
X-Windows Configuration file:
- Red Hat Enterprise 4, 5, 6/Fedora Core: /etc/X11/xorg.conf
- Red Hat Enterprise 3 (older systems): /etc/X11/XF86Config
- /usr/X11R6/bin/X -configure
This creates $PWD/xorg.conf.new (or: $PWD/XF86Config.new) - Red Hat GUI configuration tool:
- RHEL4, FC 2/3: /usr/bin/system-config-display
- Red Hat 8.0/9.0, RHEL3: redhat-config-xfree86
- Generic XFree86.org configuration tool: /usr/X11R6/bin/xf86config
Distributions of Linux will install simple open source drivers for even the most complex of graphics cards. To get full support for 3-D rotation and manipulation, 3-D shading, GLX, DRI, and two monitors, one needs to download the graphics drivers from the manufacturer.
(i.e. Quadro Pro)
The default open source NVidia driver installed by Fedora, Red Hat and SuSE is "nv" or "vesa" which is ok for simple 2-D graphics. If you want to take advantage of the full power of your graphics card, download and install the 3-D driver ("nvidia") from NVidia.com.
- Download the NVidia drivers from http://www.nvidia.com/object/unix.html
- Console Mode - Install dirivers in console terminal:
- Enter a console window: ctrl + alt + F1
- RedHat: Login as root and suspend graphics mode: init 3
or boot to init level 3. See the YoLinux "init process" tutorial. - Ubuntu 16.04: Login as root and suspend graphics mode: sudo service lightdm stop
(yes this is different than Ubuntu 14.04) - Ubuntu 14.04: Login as root and suspend graphics mode: sudo stop lightdm
(NOT sudo service lightdm stop)
The command stop is an Upstart init daemon job command. The service command works with System V init scripts.
Clean-up old kernels and free space in /boot: sudo apt autoremove
Update kernel and system software: apt upgrade or sudo synaptic for a GUI.
Install kernel source (if not already installed): apt install kernel-package (kernel source is required by the NVidia installer)
- Run the NVidia installer in the console window: sh NVIDIA-Linux-x86-1.0-8756-pkg1.run -q
Add the directive --kernel-source-path /usr/src/kernels/2.6.xxxxx (or for older systems: --kernel-source-path /usr/src/linux-xxxxx) if required to explicitly state the Linux kernel source path. - Return to graphics mode - (choose one method)
- console Ubuntu: ctrl + alt + F7
Red Hat el6: ctrl + alt + F1 - Change init level: init 5
- Ubuntu 16.04: sudo service lightdm restart
- Reboot: sudo shutdown -r now
- console Ubuntu: ctrl + alt + F7
- Configure X - Run the NVidia configuration tool or edit X11 config file:
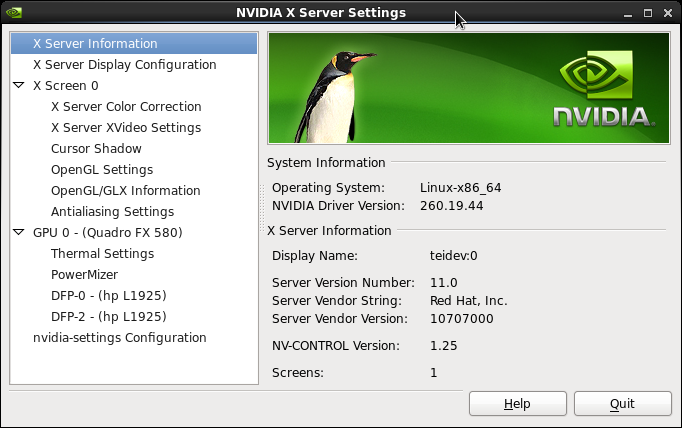
- Run NVidia X11 config tool /usr/bin/nvidia-settings
See info below - Edit X11 config file /etc/X11/xorg.conf (or for older systems: /etc/X11/XF86Config) as described below.
Although the NVidia directions do not reference manual configuration by editing the X-Windows config file, I have found it necessary to take advantage of both monitors.
To generate a default /etc/X11/xorg.conf for use with the NVidia driver, execute the command (just installed by the NVidia install program): /usr/bin/nvidia-xconfig
Edit the "Monitor" section as described in the "Wide Screen Pitfalls" section below.
- Run NVidia X11 config tool /usr/bin/nvidia-settings
[Potential Pitfall]: Graphic login attempted but refused without error and system returns to graphic login. This often happens when you update the kernel but don't re-run the NVidia installer. The NVidia installer needs to be re-run every time you upgrade the kernel or else the system tries to bring up the GUI desktop, fails and returns you to the graphic login.
[Potential Pitfall]: Ubuntu 14.04 - sometimes default Ubuntu NVidia packages can interfere with the NVidia driver installation.Remove:
- sudo apt-get remove nvidia*
- sudo apt-get autoremove
[Potential Pitfall]: Ubuntu 14.04 - sometimes conflicts will occur with Kernel Nouveau
Edit: /etc/modprobe.d/blacklist-nouveau.conf
blacklist nouveau
blacklist lbm-nouveau
options nouveau modeset=0
alias nouveau off
alias lbm-nouveau off
then reboot system.
[Potential Pitfall]: Ubuntu 14.04 - console terminal package dependancies should be installed:
Install: sudo apt-get install ngetty rungetty sc mingetty gdm
[Potential Pitfall]: Ubuntu 14.04 - sometimes default Open Source Ubuntu NVidia driver packages can interfere with the NVidia driver installation.
Remove: sudo apt-get remove nvidia*
[Potential Pitfall]: The NVidia driver kernel module does not get loaded. Verify: lsmod | grep nvidia
[Potential Pitfall]: Linux kernel upgrade leads to loss of video functionality. NVidia is constantly updating the drivers to match changes in the kernel. An upgrade to the kernel may require an upgrade to the NVidia drivers. This was true when I upgraded from RHEL 6.0 to 6.3. This problem was fixed when I upgraded the driver from NVIDIA-Linux-x86_64-260.19.44.run to NVIDIA-Linux-x86_64-304.37.run.
[Potential Pitfall]: Ubuntu - If the NVidia installer does not work, try using "linux-restricted-modules": apt-get install nvidia-glx
For more info see the NVidia Binary Driver Howto
[Potential Pitfall]: Ubuntu - NVidia installer complains about missing file /usr/src/linux-source-2.6.15/include/linux/version.h "No such file or directory". Solution:
- cd /usr/src
- tar xjvf linux-source-2.6.XX.tar.bz2
- ln -s linux-source-2.6.XX linux
- cd linux
- cp /boot/config-`uname -r` .config
- make oldconfig
- make include/linux/version.h
[Potential Pitfall]: (NVidia Quadro4 980XGL) If booting with one monitor, the graphics card will not generate a video signal for the second monitor. (Makes sense, it's not there.) One must boot with both monitors if the graphics card is to generate a video signal for both.
[Potential Pitfall]: SuSE NVidia Installer HOWTO instructions (http://www.suse.de/~sndirsch/nvidia-installer-HOWTO.html) are flawed. It suggests using the configuration program "sax2" to configure the NVidia driver. I did not find that this worked. Modify the X11 configuration file manually using this tutorial.
[Potential Pitfall]: (NVidia Quadro4 980XGL) SuSE 9.3: Yast will show options for configuring two monitors but the default open source drivers do not support two monitors.
[Potential Pitfall]: (NVidia Quadro4 980XGL)
If one monitor remains black but the other is working this could be due
to the definition of the "ConnectedMonitor".
If you are using both the analog and digital ports of the monitor, the correct
definition MUST be specified. If you connect using analog connectors but
specify a digital flat panel display (or vice versa), the screen will be black.
Valid definitions for ConnectedMonitor are:
- CRT: Analog Cathode Ray Tube (using VGA cables/connector)
- FPD: Digital Flat Panel Display (using DVI cables/connector)
- DPMS: Digital Power Management Savings for Energy Star compliant monitors.
File: /etc/X11/xorg.conf
See: Section "Device":
Section "Device"
        Identifier  "Videocard0"
        Driver      "nvidia"
        VendorName  "Videocard vendor"
        BoardName   "NVIDIA Quadro 4 (generic)"
        Option	    "TwinView" "true"
        Option	    "TwinViewOrientation" "RightOf"
        Option	    "SecondMonitorHorizSync" "31-81"
        Option	    "SecondMonitorVertRefresh" "55-85"
        Option	    "MetaModes" "1280x1024,1280x1024; 1024x768,1024x768"
        Option	    "ConnectedMonitor" "FPD,FPD"
EndSection
A mix of monitors may specify: Option "ConnectedMonitor" "FPD,CRT" if the second monitor is an analog connection.
This often occurs when two computers are connected to the same monitor, necessitating the use of both the analog and digital connections to the monitor.
Using digital flat panel monitors with digital connections and specifying "FPD" for both will also fix this problem.
For more info see the YoLinux Installation Tutorial: Installing NVidia Graphics card drivers
File: /etc/X11/xorg.conf
See: Section "Module":
Section "Module"
	Load  "dbe"
	Load  "extmod"
	Load  "fbdevhw"
	Load  "glx"
	Load  "record"
	Load  "freetype"
	Load  "type1"
EndSection
Note: Remove "dri", "GLCore". Add "glx".
(Not all configurations will include a "Module" section. My RHEL6 system does not while my Ubuntu 11 does.)
Notes:
- The NVidia driver using "TwinView" allows X-Windows to view the two displays as a single screen.
- The config file xorg.conf needs to be edited to enable proper dual monitor use. The SuSE SaX2 configuration tool was not enough nor is the Red Hat configuration tool.
- Both displays share a single frame buffer.
- To disable one of the displays for a mode, use mode name NULL:
Option "MetaModes" "1600x1200, NULL; NULL, 1024x768" - To create a panning area (bounding box) for the desktop (viewport):
Option "MetaModes" "1024x768 @1600x1200, 800x600 @1024x768" - TwinViewOrientation options:
- RightOf
- LeftOf
- Above
- Below
- Clone
- The open source drivers "nv" and "vesa" do not support "TwinView". This is only supported using the nVidia driver "nvidia".
- Manual loading/unloading the kernel module:
- Unload: modprobe -r nvidia
- Load: modprobe nvidia
- Show modules loaded by kernel: lsmod
- DVI: Digital Visual Interface. Transmits 24 bits/pixel for R, G and B. The timing almost matches the VGA analog signal. DVI sends whole frames with no compression.
- Dual link DVI video cards: (i.e. Quadro FX) The nVidia
graphics cards with a single "dual link" DVI interface (also known as
DVI-DL) are used for a single very high resolution screen or can be
used to drive two analog monitors. The "dual link" DVI connector has
many more pins than the traditional "single link" DVI connector. These
graphics cards can use a "Y" connector from the single "dual link" DVI
output to two analog VGA connectors to drive two monitors. The
configuration is the same as the "TwinView" configuration detailed
above except that one must specify: Option "ConnectedMonitor" "CRT,CRT"
For more information on DVI interfaces, see Wikipedia: DVI - Digital Visual Interface
NVidia commands: The NVidia driver installation comes with support commands.
- nvidia-settings:
- /usr/bin/nvidia-settings --help : List command arguments
- nvidia-settings -g : Show GLX settings for the X display
- nvidia-xconfig:
- nvidia-xconfig --help : List command arguments
- nvidia-xconfig -A : Advanced help about full functionality.
- nvidia-xconfig -t : Show X configuration file data in tree format
- nvidia-installer:
- nvidia-installer -A : Print the installer command's "advanced" options.
NVidia GUI configuration tool: /usr/bin/nvidia-settings
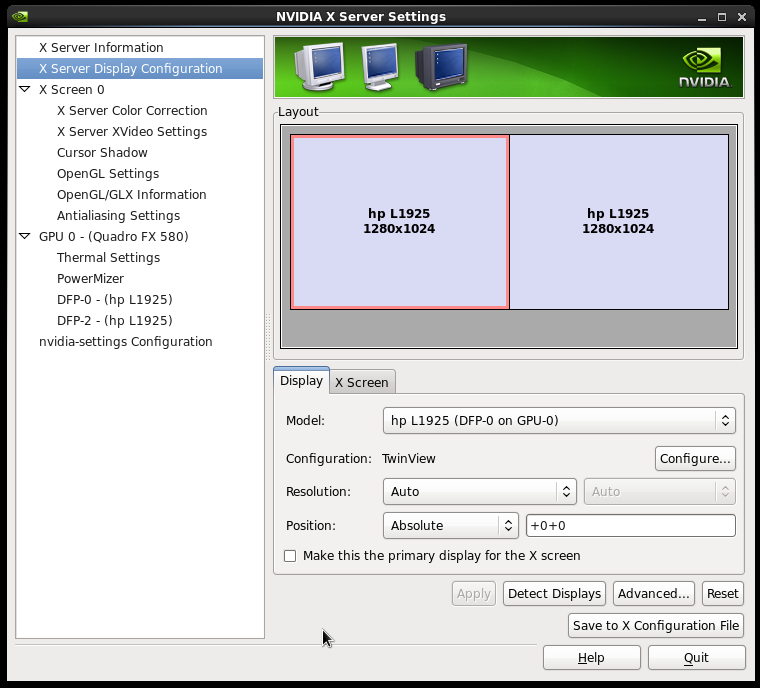
Dual screen support
Links:
(i.e. Radeon 9800)
- Download the ATI drivers for X.Org from X.org
- Run installer: sh ati-driver-installer-8.22.5-i386.run
- Choose "Install Driver X.Org 6.8"
- "Custom Install"
- Dual monitor configuration:
/usr/X11R6/bin/aticonfig --dtop=horizontal --overlay-on=1
(Command placed here by installer in above step.)
(other options include: --initial=dual-head and --screen-layout=right)
Command line help: aticonfig -h
[Potential Pitfall]: SuSE users (9.3) - Do NOT use Yast to configure the system for dual monitor use!! Don't use SaX2 either!!! Only use aticonfig - Edit /etc/X11/xorg.conf
Section "Monitor" Identifier "aticonfig Monitor 0" DisplaySize 1000 400 EndSection - Note:
- The installer will add an application to the menu, "ATI Control". This will launch the "ATI Radion 9800 Control Panel" for dual monitor control and adjustment. It will also control TV out settings.
- Check for loaded module:
- Open Source: /sbin/lsmod | grep radeon
- ATI driver: /sbin/lsmod | grep fglrx
A Xinerama configuration uses the native Xorg drivers to coordinate two graphics cards, controlling two monitors to display a single desktop. Do not use Xinerama with the proprietary driver configurations above (nVidia,ATI) as they contain the Xinerama capabilities within their drivers.
Identifying the graphics cards and PCI bus ID:
- List PCI devices bus ID:
- Xorg -scanpci
or
XFree86 -scanpci
(Execute command at run level 3: init 3)
- Xorg -scanpci
- Other PCI info commands:
Specify the device and PCI bus ID for each card:
Section "Device"
        Identifier  "Videocard0"
        Driver      "vesa"
        BusID       "PCI:0:9:0"
EndSection

Section "Device"
        Identifier  "Videocard1"
        Driver      "vesa"
        BusID       "PCI:1:0:0"
EndSection
AGP example: BusID "AGP:01:00:0"
Note:
- If using a single graphics card with a single DVI-DL port to drive two monitors, only specify a single device.
- The "vesa" driver is the most basic driver and can work with any VESA compatible video card.
Specify the server "layout":
Section "ServerLayout"
    Identifier  "Default Layout"
    Screen "Screen 0"
    Screen "Screen 1" RightOf "Screen 0"
    ...
    ..
    Option "Xinerama" "on"         - Using /etc/X11/Xorg.conf
    Option "Clone"    "off"
EndSection
Configure older XF86Config X-server to use Xinerama:
Section "ServerFlags"
    Option "Xinerama" "true"
EndSection
Red Hat/Fedora display configuration tool: /usr/bin/system-config-display
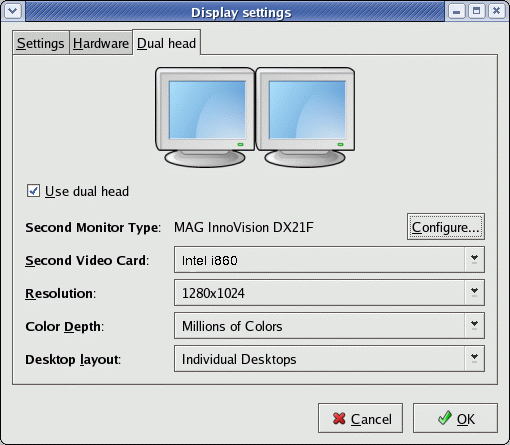
Select "Use dual head". This will configure Xinerama for two monitors. This configuration tool will not work for nVidia or ATI proprietary drivers.
Note: If starting X-windows manually: startx -- +xinerama
Xinerama info: TLDP: Xinerama configuration.
Users of OpenOffice and Adobe Acrobat on dual monitor systems (i.e. users of the NVidia Quadro video card) will notice that OpenOffice and Adobe Acrobat documents will be stretched due to improper default settings. Scalable fonts as opposed to pixel based fonts will be scaled improperly.
Compare the two images of the OpenOffice presentation display:
- Dual monitor stretched view. (distorted)
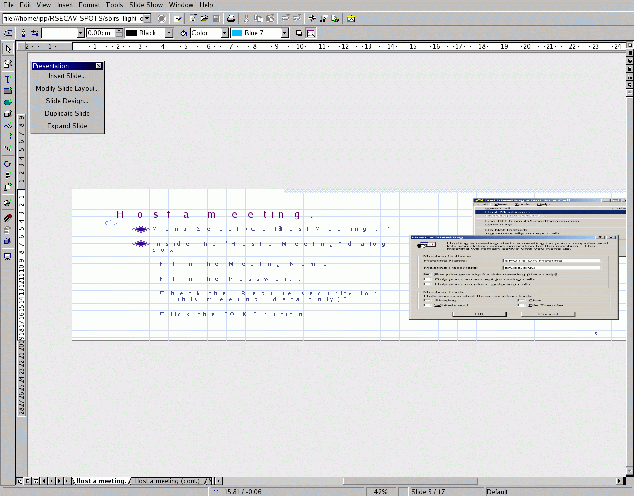
- Single Monitor and fixed dual view.(proper scale)
Solution: The "DisplaySize" entry in the /etc/X11/xorg.conf (Xorg shipped with Fedora 2 and later) (Fedora 1, Red Hat 9 or older: /etc/X11/XF86Config) file under the "Monitor" section can be tweaked to fix this problem.
Section "Monitor"
        Identifier   "Monitor0"
        ...
        ..
        DisplaySize  1000 400
        ..
Where the display size is stated in millimeters and is used to calculate the DPI (Dots Per Inch) of the screen. It's the ratio which is actually important. The ratio must reflect the horizontal desktop dimensions of two monitors. The desktop size of two screens in pixels, each of 1280x1024 is 2560x1024. This ratio is equal to that of 1000x400.
Also see:
- XFree86.org: XF86Config file man page
- Example /etc/X11/XF86Config - Example for NVidia Quadro Pro Dual Monitor (RH 8.0/NVidia driver 1.0-4363)
- Log file:
- X.org: /var/log/Xorg.0.log [local]
- XFree86: /var/log/XFree86.0.log [local]
DPMS can be configured to reduce power consumption with Energy Star compliant monitors, when the system is idle. XFree86 4.x+ or X.org 6.7+ is required.
Configuration:
- Turn on DPMS:
Section "Monitor" Identifier "Monitor0" ... .. Option "DPMS" "true" .. - Configure DPMS:
Section "ServerLayout"
        ...
        ..
        Option "StandbyTime" "360"
        Option "SuspendTime" "720"
        Option "OffTime"     "840"
        ..
Using the xset command to set X-Window display parameters:
- View current settings: xset q
- Setting DPMS:
- Disable DPMS: xset -dpms
- Enable DPMS: xset +dpms
- Set DPMS parameters: xset dpms 360 720 840
- Set font path: xset fp= /home/user1/fonts
Re-read the fonts database: xset fp rehash - Set bell volume (medium), pitch (Hz) and duration (millisec): xset b 50 400 100
Turn off bell: xset b off - Set key autorepeat: xset r off
- Turn off screen saver activation: xset s off
See: xset man page
Dual and triple monitor backgrounds:
Place wallpaper images in /usr/share/backgrounds/images/ (Red Hat and Fedora)- DualScreenWallpaper.com
- DigitalBlasphemy.com (wide, dual, tri-screen)
- Dual monitor backgrounds (2560x1024)
- Mandolux.com (dual and tri-screen)
Links:
- YoLinux Hardware: Video Cards
- Xinerama - Works only if both displays have the same resolution and the same color depth. Xinerama treats both screens as a shared desktop.
- Video timing modes
- Multiple displays
- Realtimesoft.com: resources
- Synergy2: Share a single mouse and keyboard between multiple computers with different operating systems, each with its own display, without special hardware. Better than a KVM!