

Perform the following steps to secure your web site:
- See Distribution erratas and security fixes (See Yolinux home page for list). [e.g. Red Hat Linux Errata]
Update your system where appropriate.- Red Hat/CentOS:
- yum check-update
(Print list of packages to be updated.) - yum update
#!/bin/sh /usr/bin/yum -R 120 -e 0 -d 0 -y update yum /usr/bin/yum -R 10 -e 0 -d 0 -y update - yum check-update
- Ubuntu/Debian:
- apt-get update
(Update package list to the latest version associated with that release of the OS.) - apt-get upgrade
- apt-get update
- Red Hat/CentOS:
- Reduce the number of network services exposed. These will be started by
scripts in /etc/rc.d/rc*.d/ directories. (See full list of services in: /etc/init.d/)
There may be no need to run sendmail (mail server),
portmap (RPC listener required by NFS),
lpd (Line printer server daemon. Hackers probe my system for this service all the time.),
innd (News server), linuxconf etc.
For example, sendmail can be removed from the boot process using the command:
chkconfig --del sendmail or by using the configuration tool ntsysv.
The service can be terminated using the command /etc/rc.d/init.d/sendmail stop.
At the very least one should run the command chkconfig --list
to see what processes are configured to be operable after boot-up.
See the YoLinux init process tutorial
- Verify your configuration. List the open ports and processes which hold them: netstat -punta (Also try netstat -nlp)
- List RPC services: [root]# rpcinfo -p localhost
Ideally you would NOT be running portmapper so no RPC services would be available. Turn off portmapper: service portmap stop (or: /etc/init.d/portmap stop) and remove it from the system boot sequence: chkconfig --del portmap (Portmap is required by NFS.) - Anonymous FTP (Using wu_ftpd - Last shipped with RH 8.0. RH 9 and FC use vsftpd):
By default Red Hat comes configured for anonymous FTP.
This allows users to ftp to your server and log in with the login
anonymous and use an email address as the password. If you wish
to turn off this feature edit the file /etc/ftpaccess and change:
class all real,guest,anonymous *
to
class all real,guest *
For more on FTP configuration see: YoLinux Web server FTP configuration tutorial - Use the find command to locate vulnerabilities - find suid and guid files (which can execute with root privileges) as well as world writable files and directories. For example:
- find / -xdev \( -perm -4000 -o -perm -2000 \) -type f -print
Remove suid privileges on executable programs with the command: chmod -s filename - find / -xdev \( -nouser -o -nogroup \) -print
Find files not owned by a valid user or group.
- find / -xdev \( -perm -4000 -o -perm -2000 \) -type f -print
- Use the command chattr
and lsattr
to make a sensitive security file un-modifiable over and above the usual permissions.
-
Make a file un-modifiable: chattr +i /bin/ls
Make directories un-modifiable: chattr -R +i /bin /sbin /boot /lib
Make a file append only: chattr +a /var/log/messages
-
Make a file un-modifiable: chattr +i /bin/ls
- Use "tripwire" [sourceforge: tripwire] for security monitoring of your system for signs of unauthorized file changes. Tripwire is offered as part of the base Red Hat and Ubuntu distributions. Tripwire configuration is covered below.
- Watch your log files especially /var/log/messages and /var/log/secure.
- Avoid generic account names such as guest.
- Use PAM network wrapper configurations to disallow passwords which can be
found easily by crack or other hacking programs.
PAM authentication can also disallow root network login access.
(Default Red Hat configuration.
You must login as a regular user and su - to obtain root access.
This is NOT the default for ssh and must be changed as noted below.)
See YoLinux Network Admin Tutorial on using PAM - Remote access should NOT be done with clear text telnet but with an encrypted connection using ssh. (Later in this tutorial)
- Proc file settings for defense against attacks. This includes protective measures against IP spoofing, SYN flood or syncookie attacks.
- DDoS (Distributed Denial of Service) attacks: The only
thing you can do is have gobs of bandwidth and processing
power/firewall. Lots of processing power or a firewall are useless
without gobs of bandwidth
as the network can get overloaded from a distributed attack.
Also see:- Turn off ICMP (look invisible to network scans)
- Monitor the attack with tcpdump
- User access can be restricted with the following configuration files:
- /etc/security/limits.conf
- /etc/security/group.conf
- /etc/security/time.conf
- Remove un-needed users from the system. See /etc/passwd. By default Red Hat installations have many user accounts created to support various processes. It you do not intend to run these processes, remove the users. i.e. remove user ids games, uucp, rpc, rpcd, ...
- It is best for security reasons that you reduce the number
of inetd network services exposed. The more services exposed, the greater your
vulnerability. Reduce the number of network services accessible through
the xinet or inet daemon by:
- inetd: (older Red Hat)
Comment out un-needed services in the /etc/initd.conf file.
Sample: (FTP is the only service I run)ftp stream tcp nowait root /usr/sbin/tcpd in.ftpd -l -aRestart the daemon to apply changes: /etc/rc.d/init.d/inetd restart - xinetd: (current systems)
All network services are turned off by default during an upgrade. Sample file: /etc/xinetd.d/wu-ftpd:
service ftp
{
     disable = yes          - Default is off. This line controls xinetd service (enabled or not)
     socket_type             = stream
     wait                    = no
     user                    = root
     server                  = /usr/sbin/in.ftpd
     server_args             = -l -a
     log_on_success          += DURATION USERID
     log_on_failure          += USERID
     nice                    = 10
}
Turning on/off an xinetd service:- Edit the file: /etc/xinetd.d/service-name
Changing to the line "disable = yes" turns off an xinetd service.
Changing to the line "disable = no" turns on an xinetd service.
Xinetd configuration must be performed for each and every file in the directory /etc/xinetd.d/ in order to configure each and every network service.
Restart the daemon to apply changes: /etc/rc.d/init.d/xinetd restart - You may also use the command:
chkconfig wu-ftpd on
OR
chkconfig wu-ftpd off
This will edit the appropriate file (/etc/xinetd.d/wu-ftpd) and restart the xinetd process.
Tip:
- List init settings including all xinetd controlled services: chkconfig --list
- List status of services (Red Hat/Fedora Core based systems): service --status-all
- Edit the file: /etc/xinetd.d/service-name
- inetd: (older Red Hat)
Comment out un-needed services in the /etc/initd.conf file.
- Use Linux firewall rules to protect against attacks. (iptables: kernel 2.4+ or ipchains: kernel 2.2)
Access denial rules can also be implemented on the fly by portsentry.
(Place at the end of /etc/rc.d/rc.local to be executed upon system boot, or some other appropriate script)- iptables script:
iptables -A INPUT -p tcp -s 0/0 -d 0/0 --dport 2049 -j DROP - Block NFS iptables -A INPUT -p udp -s 0/0 -d 0/0 --dport 2049 -j DROP - Block NFS iptables -A INPUT -p tcp -s 0/0 -d 0/0 --dport 6000:6009 -j DROP - Block X-Windows iptables -A INPUT -p tcp -s 0/0 -d 0/0 --dport 7100 -j DROP - Block X-Windows font server iptables -A INPUT -p tcp -s 0/0 -d 0/0 --dport 515 -j DROP - Block printer port iptables -A INPUT -p udp -s 0/0 -d 0/0 --dport 515 -j DROP - Block printer port iptables -A INPUT -p tcp -s 0/0 -d 0/0 --dport 111 -j DROP - Block Sun rpc/NFS iptables -A INPUT -p udp -s 0/0 -d 0/0 --dport 111 -j DROP - Block Sun rpc/NFS iptables -A INPUT -p all -s localhost -i eth0 -j DROP - Deny outside packets from internet which claim to be from your loopback interface. - ipchains script:
# Allow loopback access. This rule must come before the rules denying port access!!
iptables -A INPUT -i lo -p all -j ACCEPT         - This rule is essential if you want your own computer
iptables -A OUTPUT -o lo -p all -j ACCEPT          to be able to access itself through the loopback interface

ipchains -A input -p tcp -s 0/0 -d 0/0 2049 -y -j REJECT       - Block NFS
ipchains -A input -p udp -s 0/0 -d 0/0 2049 -j REJECT          - Block NFS
ipchains -A input -p tcp -s 0/0 -d 0/0 6000:6009 -y -j REJECT  - Block X-Windows
ipchains -A input -p tcp -s 0/0 -d 0/0 7100 -y -j REJECT       - Block X-Windows font server
ipchains -A input -p tcp -s 0/0 -d 0/0 515 -y -j REJECT        - Block printer port
ipchains -A input -p udp -s 0/0 -d 0/0 515 -j REJECT           - Block printer port
ipchains -A input -p tcp -s 0/0 -d 0/0 111 -y -j REJECT        - Block Sun rpc/NFS
ipchains -A input -p udp -s 0/0 -d 0/0 111 -j REJECT           - Block Sun rpc/NFS
ipchains -A input -j REJECT -p all -s localhost  -i eth0 -l    - Deny and log ("-l") outside packets from internet
                                                                 which claim to be from your loopback interface.
- iptables uses the chain rule "INPUT" and ipchains uses the lower case descriptor "input".
- View rules with iptables -L or ipchains -L command.
- iptables man page
- When running an internet web server it is best from a security point of view, that one NOT run printing, X-Window, NFS or any services which may be exploited if a vulnerability is discovered or if mis-configured regardless of firewall rules.
Also see:
- iptables script:
- Use portsentry to monitor network hacker attacks and dynamically assign firewall rules to thwart attackers. (Later in this tutorial)
- A monolithic and minimal kernel might also provide a small bit of
protection (avoid Trojan modules) as well as running on less common hardware
(MIPS, Alpha, etc... so buffer overflow instructions will not run.)
- Kernel Security Enhancements:
- SELinux: National Security Agency (NSA): Security-Enhanced Linux - Altered for increased security.
For more see the YoLinux.com Systems Admin and Web site configuration tutorials. - Ubuntu Apparmor community wiki
- SELinux: National Security Agency (NSA): Security-Enhanced Linux - Altered for increased security.
- Enable ExecShield: this is enabled by default on Red Hat EL 5/CentOS 5.
ExecShield is a Linux kernel feature which protects the system against buffer overflow exploits.
This feature is performed by random placement of stack memory, prevention of execution of memory used to hold data and text buffer handling.
ExecShield can be enabled in the Red Hat/CentOS configuration file /etc/sysctl.conf by adding the following two lines:
kernel.exec-shield = 1
kernel.randomize_va_space = 1
The current system configuration can be checked:- cat /proc/sys/kernel/exec-shield
- cat /proc/sys/kernel/randomize_va_space
Note: Intel XD/AMD NX 32 bit x86 processors only (not x86_64 which can address more that 4Gb): Enable AMD NX or Intel XD support by use of the PAE (Physical Address Extension) kernel. The PAE memory extension is required to access the XD/NX bit. To see if your processor supports NX or XD PAE, use the command: cat /proc/cpuinfo | grep flags to show a field with "pae" and "nx".
Install a Linux kernel (2.6.8+) with PAE support with the command yum install kernel-PAE. The boot loader will also have to specify the PAE kernel for boot.
The BIOS will also have to be configured to support it as well.
This kernel should only be installed on a system with a x86 32 bit processor which offers this support. The 64 bit x86_64 processors which can natively interact with the XD/NX bit do not need the PAE kernel.
It is well known that there are various blocks of IP addresses where nefarious hackers and spam bots reside. These IP blocks were often once owned by legitimate corporations and organizations but have fallen into an unsupervised realm or have been hijacked and sold to criminal spammers. These IP blocks should be blocked by firewall rules.
There are various friendly services which seek and discover these IP blocks to firewall and deny and they share this information with us. Thanks!
The Spamhaus drop list: This is a script to download the total drop list and generate an iptables filter script to block these very IP addresses:
#!/bin/bash
# Blacklist of hacker zones and bad domains from spamhaus.org
FILE=drop.lasso
/bin/rm -f $FILE
wget http://www.spamhaus.org/drop/drop.lasso
blocks=$(cat $FILE  | egrep -v '^;' | awk '{ print $1}')
echo "#!/bin/bash" > Spamhaus-drop.lasso.sh
for ipblock in $blocks
do
 echo "iptables -I INPUT -s $ipblock -j DROP" >> Spamhaus-drop.lasso.sh
done
chmod ugo+x Spamhaus-drop.lasso.sh
echo "...Done"
At the very minimum, these blocks of IP addresses should be denied by all servers.
Block or allow by country: One can deny access by certain countries or the inverse, allow only certain countries to access your server.
See these sites to generate lists:- IpInfoDb.com - generates Apache htaccess or iptables rules
- Country IP block list generator
- IpDeny.com: CIDR lists
Block forum and comment list spammers: Use the list generated from honeypots operated by StopForumSpam.com
#!/bin/bash
# Big list of IP addresses to block
# IPs gathered from the last 30 days
# Over 100k IP addresses

rm -f listed_ip_30.zip
wget http://www.stopforumspam.com/downloads/listed_ip_30.zip

rm -f listed_ip_30.txt
unzip listed_ip_30.zip

echo "#!/bin/bash" > Stopforumspam-listed_ip_30.sh
cat ./listed_ip_30.txt | awk '{print "/sbin/iptables -I INPUT -s " $1 " -j DROP"}' >> Stopforumspam-listed_ip_30.sh

chmod ugo+x Stopforumspam-listed_ip_30.sh
To block the IP addresses just execute the script: ./Stopforumspam-listed_ip_30.sh
Be aware that this is an extremely long list and can take hours to run. It is also a rapidly changing list which is updated constantly.
[Potential Pitfall]: You may get the following error:iptables: Unknown error 18446744073709551615I found that by slowing down the execution of the script, I can avoid this error. I added a bash echo to write each line to the screen and it behaved much better although also much slower.
#!/bin/bash
set -x verbose
/sbin/iptables -I INPUT -s XX.XX.XX.XX -j DROP
...
Identify the enemy:
Use the following to identify and geolocate an IP address (InfoSniper.net):
- Apache modules: Turn off modules you are not going to use. If your web site does not serve https, turn it off.
With past ssl exploits, those using this philosophy did not get burned.
- Red Hat Apache 2.x:
The configuration file /etc/httpd/conf.d/ssl.conf enables SSL by default.
This file is picked up from the line Include conf.d/*.conf
in the file /etc/httpd/conf/httpd.conf
Rename the file /etc/httpd/conf.d/ssl.conf to
ssl.conf_OFF to turn off SSL (any file ending with ".conf" is included in the web server configuration).
- Apache 1.3.x config file /etc/httpd/conf/httpd.conf
Comment out the use of the ssl module by placing a "#" in the first column.
#<IfDefine HAVE_SSL> #LoadModule ssl_module modules/libssl.so #</IfDefine> ... ... #<IfDefine HAVE_SSL> #AddModule mod_ssl.c #</IfDefine> ... ... <IfDefine HAVE_SSL> Listen 80 #Listen 443 </IfDefine> ... ... #<IfModule mod_ssl.c> #... #... ... #<VirtualHost _default_:443> #... #... ... - Ubuntu: a2dismod ssl
This will disable the loading of SSL. The Ubuntu distribution has a fairly frugal use of modules by default.
The default configuration has SSL turned off. - One can also block the https port 443 using firewall rules:
iptables -A INPUT -p tcp -s 0/0 -d 0/0 --dport 443 -j DROP
iptables -A INPUT -p udp -s 0/0 -d 0/0 --dport 443 -j DROP
- Red Hat Apache 2.x:
The configuration file /etc/httpd/conf.d/ssl.conf enables SSL by default.
This file is picked up from the line Include conf.d/*.conf
in the file /etc/httpd/conf/httpd.conf
Rename the file /etc/httpd/conf.d/ssl.conf to
ssl.conf_OFF to turn off SSL (any file ending with ".conf" is included in the web server configuration).
- Apache version exposure: (Version 1.3+) Don't allow hackers to learn which version of the web server software you are running by inducing an error and thus an automated server response. Attacks are often version specific. Spammers also trigger errors to find email addresses.
The response may be meaningless anyway if you are using the web server as a proxy to another.... ServerAdmin webmaster at megacorp dot com ServerSignature Off ... - Block hackers and countries which will never use your website.
Use the Apache directive Deny from to block access.
For extensive lists of IP addresses to block, see the Wizcrafts.net block list
<Directory /home/projectx/public_html>
    ...
    ...
    ...
    Order allow,deny
    # Block form bots
    Deny from 88.191.0.0/16 193.200.193.0/24 194.8.74.0/23
    allow from all
</Directory>
SSH protocol suite of network connectivity tools are used to encrypt connections across the internet. SSH encrypts all traffic including logins and passwords to effectively eliminate network sniffing, connection hijacking, and other network-level attacks. In a regular telnet session the password is transmitted across the Internet un-encrypted.
SSH on Linux refers to OpenSSH secure shell terminal and sftp/scp file transfer connections. SSH is also a commercial product but available freely for non-commercial use from SSH Communications Security at http://www.ssh.com/. Two versions are available, SSH1 (now very old) and SSH2 (current). The commercial version of SSH can be purchased and/or downloaded from their web site. Note that SSH1 does have a major vulnerability issues. The "woot-project" web site cracking and defacing gang uses this vulnerability. DO NOT USE SSH1 PROTOCOL!!!!! ("woot-project" exploit/attack description/recovery)
OpenSSH was developed by the the OpenBSD Project and is freely available. OpenSSH is compatible with SSH1 and SSH2. OpenSSH relies on the OpenSSL project for the encrypted communications layer. Current releases of Linux come with OpenSSH/OpenSSL.
Links:
- OpenSSH.org - Shell. Supports SSH1 and SSH2 protocols.
- OpenSSL.org - Encrypted network layer
- FreeSSH.org - SSH for other platforms
- SSH:
- SSh.com - Secure shell
- FreeSSH.org - SSh for other platforms
- Secure Shell IETF working group - (Internet Engineering Task Force) status
OpenSSH:
- Download:
- Download OpenSSH RPM's (sourceforge) - statically linked with OpenSSL 0.9.5 - Pick this one for an easy complete RPM install
- Download OpenSSH source (tgz)
- Red Hat Linux 6.x Open SSL RPM downloads (redhat.com) (SSL only)
- Installation:
- Common to Client and Server:
- Red Hat/Fedora/CentOS:
rpm -ivh openssh-2.xxx-x.x.x86.rpm - Ubuntu/Debian:
apt-get install ssh
- Red Hat/Fedora/CentOS:
- Client:
- Red Hat/Fedora/CentOS:
rpm -ivh openssh-askpass-2.xxx-x.x.x86.rpm rpm -ivh openssh-clients-2.xxx-x.x.x86.rpm rpm -ivh openssh-askpass-gnome-2.xxx-x.x.x86.rpm - Gnome desktop users - Ubuntu/Debian:
apt-get install openssh-client ssh-askpass-gnome
- Red Hat/Fedora/CentOS:
- Server:
- Red Hat/Fedora/CentOS:
rpm -ivh openssh-server-2.xxx-x.x.x86.rpm - Ubuntu/Debian:
apt-get install openssh-server
- Red Hat/Fedora/CentOS:
The rpm will install the appropriate binaries, configuration files and openssh-server will install the init script /etc/rc.d/init.d/sshd so that sshd will start upon system boot.
- Common to Client and Server:
- Configuration:
- Client configuration file /etc/ssh/ssh_config: (Default)
Change the line: # Protocol 2,1
#	$OpenBSD: ssh_config,v 1.9 2001/03/10 12:53:51 deraadt Exp $

# This is ssh client system wide configuration file.  See ssh(1) for more
# information.  This file provides defaults for users, and the values can
# be changed in per-user configuration files or on the command line.

# Configuration data is parsed as follows:
#  1. command line options
#  2. user-specific file
#  3. system-wide file
# Any configuration value is only changed the first time it is set.
# Thus, host-specific definitions should be at the beginning of the
# configuration file, and defaults at the end.

# Site-wide defaults for various options

# Host *
#   ForwardAgent no
#   ForwardX11 no
#   RhostsAuthentication no
#   RhostsRSAAuthentication yes
#   RSAAuthentication yes
#   PasswordAuthentication yes
#   FallBackToRsh no
#   UseRsh no
#   BatchMode no
#   CheckHostIP yes
#   StrictHostKeyChecking yes
#   IdentityFile ~/.ssh/identity
#   IdentityFile ~/.ssh/id_rsa
#   IdentityFile ~/.ssh/id_dsa
#   Port 22
#   Protocol 2,1              - Change this line to: Protocol 2
#   Cipher 3des
#   Ciphers aes128-cbc,3des-cbc,blowfish-cbc,cast128-cbc,arcfour,aes192-cbc,aes256-cbc
#   EscapeChar ~
Host *
        ForwardX11 yes
to: Protocol 2
This will eliminate use of SSH1 protocol.Un-comment the options required or accept the hard-coded defaults. The hard coded defaults for OpenSSH client are compatible with SSH1 client files and sshd server. An upgrade to OpenSSH client will not require any changes to the files in $HOME/.ssh/.
- Server configuration file /etc/ssh/sshd_config:
Default:# $OpenBSD: sshd_config,v 1.38 2001/04/15 21:41:29 deraadt Exp $ # This sshd was compiled with PATH=/usr/bin:/bin:/usr/sbin:/sbin # This is the sshd server system-wide configuration file. See sshd(8) # for more information. Port 22 #Protocol 2,1 - Change to: Protocol 2 #ListenAddress 0.0.0.0 #ListenAddress :: HostKey /etc/ssh/ssh_host_key HostKey /etc/ssh/ssh_host_rsa_key HostKey /etc/ssh/ssh_host_dsa_key ServerKeyBits 768 LoginGraceTime 600 - Change to: LoginGraceTime 120 KeyRegenerationInterval 3600 PermitRootLogin yes - Change to: PermitRootLogin no # # Don't read ~/.rhosts and ~/.shosts files IgnoreRhosts yes # Un-comment if you don't trust ~/.ssh/known_hosts for RhostsRSAAuthentication #IgnoreUserKnownHosts yes StrictModes yes X11Forwarding yes X11DisplayOffset 10 PrintMotd yes #PrintLastLog no KeepAlive yes # Logging SyslogFacility AUTHPRIV LogLevel INFO #obsoletes QuietMode and FascistLogging RhostsAuthentication no # # For this to work you will also need host keys in /etc/ssh/ssh_known_hosts RhostsRSAAuthentication no # similar for protocol version 2 HostbasedAuthentication no # RSAAuthentication yes # To disable tunneled clear text passwords, change to no here! PasswordAuthentication yes PermitEmptyPasswords no # Un-comment to disable s/key passwords #ChallengeResponseAuthentication no # Un-comment to enable PAM keyboard-interactive authentication # Warning: enabling this may bypass the setting of 'PasswordAuthentication' #PAMAuthenticationViaKbdInt yes # To change Kerberos options #KerberosAuthentication no #KerberosOrLocalPasswd yes #AFSTokenPassing no #KerberosTicketCleanup no # Kerberos TGT Passing does only work with the AFS kaserver #KerberosTgtPassing yes #CheckMail yes #UseLogin no #MaxStartups 10:30:60 #Banner /etc/issue.net #ReverseMappingCheck yes Subsystem sftp /usr/libexec/openssh/sftp-server- If changes are made to the configuration file, restart the "sshd" daemon to pick up the new configuration:
Ubuntu: /etc/init.d/ssh restart
Red Hat: /etc/init.d/sshd restart or service sshd restart - Ssh protocol version 1 is not as secure, it should not take 10 minutes to type your password and if someone logs in as root without logging in as a particular user first then traceability is lost if there are multiple admins, thus the changes were made as suggested above.
- Setting "PermitRootLogin no" mandates that remote logins use an undetermined user login. This removes root, a known login on all Linux systems, from the list of dictionary attacks available.
- It is a good idea to change the "Banner" so that a login greeting and
legal disclaimer is presented
to the user. i.e. change file /etc/issue.net contents to:
Access is granted to this server only to authorized personnel of Mega Corp.
By default, the /etc/issue.net message presents to the hacker the OS name, kernel release and information which can be used to determine potential vulnerabilities. - [Potential Pitfall]: Slow ssh logins - If you get the "login" prompt quickly but the "password" prompt takes 30 seconds to a minute, then you have a DNS lookup delay. Set UseDNS no in the config file /etc/ssh/sshd_config and then restart sshd. The IP address of eth0 (or the NIC used) should also refer to your own hostname in /etc/hosts
- If changes are made to the configuration file, restart the "sshd" daemon to pick up the new configuration:
- Client configuration file /etc/ssh/ssh_config: (Default)
- Generate system keys: /etc/ssh/
- ssh-keygen -q -t rsa -f /etc/ssh/ssh_host_rsa_key -C '' -N ''
- ssh-keygen -q -t dsa -f /etc/ssh/ssh_host_dsa_key -C '' -N ''
- Private keys generated: chmod 600 /etc/ssh/ssh_host_dsa_key /etc/ssh/ssh_host_rsa_key
- Public keys generated: chmod 644 /etc/ssh/ssh_host_dsa_key.pub /etc/ssh/ssh_host_rsa_key.pub
- For SELinux:
- /sbin/restorecon /etc/ssh/ssh_host_rsa_key.pub
- /sbin/restorecon /etc/ssh/ssh_host_dsa_key.pub
- Generate user keys:
- Client:
Use the command: /usr/bin/ssh-keygen -t rsaGenerating public/private rsa key pair. Enter file in which to save the key (/home/user-id/.ssh/id_rsa): Enter passphrase (empty for no passphrase): Enter same passphrase again: Your identification has been saved in /home/user-id/.ssh/id_rsa. Your public key has been saved in /home/user-id/.ssh/id_rsa.pub. The key fingerprint is: XX:bl:ab:la:bl:aX:XX:af:90:8f:dc:65:0d:XX:XX:XX:XX:XX user-id@node-nameFiles generated:$HOME/.ssh/id_rsa - binary $HOME/.ssh/id_rsa.pub - ssh-rsa ...223564257432 email address - Multiple keys/lines allowed.Command options:- -t rsa (for protocol version 2)
- -t dsa (for protocol version 2)
- -t rsa1 (for protocol version 1)
- -b 2048 (specifies the key length in bits)
- Server:
- FTP the file $HOME/.ssh/id_rsa.pub to the server
- cd $HOME/.ssh/
- cat id_rsa.pub >> authorized_keys2
- Client:
- Using ssh: On client use the following command
and login as you normally would with a telnet session:
ssh name-of server
The first time you use ssh it will issue the following message:The authenticity of host 'node.your-domain.com (XXX.XXX.XXX.XXX)' can't be established. RSA key fingerprint is XX:bl:ab:la:bl:aX:XX:af:90:8f:dc:65:0d:XX:XX:XX:XX:XX. Are you sure you want to continue connecting (yes/no)? yes Warning: Permanently added 'node.your-domain.com,XXX.XXX.XXX.XXX' (RSA) to the list of known hosts. user@node.your-domain.com's password:Answer yes. It won't ask again.To use a different user name for the login, state it on the command line: ssh -l username name-of server
OpenSSH Man Pages:
- ssh - OpenSSH SSH client (remote login program)
- sshd - OpenSSH ssh daemon
- ssh-keygen - Used to create RSA keys (host keys and user authentication keys)
- ssh_config - OpenSSH SSH client configuration file
- sshd_config - OpenSSH SSH daemon configuration file
- ssh-add - adds RSA or DSA identities for the authentication agent. Used to register new keys with the agent.
- scp - secure copy (remote file copy program)
- ssh-agent - authentication agent This can be used to hold RSA keys for authentication.
- sftp - Secure file transfer program
- sftp-server - SFTP server subsystem
SSH for MS/Windows Links:
- PuTTY. Also see PuTTY configuration
- Tera Term
SSH Notes:
- The sshd should not be started using xinetd/inetd due to time necessary to perform calculations when it is initialized.
- ssh client will suid to root. sshd on the server is run as root. Root privileges are required to communicate on ports lower than 1024. The -p option may be used to run SSH on a different port.
- RSA is used for key exchange, and a conventional cipher (default Blowfish) is used for encrypting the session.
- Encryption is started before authentication, and no passwords or other information is transmitted in the clear.
- Authentication:
- Login is invoked by the user. The client tells the server the public key that the user wishes to use for authentication.
- Server then checks if this public key is admissible.
If yes then random number is generated and encrypts it with the public key and sends the value to the client. - The client then decrypts the number with its private key and computes a checksum. The checksum is sent back to the server
- The server computes a checksum from the data and compares the checksums.
- Authentication is accepted if the checksums match.
- SSH will use $HOME/.rhosts (or $HOME/.shosts)
- To establish a secure network connection on another TCP port, use
"tunneling" options with the ssh command:
- Forward TCP local port to hostport on the remote-host:
ssh remote-host -L port:localhost:hostport command
FTP opens various ports and thus is not a good candidate. Port 21 is only used to establish the connection. - Forward TCP local port to hostport on the remote-host:
Man pages:
- ssh - secure shell client (remote login program)
- sshd - secure shell daemon (server)
- ssh-keygen - Used to create RSA keys (host keys and user authentication keys)
- ssh-keyscan - gather ssh public keys
- ssh-add - adds identities for the authentication agent Used to register new keys with the agent.
- scp - secure copy (remote file copy program)
- slogin
- sftp - secure file transfer program client.
- sftp-server - secure file transfer program server.
- ssh-agent - Authentication agent. This can be used to hold RSA keys for authentication.
- telnet - user interface to the TELNET protocol
Documentation:
- /usr/share/doc/openssh-XXX/
- /usr/share/doc/openssh-askpass-XXX/
- /usr/share/doc/openssl-0.XXX/
Test:
The network sniffer Ethereal (now Wireshark) was used to sniff network transmissions between the client and server for both telnet and ssh with the following results:
- Test telnet clear text login: (port 23)
The text sent by the client is green text on a black background.
The rest of the text was transmitted by the server.
Note that both the login ("JoeUser") and password ("super-secret-password") were captured. - Test ssh encrypted login: (port 22)
Note that the entire login and password exchange was encrypted.
Any site on the public internet will be subjected to dictionary password attacks, constantly trying new words, word and ASCII sequences from automated attack programs from compromised servers. Use fail2ban to block these attempts. Fail2ban will examine log files to find repeated, failed login attempts and either temporarily or permanently block the IP addresses of the attacking system. The default configuration of fail2ban looks over the sshd log file /var/log/secure to find the attacking system and will allow for 5 failed login attempts before blocking for 600 seconds (10 minutes).
Fail2ban can be configured to monitor the following processes:- sshd
- smtp
- Apache httpd
- lighttp
- vsftpd
- postfix
- bind9 named
- mysqld
- asterisk
- ...
Installation:
- Red Hat: yum install fail2ban
- Ubuntu: sudo apt-get install fail2ban
Configuration:
- /etc/fail2ban/fail2ban.conf
[Definition] # 1 = ERROR # 2 = WARN # 3 = INFO # 4 = DEBUG loglevel = 3 # Values: STDOUT STDERR SYSLOG file Default: /var/log/fail2ban.log # Only one log target can be specified. logtarget = SYSLOG socket = /var/run/fail2ban/fail2ban.sock pidfile = /var/run/fail2ban/fail2ban.pid - /etc/fail2ban/jail.conf (often copied to jail.local and edited for local directives)
Note: if your server is under attack, fail2ban may deliver a lot of email. You may want to remove the sendmail-whois statement.
[DEFAULT]
ignoreip = 127.0.0.1/8
bantime  = 3600
findtime  = 600
maxretry = 3
backend = auto
usedns = no

[ssh-iptables]
enabled  = true
filter   = sshd
action   = iptables[name=SSH, port=ssh, protocol=tcp]
           sendmail-whois[name=SSH, dest=root, sender=user@megacorp.com]
logpath  = /var/log/secure
maxretry = 3
[DEFAULT] directives:
Directive Description ignoreip IP addresses to never ban, like your gateway system. Multiple IPs are separated by a space. This is your white list. Default 127.0.0.1 (localhost) findtime time period during which failure occurs. eg 600 refers to the maxretry number of failures occurring during this findtime period will be banned. Default 600 seconds maxretry specify the number of failures before an IP gets banned. Default 3 bantime number of seconds that an IP is banned enabled true=monitor specified process. false for no monitoring. Default is true only for sshd - /etc/fail2ban/filter.d/sshd.conf
(default)[INCLUDES] # Read common prefixes. If any customizations available -- read them from # common.local before = common.conf [Definition] _daemon = sshd # Option: failregex # Notes.: regex to match the password failures messages in the logfile. The # host must be matched by a group named "host". The tag "<HOST>" can # be used for standard IP/hostname matching and is only an alias for # (?:::f{4,6}:)?(?P<host>[\w\-.^_]+) # Values: TEXT # failregex = ^%(__prefix_line)s(?:error: PAM: )?[aA]uthentication (?:failure|error) for .* from <HOST>( via \S+)?\s*$ ^%(__prefix_line)s(?:error: PAM: )?User not known to the underlying authentication module for .* from <HOST>\s*$ ^%(__prefix_line)sFailed \S+ for .* from <HOST>(?: port \d*)?(?: ssh\d*)?\s*$ ^%(__prefix_line)sROOT LOGIN REFUSED.* FROM <HOST>\s*$ ^%(__prefix_line)s[iI](?:llegal|nvalid) user .* from <HOST>\s*$ ^%(__prefix_line)sUser .+ from <HOST> not allowed because not listed in AllowUsers\s*$ ^%(__prefix_line)sUser .+ from <HOST> not allowed because listed in DenyUsers\s*$ ^%(__prefix_line)sUser .+ from <HOST> not allowed because not in any group\s*$ ^%(__prefix_line)srefused connect from \S+ \(<HOST>\)\s*$ ^%(__prefix_line)sUser .+ from <HOST> not allowed because a group is listed in DenyGroups\s*$ ^%(__prefix_line)sUser .+ from <HOST> not allowed because none of user's groups are listed in AllowGroups\s*$ # Option: ignoreregex # Notes.: regex to ignore. If this regex matches, the line is ignored. # Values: TEXT # ignoreregex =
Restart after making configuration changes: sudo service fail2ban restart
Configure init to start fail2ban upon boot: sudo chkconfig --level 345 fail2ban on
Also see log file: /var/log/messages
Verify blocking of hackers: Show the firewall rules generated by failed logins:
[host]# iptables -L
Chain INPUT (policy ACCEPT)
target     prot opt source               destination
fail2ban-SSH  tcp  --  anywhere             anywhere             tcp dpt:ssh

Chain FORWARD (policy ACCEPT)
target     prot opt source               destination

Chain OUTPUT (policy ACCEPT)
target     prot opt source               destination

Chain fail2ban-SSH (1 references)
target     prot opt source               destination
REJECT     all  --  122.189.194.238      anywhere             reject-with icmp-port-unreachable
REJECT     all  --  183.94.11.208        anywhere             reject-with icmp-port-unreachable
REJECT     all  --  58.218.204.132       anywhere             reject-with icmp-port-unreachable
RETURN     all  --  anywhere             anywhere
Verify fail2ban status: Show sshd fail2ban status:
[host]# fail2ban-client status
Status
|- Number of jail:	1
`- Jail list:		ssh-iptables

[host]# fail2ban-client status ssh-iptables
Status for the jail: ssh-iptables
|- filter
|  |- File list:	/var/log/secure
|  |- Currently failed:	0
|  `- Total failed:	102
`- action
   |- Currently banned:	3
   |  `- IP list:	122.189.194.238 183.94.11.208 58.218.204.132
   `- Total banned:	26
Postfix:
Dictionary login attacks against a mail server are common. Here is how to stop them,
File: /var/log/maillog(example of what you may find in your log file)
...
Nov 13 03:40:07 hostname postfix/smtpd[8286]: warning: unknown[175.100.117.22]: SASL LOGIN authentication failed: authentication failure
...
File: /etc/fail2ban/jail.local
[sasl]
enabled  = true
port     = smtp
filter   = postfix-sasl
action   = iptables-multiport[name=postfix, port="smtp", protocol=tcp]
           sendmail-whois[name=Postfix, dest=root, sender=fail2ban@example.com]
logpath  = /var/log/mail.log
maxretry = 5
File: /etc/fail2ban/filter.d/postfix-sasl.conf
# Fail2Ban filter for postfix authentication failures
[INCLUDES]
before = common.conf
[Definition]
_daemon = postfix/smtpd
failregex = ^%(__prefix_line)swarning: [-._\w]+\[\]: SASL (?:LOGIN|PLAIN|(?:CRAM|DIGEST)-MD5) authentication failed(: [ A-Za-z0-9+/]*={0,2})?\s*$
Links:
- fail2ban home page
- fail2ban Github site
- fail2ban - a set of server and client programs to limit brute force authentication attempts
- fail2ban-client - configure and control the server
- fail2ban-server - start the server
- fail2ban-regex - test regex option
FTP uses clear text access to your server. This is fine if all systems in the datacenter are secure and no one can sniff the network. Router and switch configurations make it almost impossible to sniff most networks these days, but a security compromises at the datacenter on another server can cause potential problems for your servers if you allow open un-encrypted passwords used by FTP.
VsFTPd also allows one to limit the user's view of the filesystem to their own directories. This is good. OpenSSH "sftp" does not provide this capability (until version 4.9. RHEL/CentOS 5 use OpenSSH 4.3). The "sftp" file transfer does encrypt the passwords (good) but also requires shell access (bash, csh, ...) for the account which allows full access to the filesystem (bad). The rssh shell can be used with sftp, scp, cvs, rsync, and rdist and can chroot users to their own directories and limit function to sftp access only (deny full shell access).
For newer systems (RHEL6/CentOS6/Fedora 11) with OpenSSH 4.9+ see the preferred chrooted sftp configuration for OpenSSH 4.9+.
The solution is to use rssh as your shell with OpenSSH "sftp":- rssh Home Page
- rssh RPMs - Red Hat EPEL
This installs:
- /usr/bin/rssh
- /etc/rssh.conf
- also support program /usr/libexec/rssh_chroot_helper and man pages
Configuration:
- OpenSSH configuration: /etc/ssh/sshd_config
...

PermitUserEnvironment no

...

Subsystem       sftp    /usr/libexec/openssh/sftp-server

...
Security note: Also be aware of the setting AllowTcpForwarding which controls port forwarding. - Add shell to list of usable shells: /etc/shells
/bin/sh
/bin/bash
/sbin/nologin
/bin/tcsh
/bin/csh
/bin/ksh
/bin/zsh
/opt/bin/ftponly
/usr/bin/rssh
Ubuntu: You can use the command: add-shell /usr/bin/rssh - Change the user's shell to rssh (choose one method)
- chsh -s /usr/bin/rssh user1
- usermod -s /usr/bin/rssh user1
- Assign shell when creating user: useradd -m -s /usr/bin/rssh user1
- Edit /etc/passwd
user1:x:504:504::/home/user1:/usr/bin/rssh
- Allow execution to su: chmod u+s /usr/libexec/rssh_chroot_helper
This prevents the following error in /var/log/messages
Dec 20 00:23:44 nodex rssh_chroot_helper[27450]: chroot() failed, 2: Operation not permitted - Set access for rssh: /etc/rssh.conf
logfacility = LOG_USER
allowsftp
umask = 022
#chrootpath = /users/chroot

user="user1:022:00010:/home/user1"
Global security allowable options include: allowscp, allowcvs, allowrdist, allowrsync
Specify global chroot or omit for none.
Specific user security:- User login id
- First set of three number represent the umask
- Second set of five number represent the bitmask to allow
1 1 1 1 1 rsync rdist cvs sftp scp - Specify the global chrooted directory for all using rssh. If omitted, then not chrooted. Can be overwritten by user configuration.
- Configuring the chrooted directory:
This is true for a global user chroot or individual chroot.
In this example we will show a user chrooted to their own home directory /home/user1. When chrooted, the user does not have access to the rest of the filesystem and thus is blind to all of its executables and libraries.
It will therefore be necessary to copy local executables and libraries for their local use.
Description User directory System equivalent System devices /home/user1/dev /dev Configuration files /home/user1/etc /etc
/etc/ld.so.cache
/etc/ld.so.cache.d/*
/etc/ld.so.conf - dynamic linker configuration
/etc/nsswitch.conf
/etc/passwd
/etc/group
/etc/hosts
/etc/resolv.confShared libraries (32 and 64 bit) /home/user1/lib
/home/user1/lib64/lib
/lib64Executables and libraries /home/user1/usr /usr
/usr/libexec/openssh/sftp-server
/usr/libexec/rssh_chroot_helperExecutables /home/user1/bin /bin
Use script to add chroot required files: /opt/bin/userchrootNote:#!/bin/bash # First and only argument ($1) is user id if [ -d /home/$1 ]; then USERDIR=/home/$1 else echo "Error: Directory /home/$1 does not exist" exit fi mkdir $USERDIR/etc mkdir $USERDIR/lib mkdir -p $USERDIR/usr/libexec/openssh mkdir -p $USERDIR/var/log mkdir $USERDIR/dev mknod -m 666 $USERDIR/dev/null c 1 3 cp -p /etc/ld.so.cache $USERDIR/etc # If directory exists if [ -d /etc/ld.so.cache.d ]; then cp -avRp /etc/ld.so.cache.d $USERDIR/etc fi grep $1 /etc/passwd > $USERDIR/etc/passwd cp -p /etc/ld.so.conf $USERDIR/etc cp -p /etc/nsswitch.conf $USERDIR/etc cp -p /etc/group $USERDIR/etc cp -p /etc/hosts $USERDIR/etc cp -p /etc/resolv.conf $USERDIR/etc cp -ap /usr/libexec/openssh/sftp-server $USERDIR/usr/libexec/openssh/sftp-server cp -ap /usr/libexec/rssh_chroot_helper $USERDIR/usr/libexec/rssh_chroot_helper # Authentication libraries required for login (32 bit and 64 bit systems) if [ -d /lib64 ]; then mkdir $USERDIR/lib64 cp -ap /lib64/libnss_files.so.? $USERDIR/lib64 cp -ap /lib64/libnss_files-*.so $USERDIR/lib64 else cp -p /lib/libnss_files.so.? $USERDIR/lib cp -p /lib/libnss_files-*.so $USERDIR/lib fi FILES=`ldd /usr/libexec/openssh/sftp-server | perl -ne 's:^[^/]+::; s: \(.*\)$::; print;'` for ii in $FILES do rtdir="$(dirname $ii)" [ ! -d $USERDIR$rtdir ] && mkdir -p $USERDIR$rtdir || : /bin/cp -p $ii $USERDIR$rtdir done FILES=`ldd /usr/libexec/rssh_chroot_helper | perl -ne 's:^[^/]+::; s: \(.*\)$::; print;'` for ii in $FILES do rtdir="$(dirname $ii)" [ ! -d $USERDIR$rtdir ] && mkdir -p $USERDIR$rtdir || : /bin/cp -p $ii $USERDIR$rtdir done- Script use: /opt/bin/userchroot user1
- The files and directories reflect the file and path names for Red Hat Enterprise Linux 5 and CentOS 5.
- Instead of copying files, one can also use a hard link: ln /etc/ld.so.conf /home/user1/etc/ld.so.conf if the files are on the same hard drive.
In that way, users receive updates to the system.
Symbolic links will not work. See symlinks and chroot for this discussion.
If the user directory is on a separate drive, use the copy as defined in the script. - Reduce /etc/passwd to a single user (don't have root etc):
user1:x:504:504::/home/user1:/usr/bin/rssh - Once chroot() takes place, programs will not have access to the regular log target. Specify a chrooted syslog socket target which can be accessed. The number of sockets are limited and thus configuring rssh for each user is not a good idea for a large number of users. For use with many users, use the shared chrooted jail defined by the rssh directive: chrootpath.
Blocking FTP: Setting up rssh does not turn off or block FTP access to your system. You must still turn off vsftp: /etc/init.d/vsftpd stop. There is little point to setting up secure chrooted sftp access with rssh and also running a FTP service.
Debugging:- One can pull in the full root path by issuing an internal mount:
- mount --bind /dev /home/user1/dev
- mount --bind /dev /home/user1/lib
- mount --bind /dev /home/user1/lib64
- mount --bind /dev /home/user1/usr
Unmount when done: umount /home/user1/dev - If authenticating to ldap, nis, etc, pull in the appropriate libraries.
You can test with all: cp -p /lib/libnss_* /home/user1/lib
This can be performed for /lib64 as well. - Checklog files for errors: /var/log/messages
Using gFTP as a Linux sftp client:
- Start program through menu or command line: gftp&
- Select "FTP" from toolbar
- Select "Options"
- Select "SSH" tab
- Select "Apply" amd "Ok"
- On the upper right hand side of the gftp window, select "SSH" from the pull-down menu.
Using FileZilla as a Linux sftp client:
- Select "File" + "Site Manager"
- Select "New Site" (bottom left)
- Enter "Host:"
- Choose "Servertype:" "SFTP using SSH2"
- Select "Logontype:" "Normal"
- Enter "User:" and click on "Connect".
Links:
This tool will monitor the network probes and attacks against your server. It can be configured to log and counter these probes and attacks. PortSentry can modify your /etc/hosts.deny (PAM module) file and issue IP firewall commands automatically to block hackers.
PortSentry can be loaded as an RPM but this tutorial covers compiling PortSentry from source to configure a more preferable system logging.
Note: Version 1.2 of portsentry can issue iptables, ipchains or route commands to thwart attacks. Iptables/Ipchains is a Linux firewall system built into the Linux kernel. Linux kernel 2.6/2.4 uses iptables, kernel 2.2 (old) uses ipchains. References to ipfwadm are for even older Linux kernels. Route commands can be used by any Unix system including those non-Linux systems which do not support Iptables/Ipchains.
Steps to install and configure portsentry:
- Download and unzip source code
- Edit include file and compile
- Start PortSentry
- Read logs
- Download and unzip source code:
- Download: PortSentry source code
- Move to your source directory and unzip: tar -xzf portsentry-1.2.tar.gz
- Edit include file and compile:
cd portsentry_beta/
Read file README.install. It details the following:-
Edit file: portsentry_config.h
Set file paths and configure separate log file for Portsentry:
Set options:- CONFIG_FILE - PortSentry run-time configuration file.
- WRAPPER_HOSTS_DENY - The path and name of TCP wrapper hosts.deny file.
#define CONFIG_FILE "/opt/portsentry/portsentry.conf"
#define WRAPPER_HOSTS_DENY "/etc/hosts.deny"
#define SYSLOG_FACILITY LOG_DAEMON    - Default. Change to LOG_LOCAL6
#define SYSLOG_LEVEL    LOG_NOTICE
(Note: I use /opt/portsentry/ because I like to locate "optional" files/software there. It allows for an easy backup by separating it from the OS. If you prefer, you can use /etc/portsentry/ for configurations files and follow the Linux/Unix file system logic)
The above default, "LOG_DAEMON", will log messages to the /var/log/messages file.
To log to a separate file dedicated to PortSentry logging: (This will eliminate logging clutter in the main system logging file)
- Add logging directives to syslogd configuration file: /etc/syslog.conf
Change the following line by adding an extra log facility for portsentry messages which are not going to be logged to the regular syslog output file /var/log/messages. This lists what messages to filter out from /var/log/messages.
*.info;mail.none;news.none;authpriv.none;cron.none;local6.none /var/log/messagesAdd the following line to assign a portsentry log facility:
local6.* /var/log/portsentry.logNote: Use tab not spaces in the syslog configuration file.
Restart syslogd: /etc/init.d/syslog restart
- Set portsentry_config.h entry to new log facility:
Change from default setting:#define SYSLOG_FACILITY LOG_DAEMONTo:#define SYSLOG_FACILITY LOG_LOCAL6
FYI: Options for the SYSLOG_FACILITY are defined in /usr/include/sys/syslog.h
They include:SYSLOG_FACILITY Facility Name Description LOG_LOCAL0 local0 reserved for local use LOG_LOCAL1 local1 reserved for local use LOG_LOCAL2 local2 reserved for local use LOG_LOCAL3 local3 reserved for local use LOG_LOCAL4 local4 reserved for local use LOG_LOCAL5 local5 reserved for local use LOG_LOCAL6 local6 reserved for local use LOG_LOCAL7 local7 reserved for local use LOG_USER user random user-level messages LOG_MAIL mail mail system LOG_DAEMON daemon system daemons LOG_SYSLOG syslog messages generated internally by syslogd LOG_LPR lpr line printer subsystem LOG_NEWS news network news subsystem LOG_UUCP uucp UUCP subsystem LOG_CRON cron clock daemon LOG_AUTHPRIV authpriv security/authorization messages (private) LOG_FTP ftp ftp daemon Options for the SYSLOG_LEVEL include:
SYSLOG_LEVEL Priority Description LOG_EMERG 0 system is unusable LOG_ALERT 1 action must be taken immediately LOG_CRIT 2 critical conditions LOG_ERR 3 error conditions LOG_WARNING 4 warning conditions LOG_NOTICE 5 normal but significant condition LOG_INFO 6 informational LOG_DEBUG 7 debug-level messages -
Edit file: portsentry.conf to set paths for configuration files and ports to monitor.
TCP_PORTS="1,11,15,20,21,23,25,69,79, ... "
UDP_PORTS="1,7,9,69,161,162,513,635,  ... "

...
...

IGNORE_FILE="/opt/portsentry/portsentry.ignore"
HISTORY_FILE="/opt/portsentry/portsentry.history"
BLOCKED_FILE="/opt/portsentry/portsentry.blocked"
#KILL_ROUTE="/sbin/route add -host $TARGET$ reject"   - Generic Unix KILL_ROUTE
                                                        I prefer iptables/ipchains options below
Un-comment and modify if necessary the appropriate statements. The TCP_PORTS=, UDP_PORTS= lists are ignored for stealth scan detection modes. Add common but unused services. i.e. add port 25 if the system is not accepting email as port 25 is included in most scans.
I added UDP port 68 (BOOTP) and TCP 21 (ftp), 22 (ssh), 25 (smtp mail), 53 (dns bind), 80 (http web server), 119 (news) to the ADVANCED_EXCLUDE_UDP and ADVANCED_EXCLUDE_TCP statements respectively.ADVANCED_EXCLUDE_TCP="21,22,25,53,80,110,113,119" - server ADVANCED_EXCLUDE_UDP="21,22,53,110,520,138,137,68,67" OR ADVANCED_EXCLUDE_TCP="113,139" - workstation ADVANCED_EXCLUDE_UDP="520,138,137,68,67"PAM options:
- KILL_HOSTS_DENY="ALL: $TARGET$"
For more on PAM see YoLinux network Admin TutorialChoose one option: (Options: network "route" or firewall command "iptables/ipchains")
- For those using iptables (Linux Kernel 2.6/2.4+):
KILL_ROUTE="/sbin/iptables -I INPUT -s $TARGET$ -j DROP"
(Note: The default used in portsentry.conf uses the incorrect path for Red Hat. Change /usr/local/bin/iptables to /sbin/iptables)
- For Linux 2.2.x kernels (version 2.102+) using ipchains: (Best option)
KILL_ROUTE="/sbin/ipchains -I input -s $TARGET$ -j DENY -l"
OR
KILL_ROUTE="/sbin/ipchains -I input -s $TARGET$ -j DENY"
Note: The second option is without the "-l" or logging option so ipchains won't keep logging the portscan in /var/log/messages - Simple method to drop network return routes if iptables or ipchains are not compiled into your kernel:
KILL_ROUTE="/sbin/route add -host $TARGET$ reject"
You can check the addresses dropped with the command: netstat -rn They will be routed to interface "-".
Red Hat: Portsentry uses iptables (and it must be running) and not the older ipchains. To see if iptables is invoked during system boot, use the command: chkconfig --list | grep iptables. You can NOT use portsentry to issue iptables rules if your kernel is configured to use ipchain rules.
More info on iptables and ipchains support/configuration in Red Hat. -
Edit file: portsentry.ignore (contains IP addresses to ignore. )
127.0.0.1
0.0.0.0
Your IP address
The at Home network routinely scans for news servers on port 119 from a server named authorized-scan1.security.home.net. Adding the IP address of this server (24.0.0.203) greatly reduces the logging. I also added their BOOTP server. (24.9.139.130)I manually issued the iptables (kernel 2.6/2.4) commands on my workstation to drop the hosts and deny their scans. At Home users may add the commands to the file /etc/rc.d/rc.local
/sbin/iptables -I INPUT -s 24.0.0.203 -j DROP /sbin/iptables -I INPUT -s 24.9.139.130 -j DROP -
Edit file: Makefile
INSTALLDIR = /optAnd remove the line under "uninstall": (dangerous line!!)# /bin/rmdir $(INSTALLDIR)And remove the line under "install": (troublesome line!!)# chmod 700 $(INSTALLDIR)
To:# chmod 700 $(INSTALLDIR)/$(CHILDDIR)
-
Compile: make linux
Fix the following compile errors in portsentry.c- Change printf ("Copyright 1997-2003 Craig H. Rowland <craigrowland at users dot
sourceforget dot net>\n");
to one line: printf ("Copyright 1997-2003 Craig H. Rowland\n"); - Fix warning: warning: passing argument 3 of ‘accept’ from incompatible pointer type
Separate and change declaration of "length" to: unsigned int length;
- Change printf ("Copyright 1997-2003 Craig H. Rowland <craigrowland at users dot
-
Install (as root): make install
-
- Run PortSentry for advanced UDP/TCP stealth scan detection:
- portsentry -atcp
- portsentry -audp
- Check logfile for hacker attacks. See: /var/log/messages
or /var/log/portsentry.log if you are logging to a dedicated file.
Also check /etc/hosts.deny to see a list of IP addresses that PortSentry has deemed to be attackers.
Check the "HISTORY_FILE" /opt/portsentry/portsentry.history
Note: Is is possible to have all logging sent to a logging daemon on a single server. This will allow the administrator to check the logs on only one server rather than individually on many.
Note on Red Hat RPMs:
RPM layout:
- /usr/sbin/portsentry - (chmod 700) executable
- /etc/portsentry/ - (chmod 700) Directory used for configuration files.
- /etc/portsentry/portsentry.conf (chmod 600)
- /etc/portsentry/portsentry.ignore (chmod 600)
- /var/portsentry/portsentry.history
- /var/portsentry/portsentry.blocked
Instead of using a firewall command (ipchains/iptables), a false route is used: /sbin/route add -host $TARGET$ gw 127.0.0.1.
My init script calls the portsentry executable twice with the appropriate command line arguments to monitor tcp and udp ports.
The Red Hat RPM init script uses the file /etc/portsentry/portsentry.modes
and a for loop in the
init script to call portsentry the appropriate number of times.
Their init script also recreates the portsentry.ignore file each time
portsentry is started by including the IP addresses found with ip addr show or ifconfig
and the addresses 0.0.0.0 and localhost.
Persistent addresses must be placed above a line stating:
Do NOT edit below this otherwise it is not included in the creation
of the new file.
The Red Hat RPM portsentry version logs everything to /var/log/messages. My configuration avoids log clutter by logging to a separate file.
Notes on DOS (Denial of Service) possibility: If portsentry is configured to shut down an attack with firewall rules, an attacker may use this feature to slow down your machine over time by creating a huge set of firewall rules. It would require the hacker to use (or spoof) a new IP address each time. It is probably a good idea to monitor or even clear the firewall rules from time to time.
- iptables:
- List firewall rules: iptables -L
- Clear firewall rules: iptables -F
- ipchains:
- List firewall rules: ipchains -L
- Clear firewall rules: ipchains -F
Clean-up script: /etc/cron.monthly/reset-chainrules
(-rwx------ 1 root root)
This script is run automatically once a week by cron. (The presence of this
script in this directory for the Red Hat configuration makes it so)
#!/bin/bash
# Purge and re-assign chain rules
ipchains -F
ipchains -A input -p tcp -s 0/0 -d 0/0 2049 -y -j REJECT
ipchains -A input -p udp -s 0/0 -d 0/0 2049 -j REJECT
ipchains -A input -p tcp -s 0/0 -d 0/0 6000:6009 -y -j REJECT
ipchains -A input -p tcp -s 0/0 -d 0/0 7100 -y -j REJECT
ipchains -A input -p tcp -s 0/0 -d 0/0 515 -y -j REJECT
ipchains -A input -p udp -s 0/0 -d 0/0 515 -j REJECT
ipchains -A input -p tcp -s 0/0 -d 0/0 111 -y -j REJECT
ipchains -A input -p udp -s 0/0 -d 0/0 111 -j REJECT
ipchains -A input -j REJECT -p all -s localhost  -i eth0 -l
Also see:
- Sourceforge: Portsentry Home Page - PortSentry, Logcheck and HostSentry home page.
- Portsentry description
- FAQ: Firewall Forensics - Robert Graham
Other tools to detect portscans and network based hacker attacks:
- scanlogd - Attack detection.
- InterSect Alliance - Intrusion analysis. Identifies malicious or unauthorized access attempts.
- snort - Instead of monitoring
a single server with portsentry, snort monitors the network, performing
real-time traffic analysis and packet logging on IP networks for the
detection of an attack or probe.
Also see: YoLinux IDS and Snort links
Using an init script to start and stop the portsentry program.
Init configuration: /etc/rc.d/init.d/portsentry
The init script needs to be executable: chmod a+x /etc/rc.d/init.d/portsentry
After adding the following script, enter it into the init process with
the command: chkconfig --add portsentry or
chkconfig --level 345 portsentry on
See YoLinux Init Tutorial for more information.
#!/bin/bash
#
# Startup script for PortSentry
#
# chkconfig: 345 85 15
# description:  PortSentry monitors TCP and UDP ports for network attacks
#
# processname: portsentry
# pidfile: /var/run/portsentry.pid
# config: /opt/portsentry/portsentry.conf
# config: /opt/portsentry/portsentry.ignore
# config: /opt/portsentry/portsentry.history
# config: /opt/portsentry/portsentry.blocked


# Source function library.
. /etc/rc.d/init.d/functions

# Source networking configuration.
. /etc/sysconfig/network

# Check that networking is up.
[ ${NETWORKING} = "no" ] && exit 0

# See how we were called.
case "$1" in
  start)
	echo -n "Starting portsentry: "
	daemon /opt/portsentry/portsentry -atcp
	/opt/portsentry/portsentry -audp
	echo
	touch /var/lock/subsys/portsentry
	;;
  stop)
	echo -n "Shutting down portsentry: "
	killproc portsentry
	echo
	rm -f /var/lock/subsys/portsentry
	rm -f /var/run/portsentry.pid
	;;
  status)
	status portsentry
	;;
  restart)
	$0 stop
	$0 start
	;;
  reload)
	echo -n "Reloading portsentry: "
	killproc portsentry -HUP
	echo
	;;
  *)
	echo "Usage: $0 {start|stop|restart|reload|status}"
	exit 1
esac

exit 0
Logrotate Configuration:
Create the following file to have your logs rotate.File: /etc/logrotate.d/portsentry
/var/log/portsentry.log {
    rotate 12
    monthly
    errors root@localhost
    missingok
    postrotate
        /usr/bin/killall -HUP portsentry 2> /dev/null || true
    endscript
}
Also see the YoLinux Sys Admin tutorial covering logrotate.
Tests:
- Portscan your workstation - Use your web browser to go to this site. Select "Probe my ports" and it will
scan you. You can then look at the file /opt/portsentry/portsentry.blocked.atcp
to see that portsentry dropped the scanning site:
Host: shieldsup.grc.com/207.71.92.221 Port: 23 TCP Blocked
The file /var/log/portsentry.log will show the action taken:portsentry[589]: attackalert: SYN/Normal scan from host: shieldsup.grc.com/207.71.92.221 to TCP port: 23 portsentry[589]: attackalert: Host 207.71.92.221 has been blocked via wrappers with string: "ALL: 207.71.92.221" portsentry[589]: attackalert: Host 207.71.92.221 has been blocked via dropped route using command: "/sbin/ipchains -I input -s 207.71.92.221 -j DENY -l" - nmap: portscanner - This is
the hacker tool responsible for many of the portscans you may be receiving.
Command arguments:
Argument Description -sO IP scan. Find open ports. -sT TCP scan. Full connection made. -sS SYN scan (half open scan). This scan is typically not logged on receiving system. -sP Ping ICMP scan. -sU UDP scan. -P0 Don't ping before scan. -PT Use ping to determine which hosts are available. -F Fast scan. Scan for ports listed in configuration. -T Set timing of scan to use values to avoid detection. -O Determines operating system. -p 1000-1999,5000-5999 Scan port ranges specified. Also see: nmap man page for a full listing of nmap command line arguments.
Examples:
nmap -sT -F IP-address Scan nmap -sS -F IP-address SYN Scan nmap -sU -F IP-address Scan UPD ports nmap -sF -F IP-address FIN Scan nmap -O -F IP-address Determine OS nmap -p22 -F -O IP-address
Add the option -v (verbose) or -vv (super verbose) for more info.
nmap -p 1-30,40-65535 IP-Address Scan given port ranges
The ports will be determined to be open, filtered or firewalled.Sample output from command: nmap -sS -F -O IP-Address
Starting nmap V. 2.54BETA7 ( www.insecure.org/nmap/ )
...
..
(The 1067 ports scanned but not shown below are in state: closed)
Port State Service
21/tcp open ftp
22/tcp open ssh
25/tcp open smtp
53/tcp open domain
111/tcp open sunrpc - Shut down the portmap (RPC) daemon: /etc/rc.d/init.d/portmap stop 137/tcp filtered netbios-ns - Turn off netbios services: /etc/rc.d/init.d/smb stop 138/tcp filtered netbios-dgm 139/tcp filtered netbios-ssn TCP Sequence Prediction: Class=random positive increments Difficulty=2727445 (Good luck!) Remote operating system guess: Linux 2.1.122 - 2.2.16 Nmap run completed -- 1 IP address (1 host up) scanned in 36 seconds - nmap/nmapfe: nmapfe = nmap front end - GUI front end to nmap.
It's an amazingly easy and useful tool which will help
you make discoveries about your servers before the hackers do.
Linux packages:- Red Hat RPMs: nmap-XXX.x86_64.rpm, nmap-frontend-XXX.noarch.rpm (GTK+ GUI)
- Ubuntu: nmap, zenmap
Links:
- nmap man page
- The Art of Port Scanning - by Fyodor
- Gremwell MagicTree - processes NMap and OpenVAS output to generate a report. Requires OpenOffice.
- ndiff - Compares two nmap scans and outputs the differences. Monitor network for changes.
Tripwire monitors your file system for changes. Tripwire is used to create an initial database of information on all the system files then runs periodically (cron) to compare the system to the database.
Use the command tripwire --version or rpm -q tripwire to determine the version.
Red Hat includes Tripwire as an optional package during install. The Ubuntu/Debian install is as easy as apt-get install tripwire. Upon installation it will proceed to scan your entire filesystem to create a default database of what your system looks like. (files and sizes etc) It took about ten minutes to run on my server!
Tripwire configuration files:
- Tripwire 2.3.0:
- /etc/tripwire/twcfg.txt
- /etc/tripwire/twpol.txt
Edit and change file: /etc/tripwire/twcfg.txt
Change:
LOOSEDIRECTORYCHECKING =false
to
LOOSEDIRECTORYCHECKING=TRUEThis was recommended in the comments of the file twpol.txt
Edit and change file: /etc/tripwire/twpol.txt
Change:
severity = $(SIG_XXX)
to
severity = $(SIG_XXX),
emailto = root@localhost
or
severity = $(SIG_XXX),
emailto = root@localhost;admin@isp.comwhere XXX is the severity level. This will cause Tripwire to email a report of discrepancies for the rule edited. Set the email address to one appropriate for you.
I also added:
- "User binaries" rule: directory /opt/bin
- "Libraries" rule: directory /opt/lib
I removed/commented out:- the rule "System boot changes" as it reports changes due to system boot.
- Rule: "Root config files": Many of the non-existent files listed under /root were commented out to reduce the number of errors reported.
- Rule "File System and Disk Administraton Programs": Many of the non-existent binaries listed under /sbin were commented out to reduce the number of errors reported.
After configuration files have been edited run the script: /etc/tripwire/twinstall.sh
The script will ask for a "passphrase" for the site and local system. This is a similar concept to a password - remember it!If at any point you want to make configuration/policy changes, edit these files and re-run the configuration script. The script will generate the true configuration files used by Tripwire:
- /etc/tripwire/tw.cfg
(View with command: twadmin --print-cfgfile) - /etc/tripwire/tw.pol
(View with command: twadmin --print-polfile) - /etc/tripwire/site.key
- /etc/tripwire/ServerName-a-local.key
- Tripwire 1.2-3 (Red Hat 6.2 Powertools): /etc/tw.config
Tripwire initialization:
If at any time you change the configuration file to monitor your system differently or install an upgrade (changes a whole lot of files which will "trip" tripwire into reporting all changes) you may want to generate a new database.
- Tripwire 2.3.0-58: /usr/sbin/tripwire --init
You will be prompted for your "local passphrase".
This will generate a tripwire database file: /var/lib/tripwire/ServerName-a.twd - Tripwire 1.2-3: /usr/sbin/tripwire -initialize
This will generate a tripwire database file: ./databases/tw.db_ServerName
If you are in root's home directory, this will create the file /root/databases/tw.db_ServerName
At this point copy it to a usable location:cp -p /root/databases/tw.db_ServerName /var/spool/tripwire/tw.db_ServerNameDon't change /etc/tw.config without first running tripwire -initialize otherwise it will show differences due to settings in tw.config file rather than true differences.
Cron and tripwire:
Cron runs tripwire:
- Tripwire 2.3.0-58:
File: /etc/cron.daily/tripwire-checkYou may move this cron script to the directory /etc/cron.weekly/ to reduce reporting from a daily to a weekly event.#!/bin/sh HOST_NAME=`uname -n` if [ ! -e /var/lib/tripwire/${HOST_NAME}.twd ] ; then echo "**** Error: Tripwire database for ${HOST_NAME} not found. ****" echo "**** Run "/etc/tripwire/twinstall.sh" and/or "tripwire --init". ****" else test -f /etc/tripwire/tw.cfg && /usr/sbin/tripwire --check fi
Tripwire reports will be written to: /var/lib/tripwire/report/HostName-Date.twr - Tripwire 1.2-3:
File: /etc/cron.daily/tripwire.verify script which runs the command: /usr/sbin/tripwire -loosedir -q
Note: You may want to move the script to /etc/cron.weekly/tripwire.verify to reduce email reporting to root.
Read tripwire report:
- Tripwire 2.3.0-58: twprint --print-report -r /var/lib/tripwire/report/report-file.twr
Interactive mode:
- Tripwire 1.2-3:
Update tripwire database - run: tripwire -interactive
This will allow you to respond Y/N to files if they should be permanently updated in the tripwire database. This will still run tripwire against the whole file system. I ran it from /root and it updated /root/databases/tw.db_ServerName You must then cp -p to /var/spool/tripwire/ to update the tripwire database.
Default configuration file:
- Tripwire 2.3.0-58: /etc/twcfg.txt
ROOT                   =/usr/sbin
POLFILE                =/etc/tripwire/tw.pol
DBFILE                 =/var/lib/tripwire/$(HOSTNAME).twd
REPORTFILE             =/var/lib/tripwire/report/$(HOSTNAME)-$(DATE).twr
SITEKEYFILE            =/etc/tripwire/site.key
LOCALKEYFILE           =/etc/tripwire/$(HOSTNAME)-local.key
EDITOR                 =/bin/vi
LATEPROMPTING          =false
LOOSEDIRECTORYCHECKING =false
MAILNOVIOLATIONS       =true
EMAILREPORTLEVEL       =3
REPORTLEVEL            =3
MAILMETHOD             =SENDMAIL
SYSLOGREPORTING        =false
MAILPROGRAM =/usr/sbin/sendmail -oi -t - Tripwire 1.2-3: /etc/tw.config
# Log file
@@define LOGFILEM E+pugn
# Config file
@@define CONFM E+pinugc
# Binary
@@define BINM E+pnugsci12
# Directory
@@define DIRM E+pnug
# Data file (same as BIN_M currently)
@@define DATAM E+pnugsci12
# Device files
@@define DEVM E+pnugsc
# exclude all of /proc
=/proc E
#=/dev @@DIRM
/dev @@DEVM
#=/etc @@DIRM
/etc @@CONFM
# Binary directories
#=/usr/sbin @@DIRM
/usr/sbin @@BINM
#=/usr/bin @@DIRM
/usr/bin @@BINM
#=/sbin @@DIRM
/sbin @@BINM
#=/bin @@DIRM
/bin @@BINM
#=/lib @@DIRM
/lib @@BINM
#=/usr/lib @@DIRM
/usr/lib @@BINM
=/usr/src E
=/tmp @@DIRM
Add:
/var/named @@CONFM                   - If you are running Bind DNS slave
/home/httpd/cgi-bin @@BINM
Delete/comment out:#/dev @@DEVM
This eliminated the reporting of too much junk due to a reboot of the system.
Man pages:
Tripwire 2.3.0-58:
- tripwire - a file integrity checker for UNIX systems
- twintro - introduction to Tripwire software
- twadmin - Tripwire administrative and utility tool
- twprint - Tripwire database and report printer
- siggen - signature gathering routine for Tripwire
- twconfig - Tripwire configuration file reference
- twpolicy - Tripwire policy file description reference (For file /etc/tripwire/twpol.txt)
- twfiles - Overview of files used by Tripwire and file backup process
Also see:
Tripwire will monitor your filesystems for intrusion or addition of a file so you may determine what changes have occurred on your system in sensitive areas. Chkrootkit will scan your system for known exploits, Trojan commands, and worms used to compromise a system.
Download chkrootkit from http://www.chkrootkit.org. It is a shell script which should be run as root as well as a small collection of C programs.
- Installation:
- make sense (Compile C programs)
- ./chkrootkit (Run shell script and call programs.)
- Usage:
- ./chkrootkit
OR
- ./chkrootkit -h (help)
- ./chkrootkit
See the README file for more info.
Note:
- This software is constantly being upgraded and updated to include scans for new exploits.
- If running portsentry, chkrootkit may return a false error while performing the bindshell test.
Let me start by saying that this should only be performed on your own systems. It is considered and attack to run this against the systems of others and legal action may be taken against you for performing such an audit. This is not a scan like NMAP. NESSUS will search and locate vulnerabilities on your system by actively trying to perform known exploits against the system. Nessus became a closed source appliction after forking from version 2. See OpenVAS for the open source fork.
Nessus is amazingly complete and effective. In fact it is awesome!! It will identify services on your system and try to exploit them. If a vulnerability is found it will make recommendations about upgrades, configuration changes and where to find patches. It will also explain any causes for concern in detail and explain why your system is vulnerable. And that's not all! It can output reports in various formats including HTML with pie charts and bar charts!! The HTML reports will have hyperlinks to the security reports, upgrades and patches. (I'm impressed) It can scan Unix, Linux and Windows systems for vulnerabilities.
Download Linux package (download) and install:
- Debian 18.04: sudo dpkg -i Nessus-8.4.0-ubuntu1110_amd64.deb
Start the web server based application: sudo /etc/init.d/nessusd start
(may take a few minutes before all of the plugins are initialized)
Access the web-app via a browser: https://localhost:8834/
- Create an account by choosing a username/password
If you put in your real email address when you registerred for the download, you will receive an activation code.
After the system is registered, you will be presented with a choice of scan templates:
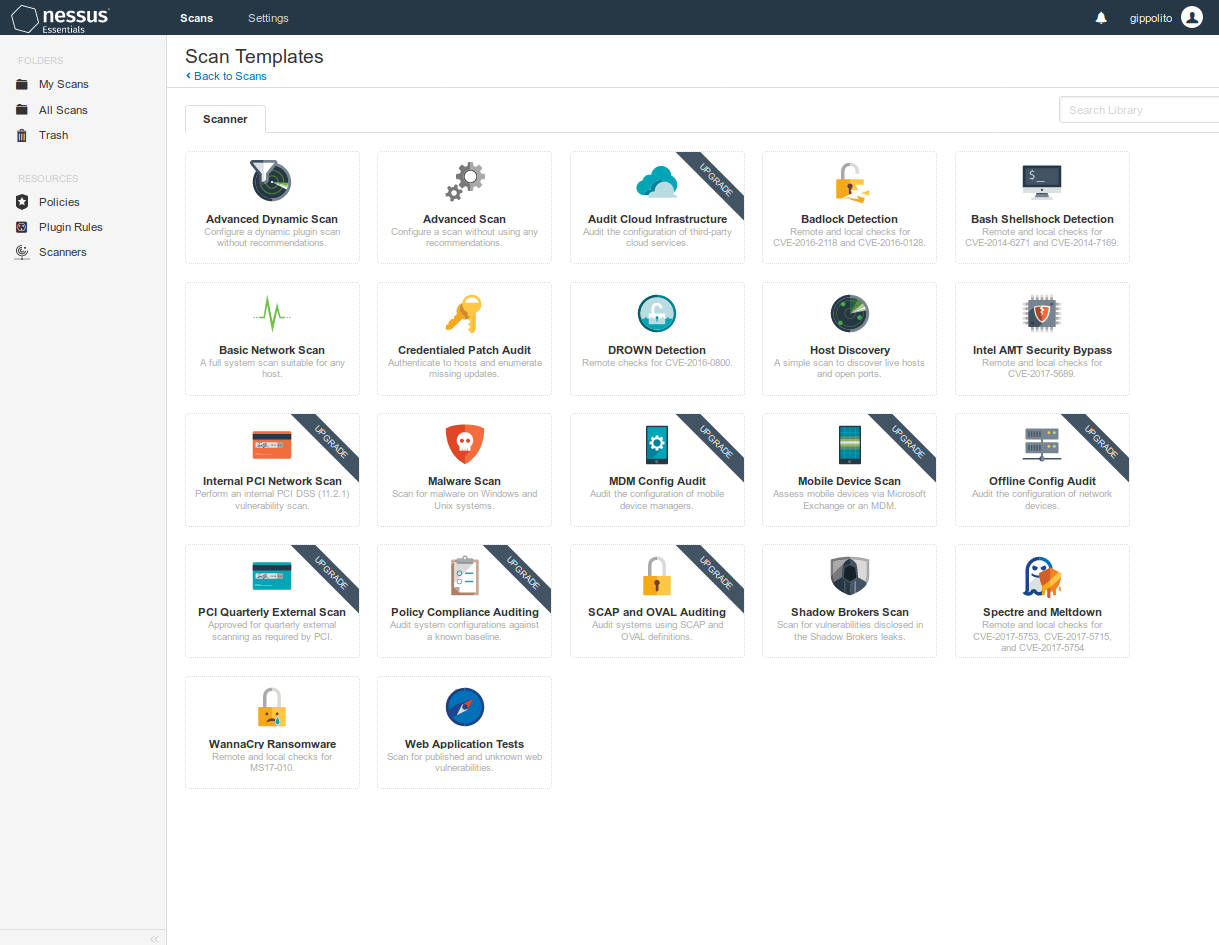
Running NESSUS:
Scan your server/website:- Login
- Select "New Scan"
- Select the "Advanced Scan" icon
- Tab: Settings/Basic/General
Enter the form values:- Name: give the scan a name, eg server-a
- Folder: My Scans (default)
- Targets: specify an IP address or a specific path: server1.megacorp.com/wordpress
- Tab: Credentials. This is required only to test elements of the system which first require a login. Eg. bash shell can not be checked unless a user account is looged in.
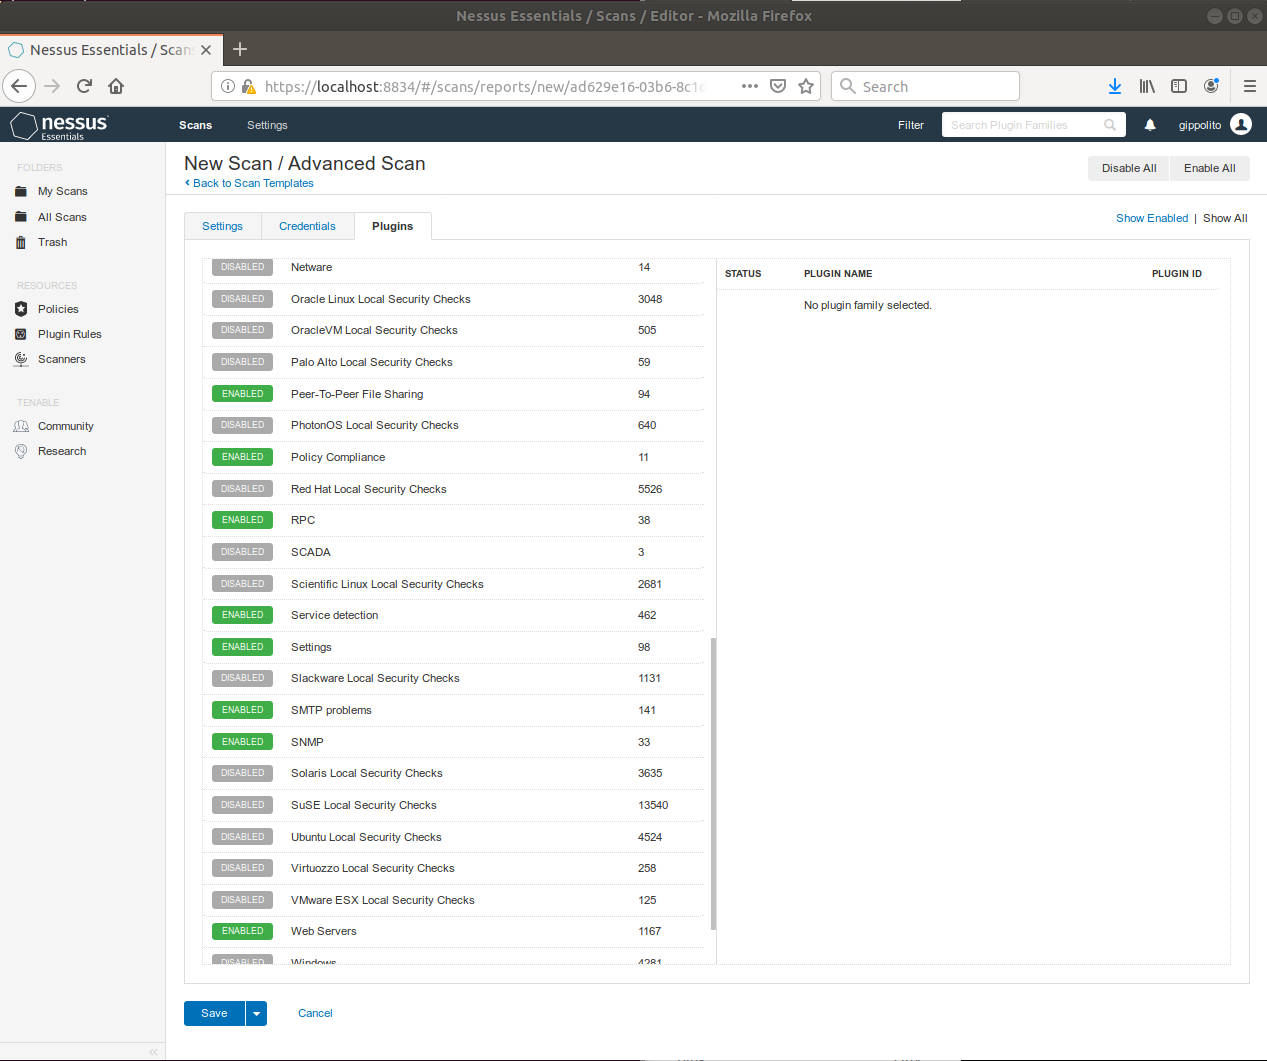
- Tab: Plugins
- Here you can turn off many of the useless scans that will not pertain to your server.
It is wise to disable the "Denial of Service" scan if testing a live server.
- Here you can turn off many of the useless scans that will not pertain to your server.
It is wise to disable the "Denial of Service" scan if testing a live server.
- Tab: Settings/Basic/General
- Select "Save scan"
- To perform a scan, choose "My Scans" or "All Scans" to see the list of scan definitions. Then select the "Launch" icon on the right hand side of the listing. It is not unusual for a scan to take 20 minutes for a full scan.
Configuration file for nessusd: /opt/nessus/etc/nessus/nessusd.conf
You may also consider a popular branch of Nessus, OpenVAS: Open Vulnerability Assessment System
Note:
- Running "Dangerous Plugins" may cause a crash of the system being audited!!
[Potential Pitfall]: No plugins found.
Fix:
- Stop service: sudo /etc/init.d/nessusd stop
- Download/Update Nessus and scanner plugins: sudo /opt/nessus/sbin/nessuscli update --all
* Nessus Plugins are now up-to-date and the changes will be automatically processed by Nessus. * Nessus Core Components are now up-to-date and the changes will be automatically processed by Nessus. - Restart service: sudo /etc/init.d/nessusd start
(may take a few minutes before all of the plugins are initialized)
[Potential Pitfall]: It's a big mess, reset!
Reset Registration and Erase Settings to a first installed state:
- Stop service: sudo /etc/init.d/nessusd stop
- Reset Nessus: sudo /opt/nessus/sbin/nessuscli fix --reset-all
WARNING: This option will reset Nessus to a fresh state, permanently erasing the following: * All scans, scan data, and policies * All users and any user settings * All preferences and settings * Registration information (Nessus will become unregistered) * Master password for this Nessus installation, if there is one Are you sure you want to proceed? (y/n) [n]: y - Restart service: sudo /etc/init.d/nessusd start
WPScan is an open source command line tool to check Wordpress and Wordpress plugins for vulnerabilities.
Installation:- Ubuntu 18.04:
- Install prerequisites: sudo apt install curl git libcurl4-openssl-dev make zlib1g-dev gawk g++ gcc libreadline6-dev libssl-dev libyaml-dev libsqlite3-dev sqlite3 autoconf libgdbm-dev libncurses5-dev automake make libtool bison pkg-config ruby ruby-bundler ruby-dev
- Install wpscan: sudo gem install wpscan
- Test: wpscan -h
_______________________________________________________________
        __          _______   _____
        \ \        / /  __ \ / ____|
         \ \  /\  / /| |__) | (___   ___  __ _ _ __ ®
          \ \/  \/ / |  ___/ \___ \ / __|/ _` | '_ \
           \  /\  /  | |     ____) | (__| (_| | | | |
            \/  \/   |_|    |_____/ \___|\__,_|_| |_|

        WordPress Security Scanner by the WPScan Team
                       Version 3.5.3
          Sponsored by Sucuri - https://sucuri.net
      @_WPScan_, @ethicalhack3r, @erwan_lr, @_FireFart_
_______________________________________________________________

[i] Updating the Database ...
[i] Update completed.

[+] URL: https://www.megacorp.com/
[+] Started: Fri May 24 18:55:48 2019

Interesting Finding(s):

[+] https://www.megacorp.com/
 | Interesting Entries:
 |  - X-CF-Powered-By: WP Rocket 3.3.2
 |  - X-UA-Compatible: IE=edge,chrome=1
 |  - X-Imforza-Hosted: HIT
 |  - X-TEC-API-VERSION: v1
 |  - X-TEC-API-ROOT: https://www.megacorp.com/wp-json/tribe/events/v1/
 |  - X-TEC-API-ORIGIN: https://www.megacorp.com
 |  - WPE-Backend: apache
 |  - X-Cacheable: SHORT
 |  - X-Pass-Why:
 |  - X-Cache-Group: normal
 |  - X-Type: default
 |  - Expect-CT: max-age=604800, report-uri="https://report-uri.megacorp.com/cdn-cgi/beacon/expect-ct"
 |  - Server: megacorp
 |  - MC-RAY: 2a91b3764c3f330a-LAX
 | Found By: Headers (Passive Detection)
 | Confidence: 100%

[+] https://www.megacorp.com/robots.txt
 | Interesting Entries:
 |  - /wp-admin/
 |  - /wp-admin/admin-ajax.php
 | Found By: Robots Txt (Aggressive Detection)
 | Confidence: 100%

[+] https://www.megacorp.com/xmlrpc.php
 | Found By: Link Tag (Passive Detection)
 | Confidence: 100%
 | Confirmed By: Direct Access (Aggressive Detection), 100% confidence
...
...
[+] Finished: Fri May 24 19:01:00 2019
[+] Requests Done: 84
[+] Cached Requests: 6
[+] Data Sent: 19.052 KB
[+] Data Received: 24.527 MB
[+] Memory used: 193.949 MB
[+] Elapsed time: 00:05:12
- YoLinux List of security Tools and Links
- NSA security guide for Red Hat Enterprise Linux 5 (pdf)
- Kali Linux - Bootable live CD Linux distro pre-configured for penetration testing.
- Bastille-Linux.org - scripts to "harden" or "tighten" the Linux system
- UnicornScan - fast portscanner
Also see onetwopunch.sh to automate UnicornScans. - Intrusion Detection on Linux: LIDS - LIDS is an intrusion detection and prevention system that resides within the Linux kernel.
- Openwall.com - Owl (security enhanced Linux) and security patches. This kernel patch makes the stack of a process non-executable so instructions loaded during a buffer overflow attack will not run.
- LDP HowTo Guides:
- Linux Networking Overview HOWTO - Daniel Lopez Ridruejo
- News/Usenet Group: comp.os.linux.security - Deja
- Insecure.org: Linux Exploits
- comp.os.linux.security FAQ
- Chkrootkit.org: Links
- RFC 2196: Site Security Handbook
- CERT: UNIX Configuration Guidelines
- Apache.org: Security Tips for Server Configuration
- Unix Security Links
- InfosysSec.org: Security Portal
- SecurityFocus.com - News and Info
- W3C: Security Resources
- Attack Info:
- Security Service Firms:
 Books:
 |
"Linux Firewalls"
by Robert L. Ziegler, Carl Constaintine ISBN #0735710996, New Riders 10/2001 This is the newer version. It includes updates on the Linux 2.4 kernel, VPN's and SSH. |

|
 |
"Linux Firewalls"
Robert L. Ziegler ISBN #0-7357-0900-9, New Riders 11/1999 Most complete Linux firewall/security book in publication. Covers ipchains, bind and a complete review of possible firewall configurations. |
|
 |
"Hack Proofing Linux : A Guide to Open Source Security"
by James Stanger, Patrick T. Lane ISBN #1928994342, Syngress
|
|
 |
"Real World Linux Security: Intrusion Prevention, Detection and Recovery"
by Bob Toxen ISBN #0130281875, Prentice Hall
|
|
 |
"Hacking Linux Exposed"
by Brian Hatch, James B. Lee, George Kurtz ISBN #0072225645, McGraw-Hill (2nd edition) From the same authors of "Hacking Exposed". |
|
 |
"Maximum Linux Security: A Hacker's Guide to Protecting Your Linux Server and Workstation"
by Anonymous and John Ray ISBN #0672321343, Sams Covers not only audit and protection methods but also investigates and explains the attacks and how they work. |
|
 |
"Network Intrusion Detection: An Analyst's Handbook"
by Stephen Northcutt, Donald McLachlan, Judy Novak ISBN #0735710082, New Riders Publishing |
|
 |
"SSH, the Secure Shell : The Definitive Guide"
by Daniel J. Barrett, Richard Silverman ISBN #0596000111, O'Reilly & Associates |
|
 |
"Nessus Network Auditing (Jay Beale's Open Source Security)"
by Renaud Deraison, Noam Rathaus, HD Moore, Raven Alder, George Theall, Andy Johnston, Jimmy Alderson ISBN #1931836086, Syngress |
|
 |
"Computer Security Incident Handling Step by Step"
by Stephen Northcutt ISBN #0967299217 |
|
 |
"Security Assessment: Case Studies for Implementing the NSA IAM"
by Russ Rogers, Greg Miles, Ed Fuller, Ted Dykstra ISBN #1932266968, Syngress |
|
 |
"Network Security Assessment"
by Chris McNab ISBN #059600611X, O'Reilly |
|
 |
"A Practical Guide to Security Assessment"
by Sudhanshu Kairab ISBN #0849317061, Auerbach Publications |
|
 |
"Aggressive Network Self-defense"
by NEIL R. WYLER ISBN #1931836205, Syngress Publishing |
|
 |
Security Source Magazine
Security Source Magazine's cover story is about keeping the network secure, from the gateway to the desktop. Subscribe now and continue to learn about valuable security topics and strategies in each quarterly issue. |
Free Subscription |
 |
Info Security Magazine
Business and management of information security. It is an international magazine, with an European focus. It is published in both print and digital editions, the latter containing the full content of the print publication, accessible via the web. Its experienced editorial team delivers stories that deal with the big picture issues of information security. Our sources and columnists are the expert security researchers and practitioners who define, drive, and lead the field. And our journalists are in demand by the IT trade and broadsheet press. |
Free Subscription |