

- Package Management:
- init: The Linux boot process.
- Quotas: Assign disk resource limits to users or groups.
- Managing groups and user security:
- Linux Networking tutorial
- DHCP Server tutorial
- NIS Server / Client configuration tutorial
- Configuring an internet web server. Apache, DNS, FTP,...
- Internet Server Security
- System optimization:
- System re-configuration: Commands used to re-configure video, keyboard, mouse, date/time, sound card, NIC, Printer...
- Installing a new kernel RPM
- YoLinux Tutorials Index
Basic command line:
-
Also see ntpstat, smbstatus, ifstat, prtstat, pidstat, lpstat, mailstat, sar, cifsiostat, ...pstree Processes and parent-child relationships top Show top processes mpstat Report processors related statistics. Example: mpstat -A
(Ubuntu install: apt-get install sysstat)dstat generate system resource statistics report. Examples: dstat -a, dstat -f
(Ubuntu install: apt-get install dstat)iostat Report CPU statistics and input/output statistics for devices and partitions. vmstat Report virtual memory statistics stat display file or file system status. Example: stat -f /dev/sda1 nfsstat / nfsiostat list NFS statistics
(Ubuntu install: apt-get install nfs-common)nstat network statistics tools ps -auxw process status uname -a print system information cat /proc/version Display Linux kernel version in use. cat /etc/redhat-release Display Red Hat Linux Release. (also /etc/issue) uptime Tell how long the system has been running. Also number of users and system's load average. w Show who is logged on and what they are doing. /sbin/lsmod List all currently loaded kernel modules.
Same as cat /proc/modules/sbin/runlevel Displays the system's current runlevel. hostname Displays/changes the system's node name. (Must also manually change hostname setting in /etc/sysconfig/network. Command will change entry in /etc/hosts) service Red Hat/Fedora command to display status of system services.
Example: service --status-all
Help: service --help
GUI/Graphical:
-
gnome-system-monitor Operating system monitor and usage graphing. gkrellm Graphical system monitor. (Additional RPM package: gkrellm) xosview Operating system monitor: load, memory, swap, net, disk, ...
List of tools:
Processes execute within their own process environment, they have their own memory, current working directory, priority, process ID, parent process ID and the file access privileges of the user ID under which they execute.
The basic Linux monitoring commands such as pstree and ps -auxw and top will inform you of the processes running on your system. Sometimes a process must be terminated. To terminate a process:
- Identify the process:
- pstree -p
OR - ps -auxw
OR - top
- pstree -p
- Kill the process:
- kill <process-id-number>
- killall <command-name>
This will perform an orderly shutdown of the process. If it hangs give a stronger signal with: kill -9 <process-id-number>. This method is not as sanitary and thus less preferred.
A signal may be given to the process. The program must be programmed to handle the given signal. See /usr/include/bits/signum.h for a full list. For example, to restart a process after updating it's configuration file, issue the command kill -HUP <process-id-number>
In the previous example, the HUP signal was sent to the process. The software was written to trap for the signal so that it could respond to it. If the software (command) is not written to respond to a particular signal, then the sending of the signal to the process is futile.
Identify all known signals: fuser -l
Process Monitoring and Management GUI Tools:
QPS:
-
Also see the GUI tool QPS. (Handles MOSIX cluster)
This tool is outstanding for monitoring, adjusting nice values (priorities),
issue signals to the process, view files the process is using, the memory,
environmnet variables and sockets the process is using.
RPM available from this site.
It is so simple to use, no instructions are necessary.
It can monitor a program to make sure it isn't doing something bad.
It is also reverse engineer what applications are doing and the environments
under which they run.
I love this tool!!
- QPS home page:
- Download RPMs for Fedora 4, 5, SuSE, Mandriva
(SuSE version 9.3 ships with a brokern QPS. Download a working version at link above.)
- Download RPMs for Fedora 4, 5, SuSE, Mandriva
Note: The RPM provided was compiled for RedHat 7.x. For RedHat 8.0+ one must install the appropriate QT library RPMs to satisfy dependencies:
rpm -ivh qt2-2.3.1-8.i386.rpm qt2-Xt-2.3.1-8.i386.rpm qt2-devel-2.3.1-8.i386.rpm qt2-static-2.3.1-8.i386.rpm
Then install qps: rpm -ivh qps-1.9.7-5.i386.rpmNote Fedora Core 3: rpm -ivh qt2-2.3.1-8.i386.rpm qps-1.9.7-5.i386.rpm
These older RH 8.0 and 7 binary release rpms even work on my AMD64 Fedora Core 3 x86_64 OS system.Configuring QPS to run applications against a process: Select "Command" + "Edit Commands..." + "Add..."
- Description: GDB
Command Line: xterm -T "GDB %C" -e gdb -d /directory-where-source-code-is-located --pid=%p - Description: gdb
Command Line: xterm -T "gdb %c (%p)" -e gdb /proc/%p/exe %p &
(As issued in RPM)
gdb man page - Description: strace
Command Line: xterm -T "strace %c (%p)" -e sh -c 'strace -f -p%p; sleep 10000'&
(show process system calls and signals. Try it with the process qps itself.)
Show output written by process:
xterm -T "strace %c (%p)" -e sh -c 'strace -f -q -e trace=write -p%p; sleep 10000'&
strace man page - Description: truss (Solaris command)
Command Line: xterm -T "truss %C (%p) -e sh -c 'truss -f -p %p; sleep 1000'&
- QPS home page:
nice: Process Priority Control
-
Multi-tasking operating systems executes processes in a time slice fashion sharing the processing resources base on their current privilege.
Privileges are not constant and elevate if they have not received an execution allocation in the processor after a given time.
This is to ensure that all processes get executed regardless of priority although a process can get squeezed out of the time allocation alltogether if the system is overloaded.
Higher priority processes may get more time allocated on the processor than a lower priority process but it is likely that the lower process will get some processor allocation.
Many system process which manage the system environment execute at an elevated priority in order to guarentee that they get executed.
User processes can have their priority elevated using the nice command.
Nice values have a range from -20 (most favorable scheduling) to 19 (least favorable).
Beware that if the priority is elevated higer than a system process, the behavior of the system may be compromised.
Modify process scheduling priority:
- Lower scheduling priority (runs slower and less likely to slow you down.)
nice -n 19 program-to-launch
Default for "nice -n" is 10 - Show default for any process: nice executable
Shows nice value to be used if run.
- Lower scheduling priority (runs slower and less likely to slow you down.)
IPCs: Semaphores, Shared Memory and Queues
-
Note that some processes may use Linux InterProcess Communication or IPC
(semaphores, shared memory or queues) which
may need to be cleaned up manually:
- Identify the semaphores: ipcs
ipcs -q List share queues.
ipcs -m Shared memory.
ipcs -s List Semaphores. - Remove the semaphores: ipcrm -s <ipcs id>
Example: If you are running Apache, you may see the following:
-
[root@node DIR]#  ipcs -m

------ Shared Memory Segments --------
key       shmid     owner     perms     bytes     nattch    status
0x00000000 341504    nobody    600       46084     27        dest
- Identify the semaphores: ipcs
lsof - Processes attached to open files or open network ports:
-
The command lsof
shows a list of processes attached to open files or network ports.
- List processes attached to a given file: lsof filename:
-
[root@node DIR]# lsof /var/log/mailman/qrunner
python  18538 mailman    4u   REG    3,5  657 486746 /var/log/mailman/qrunner
python  18578 mailman    6u   REG    3,5  657 486746 /var/log/mailman/qrunner
python  18579 mailman    6u   REG    3,5  657 486746 /var/log/mailman/qrunner
python  18580 mailman    6u   REG    3,5  657 486746 /var/log/mailman/qrunner
python  18581 mailman    6u   REG    3,5  657 486746 /var/log/mailman/qrunner
python  18582 mailman    6u   REG    3,5  657 486746 /var/log/mailman/qrunner
python  18583 mailman    6u   REG    3,5  657 486746 /var/log/mailman/qrunner
python  18584 mailman    6u   REG    3,5  657 486746 /var/log/mailman/qrunner
-
- List all open files on system: lsof
(Long list) - List all files opened by user: lsof -u user-id
- The commands netstat -punta and socklist will list open network connections.
Example: netstat -anp
Use the command lsof -i TCP:port-number to see the processes attached to the port.
Example:-
[root@node DIR]# lsof -i TCP:389
COMMAND   PID USER   FD   TYPE  DEVICE SIZE NODE NAME
slapd    5927 ldap    6u  IPv4 7560023       TCP *:ldap (LISTEN)
slapd    5928 ldap    6u  IPv4 7560023       TCP *:ldap (LISTEN)
slapd   21185 ldap    6u  IPv4 7560023       TCP *:ldap (LISTEN)
slapd   21186 ldap    6u  IPv4 7560023       TCP *:ldap (LISTEN)
slapd   21193 ldap    6u  IPv4 7560023       TCP *:ldap (LISTEN)
-
- List processes attached to a given file: lsof filename:
Restricting user resources:
-
- ulimit: (bash shell command)
Shell and process resources may be controlled and reported using the ulimit command. Display the limits of a shell using the bash command "ulimit -a". Limits can be set for the number of open files and processes, memory and virtual memory etc.
View file size limits: ulimit -f - See limits assigned in /etc/security (discussed below)
- ulimit: (bash shell command)
Process Commands:
-
- nohup - run a command immune to hangups, with output to a non-tty
Linux Commands to Monitor Memory Usage:
-
vmstat Monitor virtual memory free Display amount of free and used memory in the system. (Also: cat /proc/meminfo) pmap Display/examine memory map and libraries (so). Usage: pmap pid top Show top processes sar -B Show statistics on page swapping. time -v date Show system page size, page faults, etc of a process during execution. Note you must fully qualify the command as "/usr/bin/time" to avoid using the bash shell command "time". cat /proc/sys/vm/freepages Display virtual memory "free pages".
One may increase/decrease this limit: echo 300 400 500 > /proc/sys/vm/freepagescat /proc/meminfo Show memory size and usage.
Examination of memory usage:
- Show system page size: /usr/bin/time -v date
-
        ...
        Page size (bytes): 4096
        Exit status: 0
-
- Show paging: /usr/bin/time -v firefox
-
        ...
        Major (requiring I/O) page faults: 24
        Minor (reclaiming a frame) page faults: 11271
        Voluntary context switches: 302
        Involuntary context switches: 3689
        ...
-
- MemTotal: View system memory limits: grep MemTotal /proc/meminfo
MemTotal: 7919128 kB - swapon: View system swap size: /sbin/swapon -s
Filename				Type		Size	Used	Priority
/dev/sda5                               partition	19802108	0	-1
Also see swapoff
Explanation of terms:
- Major Page Fault (MPF): When a request for memory is made but it does not exist in physical memory, a request to the disk subsystem to retrieve pages from virtual memory and buffer them in RAM. The MPF occurs most when an application is started.
- Minor Page Fault (MnPF): Reusing a page in memory as opposed to placing it back on disk.
Hard Drive Info:
-
df -k report filesystem disk space usage. (-k reports in Kbytes) du -sh Calculates file space usage for a given directory. (and everything under it) (-s option summarizes) mount Displays all mounted devices, their mount point, filesystem, and access. Used with command line arguments to mount file system. cat /proc/filesystems Display filesystems currently in use. cat /proc/mounts Display mounted filesystems currently in use. showmount Displays mount info for NFS filesystems. cat /proc/swaps Displays swap partition(s) size, type and quantity used. cat /proc/ide/hda/any-file Displays disk information held by kernel.
Adding an extra hard drive: (See commands and dialog of adding a second IDE hard drive)
- fdisk /dev/<drive> - Allocate drive space and register info on the partition table. (Option "n"/"p", then "w" to write.)
Also see: sfdisk - cfdisk - mkfs -t ext3 /dev/<drive> - Create file system. (RH 7.1 and earlier use ext2, RH 7.2-8.0 use ext3)
- mount -t ext3 /dev/<drive's device name> /<home2 or some suitable directory> - Mount the drive
Mount a raw ISO file: mount -t iso9660 -o loop /home/user1/RedHat-9.0-i386-Disk1.iso /mnt/iso-1
(Fstab entry: /home/user1/RedHat-9.0-i386-Disk1.iso /mnt/iso-1 iso9660 loop,ro 0 3)
Also see: mkefs man page
Where the drive is /dev/hdb or some device as conforms to the Linux device names:
IDE drives are referred to as hda for the first drive, hdb for the second etc... IDE uses separate ribbon cables for primary and secondary drives. The partitions on each drive are referred numerically. The first partition on the first drive is referred to as hda1, the second as hda2, the third as hda3 etc ...
Linux IDE naming conventions:
-
Device Description Configuration /dev/hda 1st (Primary) IDE controller Master /dev/hdb 1st (Primary) IDE controller Slave /dev/hdc 2nd (Secondary) IDE controller Master /dev/hdd 2nd (Secondary) IDE controller Slave
Note: SCSI disks are labeled /dev/sda, sdb, etc... For more info see SCSI info.
Use the command cat /proc/partitions to see full list of disks and partitions that your system can see.
See Linux devices:
- Kernel 2.4: (Red Hat 7.1+)
- file:/usr/src/linux-2.4/Documentation/devices.txt - (local file)
- Kernel 2.2: (Red Hat 7.0-)
- file:/usr/src/linux/Documentation/devices.txt (local file) - H. Peter Anvin
To make the drive a permanent member of your system and have it mount upon system boot, add it to your /etc/fstab file which holds all the file system information for your system. See man page for fstab.
Example of existing /etc/fstab file:
/dev/sdb6               /                       ext2    defaults        1 1
/dev/sdb1               /boot                   ext2    defaults        1 2
/dev/cdrom              /mnt/cdrom              iso9660 noauto,user,users,ro 0 0
/dev/fd0                /mnt/floppy             auto    noauto,owner    0 0
none                    /proc                   proc    defaults        0 0
none                    /dev/pts                devpts  gid=5,mode=620  0 0
/dev/sdb5               swap                    swap    defaults        0 0
Add SCSI drive by adding line:
-
/dev/sdc1 /home2 ext2 defaults 1 2
At this point one may optionally check the file system created with the command: fsck /dev/sdc1
Note that fsck is NOT run against a mounted file system. Unmount it first if necessary. (umount) Also see the man page for:
- cfdisk - Curses based disk partition table manipulator. (very nice)
- fdisk - Manipulate/configure the partition table.
- sfdisk - Manipulate/configure the partition table.
- fsck
Mounting other file systems: (locally attached drives)
- Mounting a CD: mount -r -t iso9660 /dev/cdrom /mnt/cdrom
Un-Mount the CD-ROM: umount /dev/cdrom (No "n" in umount)This command should work for a Red Hat installation. Other distributions may require the following set-up:
        ln -sf /dev/hdc /dev/scd0     Reference SCSI device directly.
        OR
        ln -sf /dev/hdc /dev/cdrom     A more typical system

        cd /mnt
        mkdir cdrom
        mount -t iso9660 -o ro /dev/cdrom /mnt/cdrom
Don't forget to un-mount the CD with umount /mnt/cdrom
[Potential Pitfall]: There is NO "N" in umount!!!For trouble shooting your CD see your kernel documentation:
- Kernel 2.4: file:/usr/src/linux-2.4/Documentation/ide.txt (local file)
- Kernel 2.2: file:/usr/src/linux/Documentation/ide.txt (local file)
- Mounting a Windows partition.
- Mounting a floppy:
- Mount MS-DOS floppy: mount /dev/fd1 -t vfat /mnt/floppy
Also see the YoLinux tutorial on using MS-DOS floppies with Linux.
- Unix floppy: See YoLinux Tutorial - Linux Recovery and Boot Disk Creation
- Mount MS-DOS floppy: mount /dev/fd1 -t vfat /mnt/floppy
- Ramdisk: Using a portion of RAM memory to act like a superfast disk.
/sbin/mkfs -t ext2 /dev/ram
[Potential Pitfall]: I've never actually tried this. Use at your own risk!
mount /dev/ram /mnt/ramd
- Add system swap space for virtual memory paging:
Swap space may be a swap partition, a swap file or a combination of the two. One should size swap space to be at least twice the size of the computer's RAM. (but less than 2GB)dd if=/dev/zero of=/swapfile bs=1024 count=265032 - Create file filled with zeros of size 256Mb mkswap /swapfile - Create swap file swapon /swapfile - Begin use of given swap file. Assign a priority with the "-p" flag. swapon -s - List swap files cat /proc/swaps - Same as aboveThis example refers to a swap file. One may also use a swap partition. Make entry to /etc/fstab to permanently use swap file or partition.-
/swapfile swap swap defaults 0 0
Note: To remove the use of swap space, use the command swapoff. If using a swap partition, the partition must be unmounted.
Man pages:
- swapon/swapoff - enable/disable devices and files for paging and swapping
- mkswap - set up a Linux swap area
- fstab - static information about the filesystems
-
- YoLinux Tutorial: Adding an Additional Hard Drive to Your Linux System
- YoLinux Tutorial: System Optimization and hdparm
- Mounting a Windows partition or other file systems.
- YoLinux Tutorial: File System Quotas
- Hard Disk Upgrade Mini How-To
Increase open files limit:
   cat /proc/sys/fs/file-max  - Kernel configuration for max number of files
   cat /proc/sys/fs/file-nr   - Number of files presently open
   echo 4096 > /proc/sys/fs/file-max  - Set max file limit. (This is default)

   cat /proc/sys/fs/inode-max - Kernel 2.2 configuration for max number of inodes
                                To change: echo 12288 > /proc/sys/kernel/inode-max
- See:
- proc man page - process information pseudo-filesystem
- Local file Kernel 2.2 (RH 7.0-):file:/usr/src/linux/Documentation/proc.txt (local file)
Reboot count and fsck:
-
Pertains to Red Hat systems using the EXT2 filesystem (RH 7.2+ uses EXT3)
After 20 reboots of the system, Linux will perform a file system check using fsck. This is annoying for systems with many file systems because they will all be checked at once. The individual file system's mount count may be changed so that they will be checked on a different reboot.
Check current reboot status: /sbin/dumpe2fs /dev/sdb6 | grep '[mM]ount count'
-
dumpe2fs 1.19, 13-Jul-2000 for EXT2 FS 0.5b, 95/08/09
Mount count:              2
Maximum mount count:      20
Perform the previous command on all the filesystems to obtain their mount counts. Next change the mount counts for some of them.
-
umount /dev/sdb6
tune2fs -C 9 /dev/sdb6
mount /dev/sdb6
For home users who routinely shutdown and boot their systems, one can increase the maximum mount count: tune2fs -c 40
This feature can also be disabled: tune2fs -c -1
Check every week: tune2fs -i 7 -
System crash and disk check upon boot:
-
Pertains to Red Hat 7.1 EXT2 filesystems and earlier which require an integrity check.
(RH 7.2+ uses EXT3 which is a journaled file system which maintains file system integrity even with a crash.)
If the system crashes (due to power outage etc...) then upon boot the system will check if the disk was unmounted cleanly. If not you may get the following message:
-
Unexpected inconsistency; Run fsck Manually
...
*** An error occurred during the file system check.
*** Dropping you to a shell; the system will reboot
...
.
Give root password for maintenance
(or type Control-D for normal startup):
-
(repair file system) 1# fsck -A -y
...
..
.
***** FILE SYSTEM WAS MODIFIED *****
...
..
.
(repair file system) 2# exit
fsck man page
Note that fsck is NOT run against mounted file systems. -
Journaled Filesystem EXT3:
-
Convert from ext2 to ext3:
- Red Hat 7.2 upgrade gives one the option to perform this file system upgrade.
- Manual method:
- Convert: tune2fs -j /dev/hda1
- Configuration file changes: /etc/fstab change ext2 to ext3
Other journaled file systems: SGI XFS, IBM JFS and reiserfs. For files larger than 2Gb use XFS.org: SGI XFS and the SGI Linux Red Hat RPM or Red Hat ISO CD install image.
Raw Devices: Commercial databases such as Oracle and IBM DB2 can maximize performance by using raw I/O. One may use the raw command for both IDE and SCSI devices. This will map a raw device to a blocked device for an entire disk partition. To see if your system is using raw I/O issue the command: raw -a
- raw man page
- Configuration file: /etc/sysconfig/rawdevices
Add entries to this file to invoke raw I/O upon system boot. - Devices: /dev/raw/raw??
- Raw device controller: /dev/rawctl
- Sample use of command: raw /dev/raw/raw1 /dev/hdb5
- One must be of group disk to use the raw device or change
permissions:
- chmod a+r /dev/rawctl
- chmod a+r /dev/hdb5
- chmod a+rw /dev/raw/raw1
Note: The above information applies to Red Hat distributions. This info may be
different for other distributions. i.e. S.U.S.E. uses /dev/raw1 as
a device and /dev/raw as the controller.
You can mimic Red Hat behavior with a symbolic link: ln -s /dev/your_raw_controller /dev/rawctl
- SMB Mount: Mounting a Microsoft Windows shared file server drive
- NFS: Mounting/exporting a Linux shared file server drive with NFS.
Requires the following packages:- Red Hat/CentOS: portmapper nfs-utils nfs-utils-lib redhat-config-nfs
(Optional: nfs4-acl-tools) - Debian/Ubuntu: apt-get install nfs-kernel-server nfs-common portmap
Client Server File: /etc/fstab ... server:/directory-to-export /mnt/mount-point nfs rw,hard,intr 0 0 server1:/shared/images /mnt/srv1-images nfs rw,hard,intr 0 0 ...Hard mount read/write. Mount can be interrupted by the kill command.Command line mount: mount -t nfs server1:/shared/images /mnt/srv1-images
File: /etc/exports ...
List of directories to export and restrictions.
/shared/images 176.168.1.0/255.255.255.0(rw)
...
For more see exports man page.Options:
Option Description ro Mounts of the exported file system are read-only. rw Mounts of the exported file system are read-write. hard The program accessing a file on a NFS mounted file system will hang when the server crashes. intr If an NFS file operation has a major time-out and it is hard mounted, then allow signals to interrupt the file operation and cause it to return. async If the exported file system is read/write and hosts are making changes to the file system when the server crashes, data can be lost. sync By specifying the sync option, all file writes are committed to the disk before the write request by the client is completed. The sync option, however, can lower performance. wdelay Causes the NFS server to delay writing to the disk if it suspects another write request is imminent. This can improve performance by reducing the number of times the disk must be accessed by separate write commands, reducing write overhead. The no_wdelay option turns off this feature, but is only available when using the sync option. root_squash Prevents root users connected remotely from having root privileges and assigns them the user ID for the user nfsnobody. This effectively "squashes" the power of the remote root user to the lowest local user, preventing unauthorized alteration of files on the remote server. Alternatively, the no_root_squash option turns off root squashing.
Pitfalls:- Server must run services: portmap (or rpcbind), nfslock, netfs, nfs
- Restart server service to pick up file changes: service nfs restart
(or: /etc/init.d/nfs restart) - Iptables may block port. Clear iptables rules with iptables -F to test.
Keep ports 111 and 2049 clear.
-
iptables -A INPUT -f -j ACCEPT -s ip.pc.client
iptables -A INPUT -s ip.pc.client -d 0/0 4000:4003 -p 6 -j ACCEPT
iptables -A INPUT -s ip.pc.client -d 0/0 4000:4003 -p 17 -j ACCEPT
iptables -A INPUT -s ip.pc.client -d 0/0 2049 -p 17 -j ACCEPT
iptables -A INPUT -s ip.pc.client -d 0/0 2049 -p 6 -j ACCEPT
iptables -A INPUT -s ip.pc.client -d 0/0 111 -p 6 -j ACCEPT
iptables -A INPUT -s ip.pc.client -d 0/0 111 -p 17 -j ACCEPT
-
- Check PAM restrictions in /etc/hosts.deny and hosts.allow.
- To avoid NFS hanging up the system and immunity from the kill command, use the "intr" option to allow the process to be interrupted.
- The user id (uid) numbers and the group id (gid) numbers on both systems MUST match to preserve sanity. Check the numbers used in /etc/passwd and /etc/group. Typically this problem is solved by using a single point of authentication. Use NIS or LDAP.
- NEVER EVER mount to a user's home directory. i.e. /home/user1/mount-point
This is because when the user is removed from the system with the command userdel -r user1, the user's home directory is wiped and all subdirectories including the path below the mount point will be erased!! - NFS is not an encrypted protocol, and anyone on the same physical network could sniff the traffic and reassemble the information being passed back and forth.
NFS Man pages:- nfs - fstab format and options
- exports - NFS file systems being exported (for Kernel based NFS)
- exportfs - maintain list of NFS exported file systems
- nfsd/rpc.nfsd - NFS server process
- nfsstat - print NFS statistics
- rpc.mountd - NFS mount daemon
NFS GUI Configuration tool:
- system-config-nfs (Fedora Core 2+, RHEL4/5/6)
- redhat-config-nfs (Fedora Core 1)
- Red Hat/CentOS: portmapper nfs-utils nfs-utils-lib redhat-config-nfs
NIS (Network Information Systems) is often used in NFS clusters to manage authentication. See the YoLinux.com NIS tutorial.
Commands:
-
who Displays currently logged in users.
Use who -uH for idle time and terminal info.users Show all users logged in. w Displays currently logged in users and processes they are running. whoami Displays user id. groups Display groups you are part of.
Use groups user-id to display groups for a given user.set Display all environment variables in your current environment. id Display user and all group ids.
Use id user-id to display info for another user id.last Listing of most recent logins by users. Show where from, date and time of login (ftp, ssh, ...) Also see lastlog command.
Show last 100 logins: last -100history Shell command to display previously entered commands.
The greeting messages and login displays are all customizable.
-
Type of greeting File Telnet pre-login Text: File containing text: /etc/issue Ssh pre-login Text: /etc/ssh/sshd_config
Specify text file: Banner /etc/issuevsftpd Login Text: vsftpd config file: /etc/vsftpd/vsftpd.conf
Set text greeting: ftpd_banner=Put welcome greeting herePost login text message:
(message of the day)/etc/motd
Default is blank.GDM graphical login display: /etc/X11/gdm/gdm.conf (or /etc/gdm/gdm.conf)
Set image: DefaultFace=/path/file.png
Set logo: Logo=/path/file.png
Set background: BackgroundImage=/path/file.png
The three most common methods of defining a Linux user and authenticating their logins are:
- Local user authenticated locally with the password files /etc/passwd and /etc/shadow
- Network authentication using an LDAP authentication server
- NIS authentication server. To specify an NIS authentication server, use /etc/yp.conf which contains the line: ypserver ip.address.of.server. Find with ypwhich
The following describes creating a local user:
- Command Line Method: (My preference)
- useradd user_name : Add a user to the system. System uses configuration and security defaults set in /etc/default/useradd and /etc/login.defs
- useradd -m user_name : Add a user to the system and create a home directory populated with default files from /etc/skel/
- useradd -m user_name -G floppy : Will grant the user read/write privileges to the floppy (/dev/fd0) upon creation of user by adding user to group floppy in addition to the default group specified in /etc/default/useradd.
- useradd options:
-
See the useradd man page for a full list of options.Option Description -c Adds a comment or description to the password record. -d HOME_DIR Specify but don't create the user's home directory. -m Create (if it does not already exist by appending username to "/home/") and specify this as the users home directory. Default files from /etc/skel/ will be placed in the users home directory. eg. ~/.bashrc -g Initial (default) group -G grp1, grp2 Specify additional supplementary groups to which the user belongs. -s Specify default shell. Default is /bin/bash in most Linux distributions.
-
- userdel user_name : Delete user from system. Purges user from /etc/passwd, group and shadow files
- userdel -r user_name : Delete user and remove his home directory from the system. Other files will remain.
[Potential Pitfall]: Use the command "df" to see if there are any mount points to the user's directory. If there are any, they will get wiped out with the recursive delete. Thus as a policy it is best to NEVER generate a mount point within a user's directory. It is best to mount to /mnt/mount-dir and use a sym-link (ln -s /mnt/mount-dir /home/user-name/mount-dir-local) to the user's directory. The default is to not follow symlinks during the delete. - passwd user_name : Assign a password to the user. (Also see pwgen, a password generator)
Also see man page for: usermod.
Configuration file for useradd command: /etc/default/useraddDefault directory configuration and files for a new user are copied from the directory /etc/skel/. The default shell is called bash (bsh) and is a cross of the UNIX ksh and csh command shells. The users personal bash shell customizations are held in $HOME/.bashrc.
- GUI Method:
- system-config-users: GUI admin tool for managing users and groups. (Fedora Core 2+, RHEL4/5/6)
- redhat-config-users: GUI admin tool for managing users and groups. (Fedora Core 1)
- linuxconf: (Note: Linuxconf is no longer included with Red Hat Linux 7.3+)
- Start linuxconf:
- RH 5.2: Select Start + Programs + Administration + linuxconf .
- RH 6+: Select Gnome Start icon (located lower left corner) + System + Linuxconf .
- Add the user: Select options Config + User accounts +Normal + User accounts + select button Add . There is also the option of adding the user to additional groups. (I.e enter floppy under the heading Supplementary groups and then Accept ) For a list of groups, the group names should be separated by a simple space. This tool will allow you to set default directories, shells, add rules about passwords, set e-mail aliases, group membership and disk quotas. One can modify or delete users from linuxconf as well.
- Set user password: After creating the user, use options Config + User accounts + Normal + User accounts .Select the user from the list. Then select the Passwd button. This will allow you to enter an initial password for the account.
- Start linuxconf:
- File Editing Method: - (as root) Edit files to add/remove a user
- Create user entry in /etc/passwd
user:x:505:505:Mr. Dude User:/home/user:/bin/bash - Create group: /etc/group
user:x:505: - Create home directory:
cd /home
mkdir user - Copy default files:
cp -pR /etc/skel/. /home/user
chown -R user.user /home/user - The creation of /etc/shadow and /etc/gshadow require the execution of a program to encrypt passwords. Use the commands pwconv and grpconv to synchronize the shadow files.
- Assign a password: passwd user
- Also see:
- Create user entry in /etc/passwd
Note:
- For every user ID text string there is an associated UID integer. See the third ":" delimited field in the file /etc/passwd.
- The "Linux Standard Base" pecification states that IDs 0 to 99 should be statically allocated by the system and that user IDs from 100 to 499 should be reserved for dynamic allocation by system administrators and post install scripts using useradd. [LSB chapter 21] This is of course not completely realistic as it would limit Linux to 400 users. Red Hat/Fedora Linux distributions begin incrementing user UIDs from 500. By default the useradd command will increment by one for each new ID.
- Large organizations need to think ahead when creating a new user. Autonomous systems are often eventually linked together to share files using NFS at a later date and have synchronization problems. The same user ID (text string) on two different systems may have different UIDs. The problem this creates is when a file with one system can not be edited when accessed from the second system as the second system regard him as a different user because the system has a different UID. It is best to use the useradd "-u" option to assign users a UID integer associated with the text string ID. Many systems administrators use the employee ID as they know it will be unique across the corporation. Group GIDs can be assigned to department or division numbers. This will allow smooth operation of connected systems.
- NFS: For systems which will use NFS to share files, one can administer
user accounts to make creation, editing and ownership of files seamless and
consistent.
Look at the file /etc/passwd on the
file server which you will mount to determine the user ID number and group
ID number.
-
user1:x:505:505:Joe Hacker:/home/user1:/bin/bash
User-ID:User-ID-Number:Group-ID-Number:comment:/home/User-ID-Home-Directory:default-shell
[root]# useradd -u User-ID-Number -g Group-ID-Number User-ID
Ideally you would configure an NIS or LDAP authentication server so that login id's and group id's would reside on one server. This tip is for separate autonomous systems or for systems using different authentication servers which are sharing files using NFS. This tip also can also apply to smbmounted MS/Windows shares. -
- Default settings for new users are stored in /etc/skel/. To modify default .bash_logout .bash_profile .bashrc .gtkrc .kde/ configuration files for new users, make the changes here.
- Also see the YoLinux tutorial on Managing groups
Security Enhanced Linux (SELinux) enhancements developed by the US Federal National Security Agency (NSA) are included with Fedora Core beginning with version 3 and Red Hat Enterprise Linux version 4. The fine-grained access control architecture is supported in the Linux kernel. Both "type" enforcement and Role Based Access Control (RBAC) are supported. System processes and files (including socket descriptors, IPC's, devices, ...) are each assigned a collection of security attributes known as a security context.
Security Goals:
- Protect the system from the users
- Protect the users from each other
- Protect the files from scripts/programs
The following RPM packages comprise SELinux:
- selinux-policy-strict
- selinux-policy-strict-sources: Configuration files
- selinux-policy-targeted
- selinux-policy-targeted-sources: Configuration files
- libselinux: Library which provides a set of interfaces for security-aware applications to get and set process and file security contexts.
- selinux-doc
Configuration file: /etc/selinux/config
-
# This file controls the state of SELinux on the system.
One may turn off the SELinux features by setting: SELINUX=disabled
# SELINUX= can take one of these three values:
# enforcing - SELinux security policy is enforced.
# permissive - SELinux prints warnings instead of enforcing.
# disabled - SELinux is fully disabled.
SELINUX=enforcing
# SELINUXTYPE= type of policy in use. Possible values are:
# targeted - Only targeted network daemons are protected.
# strict - Full SELinux protection.
SELINUXTYPE=targeted
(Requires reboot to read new configuration.)Direct setting of enforcement:
- Enforce:
- Use command: setenforce 1
(Alter SELinux enforcement while kernel is running.)
or - echo 1 > /selinux/enforce
or - Specify in /etc/grub.conf on the "kernel" command line: enforcing=1
(Sets enforcement during boot.)
- Use command: setenforce 1
- Disable:
- Use command: setenforce 0
or - echo 0 > /selinux/enforce
or - Specify in /etc/grub.conf on the "kernel" command line: selinux=0
- Use command: setenforce 0
- Enforce:
Security contexts:
- View file/directory contexts: ls -Z /var/www
- Set file/directory context: chcon -R -h -t httpd_sys_content_t /home/user1/public_html
Options:- -R: Recursive. Files and directories in current directory and all subdirectories.
- -h: Affect symbolic links.
- -t: Specify type of security context.
- View security context of running processes: ps -eZ
- View security context of a user: id
- uid=500(user1) gid=500(user1) groups=500(user1) context=user_u:system_r:unconfined_t
- Security contexts for a new file default to that of the parent directory.
Also see YoLinux Tutorials on Web Site configuration and SELinux policies.
For tar backups which preserve SELinux file and directory policies, see star discussed in Linux backups and archiving below.
User limitations are set in the following files:
- File: /etc/security/limits.conf :
- core - limits the core file size (KB)
- data - max data size (KB)
- fsize - maximum filesize (KB)
- memlock - max locked-in-memory address space (KB)
- nofile - max number of open files
- rss - max resident set size (KB)
- stack - max stack size (KB)
- cpu - max CPU time (MIN)
- nproc - max number of processes
- as - address space limit
- maxlogins - max number of logins for this user
- priority - the priority to run user process with
- locks - max number of file locks the user can hold
- File: /etc/security/access.conf :
Limit access by network or local console logins. - File: /etc/security/group.conf :
Grant/restrict group device access.
Also see the YoLinux tutorial on Managing groups - File: /etc/security/time.conf :
Restrict user access by time, day.
Also see:
- Set user quotas on hard drive usage - YoLinux Tutorial
- bash shell command ulimit. (Mentioned above)
- getrlimit, getrusage, setrlimit - get/set resource limits and usage (C programmer api)
- sysconf - Get configuration information at runtime (C programmer api)
If you are planning to administer the system, one would login as root to perform the tasks. In many instances one would be logged in as a user and wish to perform some "root" sys-admin tasks. Here is how:
- Switch user account to root:
Shell/command mode:
su -
and then you will be prompted to enter the root password. - GUI mode:
- Allow console to be accessed by another user from same system:
xhost +localhost - Switch user and then you will be prompted to enter the root password:
su - - Set environment variable for GUI sessions so that
display used is local display. (Remember X-windows is a network enables
windowing system)
export DISPLAY=:0.0 - Launch GUI application.
- Allow console to be accessed by another user from same system:
Note: The su command was issued with a trailing "-" which means that the login process will follow the login steps of the user and will execute its profiles. Since no user id was given, the default is root user. This all would be equivalent to: su - root
Some systems may be configured so that only the switch user (su) command may be required without all of the X-window configuration.
The rpm command is used to manage software applications and system modules for Red Hat, Fedora, CentOS, Suse and many other Linux distributions.
Step One: Import Red Hat and Fedora GPG signature keys:
-
View your public key: (RHEL5)
-
[root@yoserver2 ~]# rpm -qa gpg-pubkey
gpg-pubkey-ed555983-3457f7f3
[root@yoserver2 ~]# rpm -qi gpg-pubkey-ed555983-3457f7f3
...
...
(Thus already installed. Your system is ready.)
Remove your public key: (RHEL5)
-
[root@yoserver2 ~]# rpm -e gpg-pubkey-ed555983-3457f7f3
Install public key: (Red Hat package up2date - now depricated. Use YUM.)
-
[root@yoserver2 ~]# rpm --import /usr/share/rhn/RPM-GPG-KEY
[root@yoserver2 ~]# rpm --import /usr/share/rhn/RPM-GPG-KEY-fedora
Do this once to configure RPM so that you won't constantly get the warning message that the signature is "NOKEY".
The purpose is to protect you from using a corrupt or hacked RPM.
Once these command are performed, you are ready to use the RPM command. (This is also required for the YUM commands below.)
Note: Many GPG public keys for other RPM packages (i.e. MySQL: 0x5072E1F5), can be obtained from http://www.keyserver.net/.
(The following RPM installation warning will inform you of the key to obtain: warning: MySQL-XXXX.rpm: V3 DSA signature: NOKEY, key ID 5072e1f5)
Importing a new key from key server:- gpg --keyserver keyserver.veridis.com --recv-key 5072e1f5
- gpg --export -a 5072e1f5 > pubkey_mysql.asc
- rpm --import pubkey_mysql.asc
-
Step Two: RPM commands and their use
-
RPM Command Description rpm -qilp program_package-ver.rpm Query for information on package and list destination of files to be installed by the package.
You can also use the Gnome GUI program file-roller to view and read the contents of an RPM. Great tool for inspecting an RPM package and reading the package documentation before you decide to install the package.rpm2cpio - < program_package-ver.rpm | cpio -id ./path/and/file-name Extract a single file (with path) from the RPM package to the local directory. rpm -Uvh program_package-ver.rpm Upgrade the system with the RPM package rpm -ivh program_package-ver.rpm New Install rpm -Fvh program_package-ver.rpm Freshen install. Removes all files (including config files) of older version during upgrade. rpm -q program_package Query system RPM database (/var/lib/rpm), to see if package is installed. rpm -qi program_package Query system RPM database for info/description on package (if installed) rpm -ql program_package List all files on the system associated with the package. rpm -qf file Identify the package to which this file belongs. rpm -e program_package Uninstall package from your system rpm -qa List ALL packages on your system. Use this with grep to find families of packages. rpm -qp --requires program_package-ver.rpm List dependancies (files and packages) of RPM. List prerequisites. rpm -q --whatrequires program_package List dependant packages of RPM. What packages will break if this RPM is removed. rpm -K --nogpg *.rpm Non sure if RPM downloaded ok? Verify md5 sum. RPM Flag Description --nodeps RPM flag to force install even if dependency requirements are not met. --force Overwrite of other packages allowed. --notriggers Don't execute scripts which are triggered by the installation of this package. --root /directory-name Use the system chrooted at /directory-name. This means the database will be read or modified under /directory-name. (Used by developers to maintain multiple environments) --ignorearch Allow installation even if the architectures of the binary RPM and host don't match. This is often required for RPM's which were assembled incorrectly
Notes:
- Fedora RPM downloads: http://archives.fedoraproject.org/pub/archive/fedora/linux/releases/##/Fedora/arch/os/Packages/
Use your browser, wget, curl (downloads using http, https, ftp, ...) or ftp the site download.fedora.redhat.com (login: anonymous, password: your-email-address). - Many times, (like with glibc library or Netscape RPMs etc)
it is necessary to mention two or more packages on the command line.
The rpm command will account for the co-dependency of the packages. i.e.:
- rpm -ivh abc-package1-i386.rpm abc-package2-i386.rpm abc-package3-i386.rpm
- Configuration information is stored in /var/lib/rpm
- Database of descriptive package info. RPM package rpmdb-redhat.
Installs database of all packages in distributions to make RPM more informative.
- When installing additional RPM's from the Red Hat CD, cd to the
RPMS directory on the CD which contains the packages to be installed.
- Building from a "src" (source) RPM: rpmbuild --rebuild package-name.src.rpm
The source will be placed in /usr/src/redhat/RPMS/....
The command then performs a prep, compile, install and finally creates a new binary RPM package. Use option --clean for cleanup.
The command rpmbuild --showrc package-name.src.rpm shows options to be used as specified in rpmrc and macros configuration file(s).
The source RPMs are not in the RPM database and will not be seen with "rpm -qa - [Potential Pitfall]: If you get the errors:
-
error: cannot get exclusive lock on /var/lib/rpm/Packages
error: cannot open Packages index using db3 - Operation not permitted (1)
error: cannot open Packages database in /var/lib/rpm
- Who are you logged in as?: whoami
You must be root. - File permissions: ls -l /var/lib/rpm/Packages
File must be owned by root. - Command to kill processes locking file: fuser -k /var/lib/rpm/Packages
It is best to terminate processes by exiting program (like glint) normally if possible.
-
- [Potential Pitfall]: If you get the errors:
-
[root]# rpm -e package-name
error: "package-name-X.X.X-X" specifies multiple packages
This is because a package is doubly listed: (Often due to dual 32/64 bit architectures such as the AMD Athelon/Opteron and Intel EM64T - Extended Memory 64 Technology)
[root]# rpm -q package-name
package-name-X.X.X-X
package-name-X.X.X-X
-
- [Potential Pitfall]: You try
and install an
RPM but you can not get the appropriate version of the run time
libraries because they are too old and not present on your system or
you get a runtime error:
/usr/bin/ld: cannot find /lib/libxx.so.1.0.4Here is how to install some old libraries on your newer system without corrupting your current installation.
- First force the installation of the RPM without the dependency requirement: rpm --nodeps -ivh xxxx-...rmp.
- Next download an old RPM of the appropriate library, i.e. glibc-x.x.x.rpm
- Extract the libraries from the RPM: rpm2cpio glibc-x.x.x.rpm | cpio -idv
This will install to your current directory: ./usr/lib/.. and ./lib/... - Manually copy the library file to the library directory or path accessible by LD_LIBRARY_PATH or ldconfig: i.e.
- cp ./lib/libxx.so.1.0.4 /lib/libxx.so.1.0.4
Useful man pages:
- rpm - Red Hat Package Manager
- rpmbuild - Build/create an RPM package.
- redhat-config-packages - RH 8.0 GUI
Also see:
- RPM HowTo.
- RPM.org Home Page
- Alien - package converter between rpm, dpkg, stampede slp, and slackware tgz file formats.
- CheckInstall - Create packages for RPM (Red Hat, Fedora, Suse), Debian or Slackware for install and uninstall.
Select the red dot and exclamation mark icon on the toolbar to launch up2date and follow the GUI. One may also use the command line if managing a remote server.

Execute the following commands (in order given) to perform an automatic system update:
- /usr/bin/rhn_register :You must first register your system with the Red Hat database. This command will perform a hardware inventory and reporting of your system so that Red Hat knows which software to load to match your needs.
- /usr/bin/up2date-config :This allows you to configure the "up2date" process. It allows you to define directories to use, actions to take (i.e. download updates, install or not install, keep RPM's after install or not), network access (i.e. proxy configuration), use of GPG for package verification, packages or files to skip, etc. Use of GPG requires the Red Hat public key: rpm -import /usr/share/rhn/RPM-GPG-KEY
- /usr/sbin/up2date :This command will perform an audit of RPM's on your system and discover what needs to be updated. It gives you a chance to unselect packages targeted for upgrade. It will download RPM packages needed, resolve dependencies and perform a system update if requested.
[Potential Pitfall]: This works quite well but it is not perfect. Red Hat 7.1 Apache upgrade to 1.3.22 changed the configuration completely. (Beware. manual clean-up and re-configuration is required). When up2date finds the first messed up dependency it stops to tells you. You then have to unselect the package. It then starts again from the beginning.
Installing a new package with up2date: up2date package-name
The package name is given without the version number. If the package is not
currently installed, it will be downloaded and installed, along with any
dependencies that package requires.
Command line options (partial list) for up2date:
-
Option Description --nox Do not display the GUI interface. -u
--updateCompletely update the system -h
--helpDisplay command line arguments -v
--verbosePrint more info about what up2date is doing --showall Show a list of all packages available for your release of Red Hat Linux, including those not currently installed.
Also see man pages for:
- up2date-gnome
- rhn_register-gnome
Notes:
- Update in console mode (no GUI): up2date --nox --update
- Configuration file for up2date: /etc/sysconfig/rhn/up2date
- System id and configuration info held in XML format for up2date: /etc/sysconfig/rhn/systemid
- The default download directory for up2date is /var/spool/up2date/. RPM packages and support files are downloaded to this directory.
- An automated alert to the need to update utilizes the rhnsd which can be started by issuing the command: /etc/rc.d/init.d/rhnsd start
YUM (Yellowdog Updater, Modified) is a client command line application for updating an RPM based system from an internet repository (YUM "yum-arch" server) accessible by URL (http://xxx, ftp://yyy or even file://zzz local or NFS). The YUM repository has a directory of the headers with RPM info and directory path information. YUM will resolve RPM package dependencies and manage the importation and installation of dependencies.
YUM is also capable of upgrading across releases. One can upgrade Red Hat Linux 7 and 8 to 9. Red Hat 8 and 9 can be upgraded to Fedora Core. See Fedora YUM release upgrades or upgrade Redhat 6 to 7. Note that RHEL6 is the first release of the enterprise product which can be upgraded to the next release.
YUM config file: /etc/yum.conf (CentOS 5)
-
[main]
cachedir=/var/cache/yum
keepcache=0
debuglevel=2
logfile=/var/log/yum.log
distroverpkg=redhat-release
tolerant=1
exactarch=1
obsoletes=1
gpgcheck=1
plugins=1
bugtracker_url=http://bugs.centos.org/yum5bug

# Note: yum-RHN-plugin doesn't honor this.
metadata_expire=1h

installonly_limit = 5

# PUT YOUR REPOS HERE OR IN separate files named file.repo
# in /etc/yum.repos.d
You may list packages you wish NOT to update (Space delimited list. '*' wildcards allowed.): exclude=package-name
(i.e. On x86_64 I do not update firefox or mozplugger with the 64 bit version, I use the 32 bit version so that 32 bit plugins will work.)
Set "gpgcheck=0" to avoid the signature check.
For the option "gpgcheck=1" to work, use the "rpm --import GPG-KEY commands as detailed the RPM tutorial.-
[root@server2 ~]# rpm --import /usr/share/rhn/RPM-GPG-KEY
[root@server2 ~]# rpm --import /usr/share/rhn/RPM-GPG-KEY-fedora
-
File: /etc/yum.repos.d/CentOS-Base.repo (CentOS 5)
-
[base]
name=CentOS-$releasever - Base
mirrorlist=http://mirrorlist.centos.org/?release=$releasever&arch=$basearch&repo=os
#baseurl=http://mirror.centos.org/centos/$releasever/os/$basearch/
gpgcheck=1
gpgkey=file:///etc/pki/rpm-gpg/RPM-GPG-KEY-CentOS-5

#released updates
[updates]
name=CentOS-$releasever - Updates
mirrorlist=http://mirrorlist.centos.org/?release=$releasever&arch=$basearch&repo=updates
#baseurl=http://mirror.centos.org/centos/$releasever/updates/$basearch/
gpgcheck=1
gpgkey=file:///etc/pki/rpm-gpg/RPM-GPG-KEY-CentOS-5

...
...
Mirror site/sites which contain base configuration RPM's are listed.
Other protocols such as ftp can be used as well as http.
Terms:
- releasever: Release Version - current version of Fedora.
- basearch: Base Architecture - system hardware architecture i.e. i386
Add other repositories: (not included in default install)
- EPEL: Extra Packages for Enterprise Linux
Create file: /etc/yum.repos.d/epel.repo[epel] name=Extra Packages for Enterprise Linux 5 - $basearch #baseurl=http://download.fedoraproject.org/pub/epel/5/$basearch mirrorlist=http://mirrors.fedoraproject.org/mirrorlist?repo=epel-5&arch=$basearch failovermethod=priority enabled=1 gpgcheck=1 gpgkey=file:///etc/pki/rpm-gpg/RPM-GPG-KEY-EPEL [epel-debuginfo] name=Extra Packages for Enterprise Linux 5 - $basearch - Debug #baseurl=http://download.fedoraproject.org/pub/epel/5/$basearch/debug mirrorlist=http://mirrors.fedoraproject.org/mirrorlist?repo=epel-debug-5&arch=$basearch failovermethod=priority enabled=0 gpgkey=file:///etc/pki/rpm-gpg/RPM-GPG-KEY-EPEL gpgcheck=1 [epel-source] name=Extra Packages for Enterprise Linux 5 - $basearch - Source #baseurl=http://download.fedoraproject.org/pub/epel/5/SRPMS mirrorlist=http://mirrors.fedoraproject.org/mirrorlist?repo=epel-source-5&arch=$basearch failovermethod=priority enabled=0 gpgkey=file:///etc/pki/rpm-gpg/RPM-GPG-KEY-EPEL gpgcheck=1
Adding FreshRPM GPG signature key:- [root@server2 ~]# rpm --import http://download.fedora.redhat.com/pub/fedora/linux/extras/RPM-GPG-KEY-Fedora-Extras
- Add FreshRPM repository site to your list for downloads of non-standard Fedora software.
(Software not released by Red Hat like DVD players, audio encoders/rippers, etc)
Create file: /etc/yum.repos.d/freshrpms.repo[freshrpms] name=Fedora Linux $releasever - $basearch - freshrpms baseurl=http://ayo.freshrpms.net/fedora/linux/$releasever/$basearch/freshrpms enabled=0 gpgcheck=1
To directly enable a particular repository which is currently disabled (enabled=0): yum -y --enablerepo=freshrpms install kinoAdding FreshRPM GPG signature key:
- [root@server2 ~]# rpm --import http://freshrpms.net/packages/builds/yum/RPM-GPG-KEY.freshrpms
- Add: RpmForge.org (add by installing RPM with RpmForge configuration: rpmforge-release-xxxx.rpm)
Installs file: /etc/yum.repos.d/rpmforge.repo[rpmforge] name = RHEL $releasever - RPMforge.net - dag baseurl = http://apt.sw.be/redhat/el6/en/$basearch/rpmforge mirrorlist = http://apt.sw.be/redhat/el6/en/mirrors-rpmforge enabled = 1 protect = 0 gpgkey = file:///etc/pki/rpm-gpg/RPM-GPG-KEY-rpmforge-dag gpgcheck = 1
Required keys and support files are included in the RPM.
Adding GPG signature key:- [root@server2 ~]# rpm --import http://apt.sw.be/RPM-GPG-KEY.dag.txt
- Add: Macromedia.mplug.org
Create file: /etc/yum.repos.d/flash.repo[flash] name=Macromedia Flash plugin baseurl=http://macromedia.mplug.org/apt/fedora/$releasever http://sluglug.ucsc.edu/macromedia/apt/fedora/$releasever http://ruslug.rutgers.edu/macromedia/apt/fedora/$releasever http://macromedia.rediris.es/apt/fedora/$releasever enabled=0 #gpgcheck=1To directly enable a particular repository which is currently disabled (enabled=0): yum -y --enablerepo=flash install flash-plugin - Fedora examples (more repositories: Jpackage, ...)
Registering Red Hat Enterprise Linux to enable YUM repository use:
Commands:- rhn_register: GUI to enter user account and "Installation Number". Must purchase a license to get this.
- rhnreg_ks: Register a login/user account
Using YUM and YUM examples:
- Update:
- List packages which will be updated: yum check-update
(Does not perform an update) - Update all packages on your system: yum update
- Update a package: yum update package-name
- Update all with same prefix: yum update package-name-prefix\*
This command will update your system. It will interactively ask permission. i.e. "Is this ok [y/N]:" - To avoid the prompt/questions use the command: yum -y update
Sample session:
# yum -y update
Setting up Update Process
Setting up Repos
base                      100% |=========================| 1.1 kB    00:00
updates-released          100% |=========================|  951 B    00:00
Reading repository metadata in from local files
base      : ################################################## 2852/2852
primary.xml.gz            100% |=========================| 367 kB    00:02
MD Read   : ################################################## 927/927
updates-re: ################################################## 927/927
Excluding Packages in global exclude list
Finished
Resolving Dependencies
--> Populating transaction set with selected packages. Please wait.
---> Downloading header for mod_dav_svn to pack into transaction set.
mod_dav_svn-1.1.4-1.1.x86 100% |=========================| 8.9 kB    00:00
---> Package mod_dav_svn.x86_64 0:1.1.4-1.1 set to be updated
---> Downloading header for initscripts to pack into transaction set.
initscripts-7.93.7-1.x86_ 100% |=========================|  87 kB    00:00
---> Package initscripts.x86_64 0:7.93.7-1 set to be updated
---> Downloading header for gtk2 to pack into transaction set.
...
...

--> Running transaction check

Dependencies Resolved
Transaction Listing:
  Install: aqhbci.x86_64 0:1.0.2beta-0.fc3 - updates-released
  Install: aqhbci-devel.x86_64 0:1.0.2beta-0.fc3 - updates-released
  Install: kernel.x86_64 0:2.6.11-1.14_FC3 - updates-released
...
...

Performing the following to resolve dependencies:
  Install: aqbanking-devel.x86_64 0:1.0.4beta-0.fc3 - updates-released
  Install: gwenhywfar-devel.x86_64 0:1.7.2-0.fc3 - updates-released
Total download size: 431 M
Downloading Packages:
(1/168): mod_dav_svn-1.1. 100% |=========================|  54 kB    00:00
(2/168): initscripts-7.93 100% |=========================| 1.1 MB    00:03
...
...

Running Transaction Test
Finished Transaction Test
Transaction Test Succeeded
Running Transaction
Updating: libgcc 100 % done 1/333
Updating: libgcc 100 % done 2/333
...
...
Completing update for mod_dav_svn  - 169/333
Completing update for initscripts  - 170/333
Completing update for gtk2  - 171/333
...
...
Installed: aqhbci.x86_64 0:1.0.2beta-0.fc3 aqhbci-devel.x86_64 0:1.0.2beta-0.fc3 kernel.x86_64 0:2.6.11...
Dependency Installed: aqbanking-devel.x86_64 0:1.0.4beta-0.fc3 gwenhywfar-devel.x86_64 0:1.7.2-0.fc3
Updated: ImageMagick.i386 0:6.2.0.7-2.fc3 ImageMagick.x86_64 0:6.2.0.7-2.fc3 ImageMagick-c++.i386 ...
...
...
Obsoleted: openhbci.x86_64 0:0.9.17-1 openhbci.i386 0:0.9.17-1 openhbci-devel.x86_64 0:0.9.17-1
Complete!
#
[Potential Pitfall]: Many times I have found that I can get the following errors:
Setting up Update Process
I find that the error is traced to having two version of a package installed at once. The following command will reveal if this is true: rpm -q package-name. If there are two versions of the same package installed, I find that removing the newer version and re-running YUM to install an upgrade gets past these errors.
Setting up repositories
Reading repository metadata in from local files
Could not find update match for package-name ... ... --> Finished Dependency Resolution Error: Missing Dependency: package-name
- List packages which will be updated: yum check-update
- To install a single package: yum -y install package-name
This will also resolve package dependencies. - Remove a package: yum remove package-name
- Info:
- List available packages, version and state (base, installed, updates-released): yum list
- List the packages installed which are not available in repository listed in config file: yum list extras
- List packages which are obsoleted by packages in yum repository: yum list obsoletes
- Clean local cache of headers and RPM's: yum clean all
(See: /var/cache/yum/)
Yum Commands:
-
See yum man page for a full listing of commands and command arguments.YUM Command Description yum -y install package-name Install package. yum -y install package-name.arch Install package of specified architecture. This is common when installing Firefox "i386" on a "x86_64" platform.
i.e.: yum -y install firefox.i386yum check-update Show which packages are available to be updated. yum -y update package-name
yum -y update
yum -y --exclude=package-name updateUpdate package.
Update all packages on system for which updates are available.
Update all packages which have available updates excluding the specified package.yum remove package-name
yum remove package-name-1 package-name
yum remove package-name-2Remove package.
Remove packages.yum clean headers
yum clean cache
yum clean allRemove RPM header files.
Remove files from YUM cache: /var/cache/yum/
Clean up all YUM files left over from previous installations.yum list package-name
yum list regexList information about available packages from configured YUM repository. Will also list those which contain the specified regular expression search pattern. yum list installed [regex-optional] List installed packages. Same as rpm -qa yum list available [regex-optional] List all available packages. yum search partial-package-name List all packages which match the string specied in the package name or description. yum grouplist
yum groupinstall group-name
yum groupremove group-name
yum groupupdate group-nameList available package groups.
Install default packages in specified group.
Remove packages in group.
Update packages in group.rhn_register Register to a Red Hat Network hosted server. Typically useful for licensed Red Hat Enterprise Linux.
Notes:
- yum man page
- yum.conf man page
- You can set up your own YUM server for your own cluster or intranet. Set up a web server with the same paths as used in the configuration files and point your configuration files to your server. See YoLinux web server tutorial for configuration information.
- Fedora configures YUM as a daily cron job: /etc/cron.daily/yum.cron
#!/bin/sh

if [ -f /var/lock/subsys/yum ]; then
        /usr/bin/yum -R 10 -e 0 -d 0 -y update yum
        /usr/bin/yum -R 120 -e 0 -d 0 -y update
fi
Links:
- YUM Homepage
- YUM Guides - YUM download, install and YUM server configuration.
Groups go beyond packages and dependancies. It is a collective group of supporting (not dependent) packages and tools.
List Yum groups available for installation:# yum grouplist Installed Groups: Administration Tools Authoring and Publishing Cluster Storage Clustering DNS Name Server Development Tools ... ... ... Available Groups: Beagle Development Libraries Eclipse Educational Software Electronic Lab Fedora Packager FreeNX and NX ... ... ...
Install a group (eg Web Server): yum groupinstall "Web Server"
Remove: yum groupremove "Web Server"
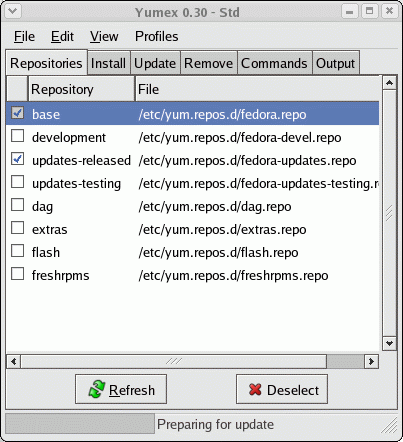
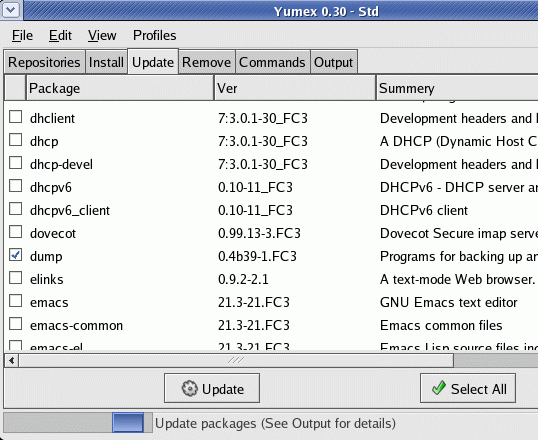
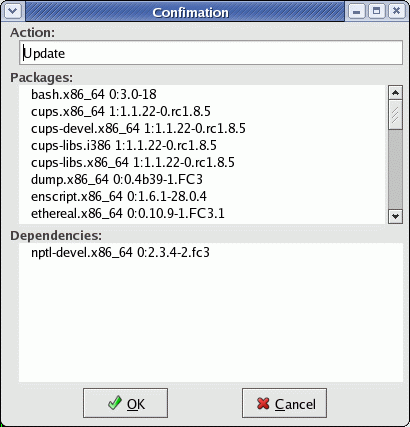
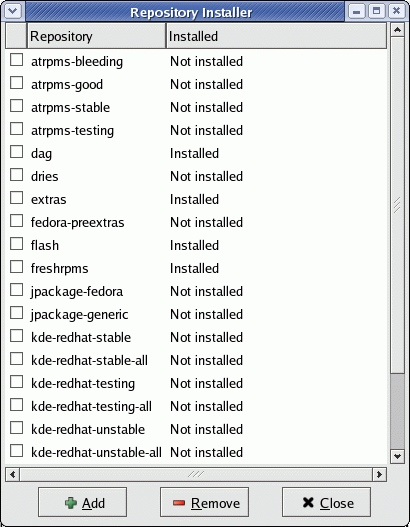
YumEx: (Yum Extender) GUI interface to YUM commands and configuration
YumEx will allow you to manage the RPM packages on your system. It allows the administrator to install/update packages from internet repositories as well as un-install RPMs from the system.
The command rdist helps the system administrator install software or update files across many machines. The process is launched from one computer.
Command: rdist -f instruction-file
Instruction file:
-
files=(
/fully-qualified-path-and-file-name
/next-fully-qualified-path-and-file-name
)
dest = ( computer-node-name )

${files} -> ${dest}

install /fully-qualified-directory-name-of-destination;
For more info see the rdist man page and rdistd man page (section 8: "man 8 rdistd").
Also see the rsync man page to migrate file changes.
The command rsync helps the system administrator synchronize files on two separate computers. This is ideal for web site maintenance.
Rsync Examples:
- match up and update a backup directory on the same system (eg a USB stick):
rsync -av ~/Documents /media/KINGSTON - match up and update a backup directory on a different system:
rsync -avr --rsh=/usr/bin/ssh ~/Documents userx@remote-server:/mnt/drive2 - using a file list to identify files:
rsync -e ssh -p 777 --delete --include-from=files-to-sync.txt -avzu ./ www.your-domain.com:Test with flags -navzu
File: files-to-sync.txt
-
+index.html
-README
+webpage-1.html
+webpage-2.html
+webpage-3.html
-
Links:
- YoLinux Rsync Examples and Tutorial - extensive tutorial on how to Copy, Mirror, Synchronize, Backup and Restore files
- rsync Home Page
- Rsync Documentation
- For more info see the rsync man page
    /var/log/messages   - system messages
            /secure     - Logging by PAM of network access attempts
            /dmesg      - Log of system boot. Also see command dmesg
            /boot.log   - Log of system init process
            /xferlog.1  - File transfer log
            /lastlog    - Requires the use of the lastlog command to examine contents
            /maillog    - log from sendmail daemon
Note: The lastlog command
prints time stamp of the last login of system users. (Interprets file: /var/log/lastlog)
Also see last command.
Many system and server application programs such as Apache, generate log files. If left unchecked they would grow large enough to burden the system and application. The logrotate program will periodically backup the log file by renaming it. The program will also allow the system administrator to set the limit for the number of logs or their size. There is also the option to compress the backed up files.
Configuration file: /etc/logrotate.conf
Directory for logrotate configuration scripts: /etc/logrotate.d/
Example logrotate configuration script: /etc/logrotate.d/process-name
-
/var/log/process-name.log {
    rotate 12
    monthly
    errors root@localhost
    missingok
    postrotate
        /usr/bin/killall -HUP process-name 2> /dev/null || true
    endscript
}
Form of command: find path operators
Examples:
- Search and list all files from current directory and down for the string ABC:
find ./ -name "*" -exec grep -H ABC {} \;
find ./ -type f -print | xargs grep -H "ABC" /dev/null
egrep -r ABC * - Find all files of a given type from current directory on down:
find ./ -name "*.conf" -print - Find all user files larger than 5Mb:
find /home -size +5000000c -print - Find all files owned by a user (defined by user id number. see /etc/passwd) on the system: (could take a very long time)
find / -user 501 -print - Find all files created or updated in the last five minutes: (Great for finding effects of make install)
find / -cmin -5 - Find all users in group 20 and change them to group 102: (execute as root)
find / -group 20 -exec chown :102 {} \; - Find all suid and setgid executables:
find / \( -perm -4000 -o -perm -2000 \) -type f -exec ls -ldb {} \;
find / -type f -perm +6000 -lsNote: suid executable binaries are programs which switch to root privileges to perform their tasks. These are created by applying a "sticky" bit: chmod +s. These programs should be watched as they are often the first point of entry for hackers. Thus it is prudent to run this command and remove the "sticky" bits from executables which either won't be used or are not required by users. chmod -s filename
- Find all world writable directories:
find / -perm -0002 -type d -print - Find all world writable files:
find / -perm -0002 -type f -print
find / -perm -2 ! -type l -ls - Find files with no user:
find / -nouser -o -nogroup -print - Find files modified in the last two days:
find / -mtime 2 -o -ctime 2 - Compare two drives to see if all files are identical:
find / -path /proc -prune -o -path /new-disk -prune -o -xtype f -exec cmp {} /new-disk{} \;
Partial list of find directives:
-
Directive Description -name Find files whose name matches given pattern -print Display path of matching files -user Searches for files belonging to a specific user -exec command {} \; Execute Unix/Linux command for each matching file. -atime (+t,-t,t) Find files accessed more that +t days ago, less than -t or precisely t days ago. -ctime (+t,-t,t) Find files changed ... -perm Find files set with specified permissions. -type Locate files of a specified type: - c: character device files
- b: blocked device
- d: directories
- p: pipes
- l: symbolic links
- s: sockets
- f: regular files
-size n Find file size is larger than "n" 512-byte blocks (default) or specify a different measurement by using the specified letter following "n": - nb: bytes
- nc: bytes
- nk: kilobytes
- nw: 2-byte words
Also see:
- gnome-Find - GUI front-end to the GNU find utility
| locate/slocate | Find location/list of files which contain a given partial name |
| which | Find executable file location of command given. Command must be in path. |
| whereis | Find executable file location of command given and related files |
| rpm -qf file | Display name of RPM package from which the file was installed. |
| dpkg -S file | Display name of Debian package from which the file was installed. |
Note: The script /etc/cron.daily/updatedb.cron generates the index for the locate command. It will generate the database /var/lib/locatedb
| ls | List directory contents. List file information |
| chmod | Change file access permissions
chmod ugo+rwx file-name :Change file security so that the user, group and all others have read, write and execute privileges. chmod go-wx file-name :Remove file access so that the group and all others have write and execute privileges revoked/removed. |
| chown | Change file owner and group
chown root.root file-name :Make file owned by root. Group assignment is also root. |
| fuser | Identify processes using files or sockets
If you ever get the message: error: cannot get exclusive lock then you may need to kill a process that has the file locked. Either terminate the process through the application interface or using the fuser command: fuser -k file-name |
| file | Identify file type. file file-name Uses /usr/share/magic, /usr/share/magic.mime for file signatures to identify file type. The file extension is NOT used. |
Add shell script to have run hourly, daily, weekly or monthly into the appropriate directory:
- /etc/cron.hourly/
- /etc/cron.daily/
- /etc/cron.weekly/
- /etc/cron.monthly/
These are preconfigured schedules. To assign a very specific schedule add a line to the /etc/crontab file. Cron entries may also be added to a crontab formatted file located in the directory /var/spool/cron/.
Online, web based crontab entry generator.
Red Hat/CentOS/Fedora SeLinux security contexts for cron:
- Specify each context separately: chcon -u system_u -r object_r -t bin_t /etc/cron.weekly/crontask
- Specify context all at once: chcon system_u:object_r:bin_t /etc/cron.weekly/crontask
[Potential Pitfall]: Try this method if you get the following error:
chcon: can't apply partial context to unlabeled file /etc/cron.weekly/crontask
Scheduling access and control:
- The administrator can allow users to use this facility with specific control by using the /etc/cron.deny and /etc/cron.allow files.
- The at facility may be controlled with the /etc/at.deny and /etc/at.allow files.
Man pages:
- cron - daemon to execute scheduled commands
- crontab - command to maintain crontab files for individual users
- /etc/crontab - file of tables for driving cron
The at command will schedule single jobs. (cron is for re-occurring jobs) The daemon /usr/sbin/atd will run jobs scheduled with the at command. Access control to the command is controlled using the files /etc/at.allow (list of user id's permitted to use the at command) and /etc/at.deny.
Time is specified before the date:
- at HH:MM month-name day with an optional year
- at midnight MMDDYY
- at HH PM today
- at noon DD.MM.YY
- at 14:30 19.03.06
- at noon tomorrow
The at command will respond with it's "at>" prompt upon which you enter the command you wish to execute followed by "Enter". More commands may be entered. When done enter "control-d".
Input at commands from a file: at midnight today < job-list-file
List jobs with the command atq
[prompt]$ atqThe first column lists the job number.
1 2002-03-07 12:00 a user-id
Delete job with the command atrm
[prompt]$ atrm 1
Man pages:
- at - schedule job at a specified time
- atq - lists the user's pending jobs or all if root
- atrm - deletes jobs, identified by their job number
- batch - executes commands when system load levels permit (based on a specified system load)
- at.allow/at.deny - determine who can submit jobs via at or batch
- atrun - for backward compatibility. Functionality built into at
- after - Execute a command after a time delay
The BIOS computer clock stores hardware time while the OS keeps track of system time. The system time is initialized during boot by syncing OS time to the hardware time. It is common for web servers to set their clocks to GMT0 time as their audience is worldwide and GMT is the only true standard time. Your local office server would most likely be set to local time.
Read time:- Read system time (Linux OS time):
- Read hardware clock (BIOS clock):
- /sbin/hwclock
(Same as /sbin/hwclock --show) - /sbin/hwclock --utc
- /sbin/hwclock
Set time: (two methods)
- Note than when setting server time to GMT, set your local environment first to GMT: export TZ=GMT0
(link to current GMT)
- Set hardware clock and sync system (OS) time to match: (hctosys)
- Set hardware clock: /sbin/hwclock --utc --set --date="07/14/2015 23:16:30"
(Set either --utc or --localtime)
Then match system clock: hwclock --hctosys --utc
(Set the System Time from the Hardware Clock.)
- Set hardware clock: /sbin/hwclock --utc --set --date="07/14/2015 23:16:30"
- Set system (OS) clock and sync hardware time to match: (systohc)
- Set system time (Linux OS time):
- date -s 10:20
- date 073023162008.30
July 30, 2008 11:16 pm and 30 seconds - date MMDDhhmm.ss
(month, day, hour, minute, year and dot seconds - seconds optional)
(where hours are from 00 to 24)
- Set hardware clock to system clock in UTC: /sbin/hwclock --systohc --utc
(UTC preferred for Linux because it allows automatic accounting of daylight savings time. Microsoft OS's use local time. UTC will mess up the time setting on a dual boot system which hosts a Microsoft OS) - Set hardware clock in localtime to current system clock: /sbin/hwclock --systohc
(Same as: /sbin/hwclock --systohc --localtime)
- Set system time (Linux OS time):
View settings in /etc/adjtime
Configure time settings: Time, Time zone, NTP
- Red Hat Enterprise/ Fedora GUI configuration: /usr/bin/system-config-time
- Time zone: tzselect
- Ubuntu:
- Time zone: tzconfig
Set System Time: (using NTP - Network Time Protocol)
- Query/Print the time returned by the remote host:
- Fedora Core (RPM: ntp-4.2.0): /usr/sbin/ntpdate -q hostname
- Up to Red Hat 9.0 (RPM: ntp-4.1.2): rdate -p hostname
- Set the system time to the returned time: (Must be root. Only root can change system clock.)
- Fedora Core (RPM: ntp-4.2.0): /usr/sbin/ntpdate hostname
- Up to Red Hat 9.0 (RPM: ntp-4.1.2): rdate -s hostname
Try: /usr/sbin/ntpdate -q time.ucla.edu
See List of public NTP Time Servers or http://www.pool.ntp.org.
Note: Typically many web servers set their time to GMT due to the world wide nature of their service. Internally UNIX systems use Coordinated Universal Time (UTC) which is the number of seconds since Jan 1, 1970 0 hrs. "Calendar Time" is then calculated based on your time zone and whether you are on Standard or Daylight Savings time (Second Sunday of March to First Sunday of November - beginning March 2007).
Sync System Time:
- The timed (time server daemon) allows one to synchronizes the host's time with the time of another host. This is a master - slave configuration. See the timed and timedc man pages.
Shell environment variables:
- TZ: Time Zone
- i.e.: export TZ=PST8PDT
- Zone format: [time standard] [offset] [dst]
- See directory: /usr/share/zoneinfo/
- File: /usr/share/zoneinfo/PST8PDT not viewable.
- See file: /usr/share/zoneinfo/zone.tab
- See tzselect, tzset, tzfile, zic (time zone compiler) man pages.
- Print time zone info with zdump: zdump HKT-8
- TIMEFORMAT:
For more info see the man page for your shell. (i.e. man bash)
-
TZ Variable GMT Offset Description GMT0 0 Greewich Mean Time UTC0 0 Universal Coordinated Time FST2FDT 2 Fernando De Noronha Std GST3 3 Greenland Standard Time BST3 3 Brazil Standard Time EST3EDT 3 Eastern Brazil Standard Time NST3:30NDT 3.5 Newfoundland Standard Time/Newfoundland Daylight Time AST4ADT 4 Atlantic Standard Time/ Atlantic Daylight Time EST5EDT 5 USA Eastern Standard Time/ Eastern Daylight Time EST6CDT 5 USA Eastern Standard Time/ Central Daylight Time CST6CDT 6 USA Central Standard Time/ Central Daylight Time MST7 7 USA Mountain Standard Time MST7MDT 7 USA Mountain Standard Time/ Mountain Daylight Time PST8PDT 8 USA Pacific Standard Time/Pacific Daylight Time, 8 hrs from GMT AKS9AKD 9 USA Alaska Standard Time/Alaska Daylight Time YST9YDT 9 Yukon Standard Time/Yukon Daylight Time HST10 10 USA Hawaiian Standard Time/ Hawaiian Daylight Time NZST-12NZDT -12 New Zealand Standard Time/ New Zealand Daylight Time EST-10 -10 Australian Eastern Standard Time EST-10EDT -10 Australian Eastern Standard Time/Australian Eastern Daylight Time CST-9:30 -9.5 Australian Central Standard Time CST-9:30CDT -9.5 Australian Central Standard Time/Australian Central Daylight Time JST-9 -9 Japan Standard Time KST-9KDT -9 Korean Standard Time WST-8:00
WAS-8WAD-8 Australian Western Standard Time CCT-8 -8 China Coast Time HKT-8 -8 Hong Kong Time JST-7:30 -7.5 Java Standard Time NST-7 -7 North Sumatra Time IST-5:30 -5.5 Indian Standard Time IST-3:30IDT -3.5 Iran Standard Time MSK-3MSD -3 Moscow Time SAST-2SADT -2 South Africa Standard Time/South Africa Daylight Time EET-2EEST -2 Eastern European Time/Eastern European Time Daylight Savings Time MET-2METDST -2 Middle European Time/Middle European Time Daylight Savings Time CET-1CEST -1 Central European Time/Central European Time Daylight Savings Time WAT-1 -1 West Africa Time WET0WETDST 0 Western European Time/Western European Time Daylight Savings Time See /usr/share/zoneinfo/.
Network Time Protocol (NTP): (configuration)
-
The daemon ntpd will continually monitor time and synchronize your system clock
with that of a known accurate time system (atomic clock).
Corrections are implemented in small steps to correct the clock over time.
Errors of over 1000 seconds causes ntpd to abort correction.
The init script /etc/rc.d/init.d/ntpd issues the command /usr/sbin/ntpdate to set the time.
You may also issue the command: /usr/sbin/ntpdate -b -s time.nist.gov ns.arc.nasa.gov tick.usno.navy.mil
This will hang without an internet connection!!!
Time servers:
- time.nist.gov
- ns.arc.nasa.gov
- tick.usno.navy.mil
Configuring NTP:
The system may be configured as:
- a pure NTP client.
- a pure NTP server
- an NTP client which then acts as an NTP server for a domain
Client Configuration:
- List accurate clocks to use in file: /etc/ntp.conf
-
server time1.ntpServer.gov
server time2.ntpServer.gov
restrict time1.ntpServer.gov mask 255.255.255.255 nomodify notrap noquery
restrict time2.ntpServer.gov mask 255.255.255.255 nomodify notrap noquery
restrict 127.0.0.1
This will synchronize your system clock with the times servers listed.
Note that using IP addresses instead of fully qualified domain names will provide a faster response.
restrict options:option Description mask Limits the remote NTP server to a single IP address (255.255.255.255), default mask 0.0.0.0. nomodify Run time configuration can not be modified by remote NTP server notrap Do not log remote messages. noquery Do not allow remote ntpq or ntpdc querries notrust Deny cryptographically un-authenticated NTP querries.
-
- Syncronize time with NTP server: ntpdate -u time1.ntpServer.gov
- Start NTP daemon: service ntpd start
(or: /etc/init.d/ntpd start) - Configure NTP daemon to start during boot: chkconfig ntpd on
- Check time: date
Note:
- NTP uses UDP on port 123 for inbound and outbound communication.
- Check /var/log/messages for errors.
- PHP has an independent setting in /etc/php.ini
-
[Date]
; Defines the default timezone used by the date functions
;date.timezone = GMT-0
date.timezone = Europe/London
-
- MySQL has an independent setting in /etc/my.cnf
-
[mysqld_safe]
timezone = Europe/London
Where the time zone is one from the list in /usr/share/zoneinfo/zone.tab
Or in SQL: SET SESSION timezone=GMT -
- Red Hat Enterprise/Fedora GUI configuration:
-
Command: /usr/bin/system-config-time
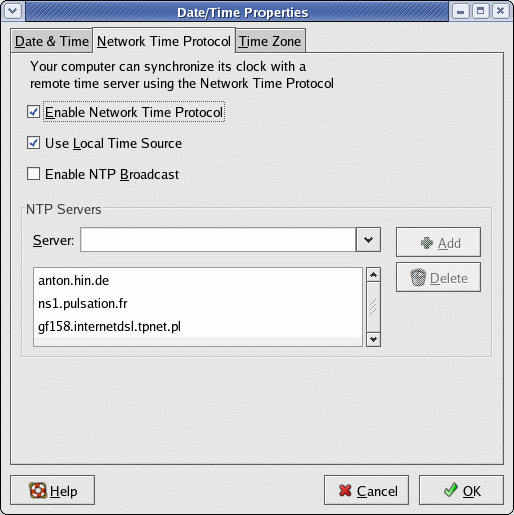
-
Command: /usr/bin/system-config-time
- SuSE GUI configuration:
- [root]# yast2 ntp-client
- sntp - Network Time Protocol (NTP) daemon
- ntpd - Network Time Protocol (NTP) daemon
- ntp.conf - Server Options
- ntp_acc - Access Control Options
- ntp_auth - Authentication Options
- ntp_clock - Reference Clock Options
- ntp_decode - ntpd Event Messages and Status Words
- ntp_misc - Miscellaneous Options
- ntp_mon - Monitoring Options
- ntp-keygen - generate public and private keys
- ntpdate - Set the date and time via NTP
- ntpq - Standard NTP query program
- ntpdc - Special NTP query program
- ntpstat - Show network time synchronization status
- ntptime - Read kernel time variables
- ntprace - Trace a chain of NTP servers back to the primary source (RPM package ntp-perl)
- ntp-wait - waits until ntpd is in synchronized state (RPM package ntp-perl)
Links:
- NTP.org: Network Time Protocol (NTP)
- See documentation /usr/share/doc/ntp-*/ntpd.html
- Time codes
- IRIG - Inter-Range Instrumentation Group (GPS satellite based time. Very accurate.)
- IRIG PCI cards (Linux drivers)
- Internet time code RFCs:
When you login, this message may greet you. The system will often send a mail message to the "root" user after the completion of some cron jobs, software installation or as an error message meant to alert the system administrator. Type the console command "mail". The following simple commands will help you navigate through this simple mail client.
-
Mail command Description ? List commands (Help) h Print mail headers h 1 Print mail headers starting with message number 1 q Quit and delete mail which has been viewed (typed) x Quit but save mail viewed. t Type (view) current message t 4 Type out message 4 to the console n Type out next message d Delete the active message d 4 Delete message number 4 d 1-4 Delete messages number 1 to 4
The "mail" command is included with the package "mailx". This is included with the default Fedora and Red Hat installations. Ubuntu users must include the "universe" repository to get access to the package "mailx".
- tty: Print the file name of the terminal connected to standard input
[prompt]$ tty
/dev/pts/4 - stty: Text Terminal configuration commands.
[prompt]$ stty -all - Human-readable form speed 38400 baud; rows 24; columns 80; line = 0; intr = ^C; quit = ^\; erase = ^?; kill = ^U; eof = ^D; eol = M-^?; eol2 = M-^?; start = ^Q; stop = ^S; susp = ^Z; rprnt = ^R; werase = ^W; lnext = ^V; flush = ^O; min = 1; time = 0; -parenb -parodd cs8 hupcl -cstopb cread -clocal -crtscts -ignbrk brkint -ignpar -parmrk -inpck -istrip -inlcr -igncr icrnl ixon -ixoff -iuclc ixany imaxbel opost -olcuc -ocrnl onlcr -onocr -onlret -ofill -ofdel nl0 cr0 tab0 bs0 vt0 ff0 isig icanon iexten echo echoe echok -echonl -noflsh -xcase -tostop -echoprt echoctl echoke [prompt]$ stty -g - stty-readable form
2d02:5:4bf:8a3b:3:1c:7f:15:4:0:1:ff:11:13:1a:ff:12:f:17:16:ff:0:0:0:0:0:0:0:0:0:0:0:0:0:0:0
[prompt]$ stty `echo 2d02:5:4bf:8a3b:3:1c:7f:15:4:0:1:ff:11:13:1a:ff:12:f:17:16:ff:0:0:0:0:0:0:0:0:0:0:0:0:0:0:0`
[prompt]$ stty columns 132
[prompt]$ stty erase '^?' - Here the "^" refers to the caracter shift-6 and not <ctrl> [prompt]$ stty sane
[prompt]$ stty -tabs - Expand tabs to spaces [prompt]$ stty --help | more - clear: Clear Text Terminal
- reset: Reset Text Terminal
Terminal control characters:
-
Description Control Character C format ASCII (decimal) Linefeed ctrl-j \n 10 Carriage Return ctrl-m \r 13 Escape Character ctrl-v
22 Stop screen scroll ctrl-s
19 Resume screen scroll ctrl-q
17 Backspace (and delete) one character ctrl-h \b 8 Backspace (and delete) one word ctrl-w
23 Delete line ctrl-u
21 End of file ctrl-d
ctrl-z (DOS/VAX)
4 Interrupt signal SIGINT ctrl-c
3 Suspend signal SIGSTOP ctrl-z
26 Quit signal SIGQUIT ctrl-\
28 Typically repaint screen.
(In bash reverse search of command history)
(Non POSIX)ctrl-r
18
Note:
- When typing a "ctrl-m" is just like hitting the "Enter" key. If you want to enter the "ctrl-m" as part of the entry to the stty command then prefix it with "ctrl-v" so that the "ctrl-m" "escaped" from acting as a terminal directive but instead acts as command input.
- Check terminal type: echo $TERM
- Set terminal type: export TERM=xterm
This is a very common fix for many remote terminal problems.
Gnome Terminal:
Terminal configuration to handle the annoying backspace problems associated with telnet-ing to a different system. For example, how to configure the Linux gnome-terminal for use with an SGI/IRIX system:
- Start /usr/bin/gnome-terminal
- Select: "File" + "New Profile..."
- Enter profile name: SGI
Base on: Default
Select: "Create" - Select: "Edit" + "Profiles..."
Select profile: "SGI" and select "Edit" button. - Select the tab: "Compatibility"
Backspace key generates: change from "ASCII DEL" to "Control-H"
Select: "Close" - Select: "Terminal" + "Profile" + "SGI"
Man Pages:
- termios - get and set terminal attributes
- ascii - the ASCII character set
- setserial - get/set Linux serial port information
- term - format of compiled term file
- terminfo - terminal capability data base
- tic - the terminfo entry-description compiler
- xterm - terminal emulator for X
- ncurses - CRT screen handling and optimization package
Text Terminal Programs:
- GNU Screen - multiplex terminal between processes.
- MultiGnomeTerminal
- KDE: Konsole
- xterm
- PuTTY
Directory Listings and Terminal Colors for "ls": If you alter your terminal background color, you will quickly find that the display from the command "ls" may obscure some of the results. There are three options for setting the colors applied to the results of the "ls" command:
- The color scheme can be ignored and all output displayed in the foreground color.
Set an alias in your $HOME/.bashrc file: alias ls='ls -F'
The output will use symbols instead of colors to identify the types:- A closing "/" will denote a directory.
- A "@" denotes a symbolic link.
- An "*" denotes execute permissions.
- Use the command dircolors to list the system default. Change and assign new colors using the environment variable "LS_COLORS". This can be set in your $HOME/.bashrc file.
LS_COLORS='no=00:fi=00:di=01;34:ln=01;36:pi=40;33:so=01;35:do=01;35: bd=40;33;01:cd=40;33;01:or=40;31;01:ex=01;32:*.tar=01;31: *.tgz=01;31:*.arj=01;31:*.taz=01;31:*.lzh=01;31:*.zip=01;31: *.z=01;31:*.Z=01;31:*.gz=01;31:*.bz2=01;31:*.deb=01;31: *.rpm=01;31:*.jar=01;31:*.jpg=01;35:*.jpeg=01;35:*.gif=01;35: *.bmp=01;35:*.pbm=01;35:*.pgm=01;35:*.ppm=01;35:*.tga=01;35: *.xbm=01;35:*.xpm=01;35:*.tif=01;35:*.tiff=01;35:*.png=01;35: *.mov=01;35:*.mpg=01;35:*.mpeg=01;35:*.avi=01;35:*.fli=01;35: *.gl=01;35:*.dl=01;35:*.xcf=01;35:*.xwd=01;35:*.ogg=01;35:*.mp3=01;35:*.wav=01;35:';
export LS_COLORS
System defaults shown. - Specify colors used in the system configuration file: /etc/DIR_COLORS or in your local file $HOME/.dir_colors
| /usr/bin/lsdev | List devices and info on system hardware. Also IRQ's.(RPM package procinfo) Also cat /proc/devices |
| /sbin/lspci | list all PCI devices (result of probe) Also lspci -vvx and cat /proc/pci |
| cat /proc/interrupts | List IRQ's used by system and the device using the interrupt. |
| cat /proc/ioports | List I/O ports used by system. |
| cat /proc/dma | List DMA channels and device used by system. |
| cat /proc/cpuinfo | List info about CPU. |
Also See:
- Kernel 2.4: (Red Hat 7.1+)
- file:/usr/src/linux-2.4/Documentation/devices.txt - (local file)
- Kernel 2.2: (Red Hat 7.0-)
- See Linux devices: file:/usr/src/linux/Documentation/devices.txt (local file) - H. Peter Anvin
- Local file Kernel 2.2:file:/usr/src/linux/Documentation/proc.txt (local file)
At some point you will be required to administer the installation of PERL
modules.
Installation can be done:
- Manually:
- Un-zip/Un-tar module: tar xzf yourmodule.tar.gz
- Build with PERL makefile:
- perl Makefile.PL
- make
- Install: make install
- Automatically: (preferred)
# perl -MCPAN -e shell - First time through it will ask questions.
This method rocks! It connects to a CPAN server and ftp's a gzipped tarball and installs it. First time through it will ask a bunch of questions. (Answer "no" to the first question for autoconfigure.) Defaults were good for me. The only reason to manually configure this is if you are using a proxy. It then asks for your location (i.e. North America) and country. I entered a number for the first CPAN server but after that the actual URL was cut and pasted in whole.
.... Answer "no" to the first question for autoconfigure. ... .. cpan> install URI ... .. cpan> i /PerlMagick/ - Inquire about module. (Search by keyword) Distribution J/JC/JCRISTY/PerlMagick-5.36.tar.gz Module Image::Magick (J/JC/JCRISTY/PerlMagick-5.36.tar.gz) cpan> install Image::Magick ... cpan> install Image::Info ... cpan> install IO::String IO::String is up to date. cpan> helpIf it fails, you must load the appropriate RPMs and retry using "force install module-name"
PERL update: perl -MCPAN -e 'install Perl'
- Testing for a working Perl module: (Apache::AuthenNIS)
-
File: testAuthenNIS.pl
#!/usr/bin/perl
Test: [root]# ./testAuthenNIS.pl
BEGIN{push @INC, "/usr/lib/perl5/site_perl/5.8.5/Apache";}
eval "use Apache::AuthenNIS"; $hasApacheAuth = $@ ? 0 : 1;
printf "Apache::AuthenNIS". ($hasApacheAuth ? "" : " not") . " installed";
printf "\n";
- Good: Apache::AuthenNIS installed
- Not good: Apache::AuthenNIS not installed
-
File: testAuthenNIS.pl
- Most PERL modules are now available as RPMs. See:
- RpmForge.org (Also available via YUM)
- Search RpmFind.net
Basic file compression utilities: (and file extensions)
- gzip (.gz): Also see
zcat,
gunzip,
gznew,
gzmore
compress: gzip file-name
compress a directory and contents: tar -c directory-name/ | gzip > archive.tar.gz
decompress: gzip -d file-name.gz - bzip2 (.bz2): Also see:
bunzip2,
bzcat,
bzip2recover
compress: bzip2 file-name
decompress: bunzip2 file-name.bz2 - compress (.Z): (Adaptive Lempel-Ziv compression) Also see:
uncompress,
zcat
compress: compress file-name
decompress: uncompress file-name.Z
(Provided by the RPM package ncompress) - pack (.z): Also see:
unpack
compress: pack file-name
decompress: unpack file-name.z - zip (.zip): Compress files or groups of files. (R.P.Byrne compression) Compatible with PC PKZIP files. Also see:
unzip
compress: zip file-name
compress a directory and contents: zip -r archive.zip directory-name/
decompress: unzip file-name.zip
Also see the GUI Gnome based program file-roller.
The file utility
is great for viewing the contents and extracting compressed tar, RPM
and Java "jar" files. It even can view and extract compressed files
within other compressed tar archives!! It can also create compressed
archive files as well. Great tool for inspecting an RPM package and
reading the package documentation before you decide to install the
package.
(Introduced in Red Hat 8.0)
Gnome file-roller home page
Basic file packing/archiving ultilities:
- shar (.shar): create shell archives which can be unpacked with /bin/sh
Can also mix in tar, uuencode, mixed uuencode, gzip, etc.
pack: shar *.h > includes.shar
unpack: unshar includes.shar or sh - ar (.a): create, modify or extract from archive library file.
pack: ar cvq libctest.a ctest1.o ctest2.o
unpack: ar x libctest.a
Typicall used by programmers to generate link libraries.
For more see the YoLinux Static, Shared Dynamic and Loadable Linux Libraries tutorial.
It should be noted that automated enterprise wide multi-system backups should use a system such as Amanda. (See Backup/Restore links on YoLinux home page) Simple backups can be performed using the tar command:
- tar -cvf /dev/st0 /home /opt
This will backup the files, directories and all it's subdirectories and files of the directories /home and /opt to the first SCSI tape device. (/dev/st0)
Restoring files from backup:
- tar -xvf /dev/st0
Script to perform weekly archive backups: /etc/cron.weekly/backup-weekly.sh
-
#!/bin/bash
tar -cz -f /mnt/BackupServer/user-id/backup-weekly-`date +%F`.tar.gz -C /home/user-id dir-to-back-up
Manual page for the tar command.
SELinux Tar:
"Security Enhanced" Linux archive backup, "star", will save and restore the SELinux attributes. Note that the "tar" command will not operate with the "star" archive.star -xattr -H=exustar -c -f archive-file.star /directory/path/to/backup/
For more on SELinux, see above section.
Notes:
- Backup using compression to put more on SCSI tape device: tar -z -cvf /dev/st0 /home /opt
- List contents of tape: tar -tf /dev/st0
- List contents of compressed backup tape: tar -tzf /dev/st0
- Backup directory to a floppy: tar -cvf /dev/fd0 /home/user1
When restored it requires root because the root of the backup is "/home".
For more on Linux floppy devices see the YoLinux tutorial: Using floppies with Linux. - Backup sub-directory to floppy using a relative path: tar -cvf /dev/fd0 src
First execute this command to go to the parent directory: cd /home/user1 - Backup sub-directory to floppy using a defined relative path: tar -cvf /dev/fd0 -C /home/user1 src
- Restore from floppy: tar -xvf /dev/fd0
- Backup directory to a compressed archive file:
tar -z -cvf /usr/local/Backups/backup-03212001.tar.gz -C /home/user2/src project-x
List contents: tar -tzf /usr/local/Backups/backup-03212001.tar.gz
Restore:
cd /home/user2/src
tar -xzf /usr/local/Backups/backup-03212001.tar.gz
Also see:
- Automated Snapshot-Style Backups with Linux and Rsync
- Manual page for the mt mag tape control command.
Example, rewind tape: mt -f /dev/st0 rewind - Manual page for the dd command.
Example, retrieve and convert data from tape: dd if=/dev/st0 bs=2 | tar -x -
(National Institute of Justice (NIJ) Special Report documenting results of testing dd for computer forensics) - Manual page for the dump command.
Example: /sbin/dump -0u -f /dev/st0 /home/user1
Level 0 (everything backed up, not incremental)
Option u: Update file /etc/dumpdates
(XFS file system users use xfsdump)
Note: this is also tied to the /etc/fstab file and dump flags (field 5) set for each file system. - Manual page for the restore command.
(XFS file system users use xfsrestore)
- Fix the error: "Failed to activate 'OAFID:GNOME_SettingsDaemon"
This annoying dialog box may appear after one logs in. Themes, sounds
or background may cease to operate properly. You may also get the error
message "The Settings Daemon restarted too many times."
To fix this condition run the script: /usr/bin/oaf-slay
This script will kill OAF processes on systems using OAF and bonobo.
- sysreport - This script generates an HTML report on your system configuration.
- Unix command line output is sent to the screen (default) but you would
also like the output to print to a file (bash shell):
command 2>&1 | tee output-file.txt - Red Hat Enterprise 4/Fedora Core (2+) GUI system configuration tool commands begin with "system-config-". Type this in a bash shell and press tab twice to view all the GUI configuration tool commands available.
- Process Monitoring HowTo - Alavoor Vasudevan
- SysAdmin Magazine - Journal for Unix System Administrators
- Shell Script Resources:
SysAdmin Tools:
Alternate configurations:
 Books:
 |
"Ubuntu Unleashed 2017 edition:"
Covering 16.10 and 17.04, 17.10 (12th Edition) by Matthew Helmke, Andrew Hudson and Paul Hudson Sams Publishing, ISBN# 0134511182
|

|
 |
"Ubuntu Unleashed 2013 edition:"
Covering 12.10 and 13.04 (8th Edition) by Matthew Helmke, Andrew Hudson and Paul Hudson Sams Publishing, ISBN# 0672336243 (Dec 15, 2012)
|
|
 |
"Ubuntu Unleashed 2012 edition:"
Covering 11.10 and 12.04 (7th Edition) by Matthew Helmke, Andrew Hudson and Paul Hudson Sams Publishing, ISBN# 0672335786 (Jan 16, 2012)
|
|
 |
"Red Hat Enterprise Linux 7: Desktops and Administration"
by Richard Petersen Surfing Turtle Press, ISBN# 1936280620 (Jan 13, 2017)
|
|
 |
"Fedora 18 Desktop Handbook"
by Richard Petersen Surfing Turtle Press, ISBN# 1936280639 (Mar 6, 2013)
|
|
 |
"Fedora 18 Networking and Servers"
by Richard Petersen Surfing Turtle Press, ISBN# 1936280698 (March 29, 2013)
|
|
 |
"Fedora 14 Desktop Handbook"
by Richard Petersen Surfing Turtle Press, ISBN# 1936280167 (Nov 30, 2010)
|
|
 |
"Fedora 14 Administration and Security"
by Richard Petersen Surfing Turtle Press, ISBN# 1936280221 (Jan 6, 2011)
|
|
 |
"Fedora 14 Networking and Servers"
by Richard Petersen Surfing Turtle Press, ISBN# 1936280191 (Dec 26, 2010)
|
|
 |
"Practical Guide to Ubuntu Linux (Versions 8.10 and 8.04)"
by Mark Sobell Prentice Hall PTR, ISBN# 0137003889 2 edition (January 9, 2009)
|
|
 |
"Fedora 10 and Red Hat Enterprise Linux Bible"
by Christopher Negus Wiley, ISBN# 0470413395
|
|
 |
"Red Hat Fedora 6 and Enterprise Linux Bible"
by Christopher Negus Sams, ISBN# 047008278X
|
|
 |
"Fedora 7 & Red Hat Enterprise Linux: The Complete Reference"
by Richard Petersen Sams, ISBN# 0071486429
|
|
 |
"Red Hat Fedora Core 6 Unleashed"
by Paul Hudson, Andrew Hudson Sams, ISBN# 0672329298
|
|
 |
"Red Hat Linux Fedora 3 Unleashed"
by Bill Ball, Hoyt Duff Sams, ISBN# 0672327082
|
|
 |
"Red Hat Linux 9 Unleashed"
by Bill Ball, Hoyt Duff Sams, ISBN# 0672325888 May 8, 2003 I have the Red Hat 6 version and I have found it to be very helpful. I have found it to be way more complete than the other Linux books. It is the most complete general Linux book in publication. While other books in the "Unleashed" series have disappointed me, this book is the best out there. |
|
 |
"UNIX Power Tools"
by Jerry D. Peek, Tim O'Reilly, Mike Loukides O'Reilly & Associates, ISBN# 1565922603 This book is a requirement for any serious system administrator or developer. One of my favorite UNIX books. |
|
 |
"UNIX Power Tools"
by Cameron Newham, Bill Rosenblatt O'Reilly & Associates, ISBN# 1565923472 This book is a great bash shell script book. |
|
 |
Essential Guide to Disaster Recovery
|
Free Request
|