
Red Hat / Fedora Core RPM Packages:
RHEL 6/CentOS/AWS MySQL 5.5 example:- mysql-version.rpm (Required. Includes client)
- mysql-server-version.rpm (Required)
- mysql-config-version.rpm (Required config file: /etc/my.cnf)
- mysql-devel-version.rpm (Optional: C include files and libraries for developers)
- php-mysql-version.rpm (Optional: For accessing MySQL database from php)
Check if installed: rpm -q mysql mysql-server mysql-config
Also see YoLinux.com package management - using RPM to set GPG signatures and install RPM packages.
Installing MySQL.com RPM packages: If installing newer versions of MySQL from RPM packages obtained from MySQL.com, you must first import and register their public GPG key:
- Download public key named build@mysql.com from http://www.keyserver.net/ with one of two methods:
- wget --output-document=pubkey_mysql.asc http://keyserver.veridis.com:11371/export?id=-8326718950139043339
(Saves key 0x5072E1F5 as file pubkey_mysql.asc) - gpg --keyserver keyserver.veridis.com --recv-key 5072e1f5
gpg --export -a 5072e1f5 > pubkey_mysql.asc
- wget --output-document=pubkey_mysql.asc http://keyserver.veridis.com:11371/export?id=-8326718950139043339
- Import key: rpm --import pubkey_mysql.asc
[Potential Pitfall]: Your system should have a host name other than the default "localhost". Give your systems a host name if you get the following installation error:
ERROR: 1062  Duplicate entry 'localhost-root' for key 1
ERROR: 1062  Duplicate entry 'localhost-' for key 1
Use the command hostname to give your system a hostname and also set in the configuration file /etc/sysconfig/network
Ubuntu / Debian package installation:
- apt-get install mysql-client
- apt-get install mysql-server
Start the database:
Start the database:- Red Hat: /etc/init.d/mysqld restart
- Ubuntu/Debian: /etc/init.d/mysql restart
Notes:
- I use the command word "restart" instead of "start" because the database might already be running. There is no penalty to trying to stop a database that has already been stoppped.
- The init script will run /usr/bin/mysql_install_db to create a default
database in /var/lib/mysql/ if the mysql init script has never been run before.
Only executes the first time the MySQL init script is run.
The install script will not be run again as long as the default database directory exists.
The database executes as user mysqld and group mysqld. - Default config file installed by RPM: /etc/my.cnf
(Ubuntu: /etc/mysql/my.cnf)[mysqld]
datadir=/var/lib/mysql
socket=/var/lib/mysql/mysql.sock
[mysql.server]
user=mysql
basedir=/var/lib
[safe_mysqld]
err-log=/var/log/mysqld.log
pid-file=/var/run/mysqld/mysqld.pid
[Potential Pitfall]: AWS uses a secure install script to force the setting of the default root password:
sudo /usr/libexec/mysql55/mysql_secure_installation
The secure install script will give the following error if you don't start the database first.
ERROR 2002 (HY000): Can't connect to local MySQL server through socket '/var/lib/mysql/mysql.sock' (2))Start the database:
- Red Hat/CentOS/AWS: sudo service mysqld restart
Post installation:
- The first step is to assign the database "root" user a password.
Admin user id: root
Default password: blank
You can use the following command to reset the database "root" password:sudo mysql_secure_installationAlso look at the mysql_secure_installation man page to see the full list of the command's capabilities.
The database "root" password can also be set with the command mysqladmin[prompt]$ mysqladmin -u root password 'new-password'All subsequent password changes will require the specification of the current password:[prompt]$ mysqladmin -u root -pold-password password 'new-password'
Note: the following SQL commands will also work:mysql> USE mysql;
mysql> UPDATE user SET Password=PASSWORD('new-password') WHERE user='root'; mysql> FLUSH PRIVILEGES; - Create a database: (Creates directory /var/lib/mysql/bedrock)
[prompt]$ mysqladmin -h localhost -u root -ppassword create bedrock
(or use SQL command: CREATE DATABASE bedrock;)
Show all mysql databases: mysqlshow -u root -ppassword - Add tables, data, etc:
Connect to database and issue the following SQL commands:[prompt]$ mysql -h localhost -u root -ppassword ... mysql> show databases; -- List all databases in MySQL. +----------+ | Database | +----------+ | bedrock | | mysql | | test | +----------+ mysql> use bedrock; -- Specify database to connect to. Also refers to path: /var/lib/mysql/bedrock mysql> create table employee (Name char(20),Dept char(20),jobTitle char(20));
mysql> DESCRIBE employee; -- View table just created. Same as "show columns from employee;" +----------+----------+------+-----+---------+-------+ | Field | Type | Null | Key | Default | Extra | +----------+----------+------+-----+---------+-------+ | Name | char(20) | YES | | NULL | | | Dept | char(20) | YES | | NULL | | | jobTitle | char(20) | YES | | NULL | | +----------+----------+------+-----+---------+-------+ 3 rows in set (0.03 sec) mysql> show tables;
+-------------------+
| Tables_in_bedrock |
+-------------------+
| employee |
+-------------------+
mysql> INSERT INTO employee VALUES ('Fred Flinstone','Quarry Worker','Rock Digger');
mysql> INSERT INTO employee VALUES ('Wilma Flinstone','Finance','Analyst');
mysql> INSERT into employee values ('Barney Rubble','Sales','Neighbor');
mysql> INSERT INTO employee VALUES ('Betty Rubble','IT','Neighbor');
Note: Data type used was CHAR. Other data types include:- CHAR(M) : Fixed length string. Always stores M characters whether it is holding 2 or 20 characters. Where M can range 1 to 255 characters.
- VARCHAR(M) : Variable length. Stores only the string. If M is defined to be 200 but the string is 20 characters long, only 20 characters are stored. Slower than CHAR.
- INT : Ranging from -2147483648 to 2147483647 or unsigned 0 to 4294967295
- FLOAT(M,N) : FLOAT(4,2) - Four digits total of which 2 are after the decimal. i.e. 12.34 Values are rounded to fit format if they are too large.
- DATE, TEXT, BLOB, SET, ENUM
- Add a user. Use the MySQL SQL console to enter
SQL commands. The command mysql with the correct login/password
will connect you to the database.
The admin tables are stored in the database "mysql".
[prompt]$ mysql -h localhost -u root -ppassword
Welcome to the MySQL monitor.  Commands end with ; or \g.
Your MySQL connection id is 1 to server version: 3.23.41

Type 'help;' or '\h' for help. Type '\c' to clear the buffer.

mysql> USE mysql;
mysql> SHOW TABLES;
+-----------------+
| Tables_in_mysql |
+-----------------+
| columns_priv    |
| db              |
| func            |
| host            |
| tables_priv     |
| user            |
+-----------------+
mysql> INSERT INTO user (Host, User, Password, Select_priv)
              VALUES ('', 'Dude1', password('supersecret'), 'Y');
mysql> FLUSH PRIVILEGES;   -- Required each time one makes a change to the GRANT table
mysql> GRANT ALL PRIVILEGES ON bedrock.* TO Dude1;
mysql> FLUSH PRIVILEGES;   -- Required each time one makes a change to the GRANT table
mysql> quit
Note:- There is NO space between the -p and the password! You can omit the password and you will be prompted for it.
- The SQL flush command is equivalent to issuing the command:
[prompt]$ mysqladmin reload
- Test the database:
mysql> SELECT * from employee; +-----------------+---------------+-------------+ | Name | Dept | jobTitle | +-----------------+---------------+-------------+ | Fred Flinstone | Quarry Worker | Rock Digger | | Wilma Flinstone | Finance | Analyst | | Barney Rubble | Sales | Neighbor | | Betty Rubble | IT | Neighbor | +-----------------+---------------+-------------+ 1 row in set (0.00 sec) mysql> SELECT name FROM employee WHERE dept='Sales'; +---------------+ | name | +---------------+ | Barney Rubble | +---------------+ 1 row in set (0.00 sec) - Quit from the SQL shell:
[prompt]$ quit
- Shutting down the database:
[prompt]$ mysqladmin -u root -ppassword shutdown       - PREFERRED
OR
[prompt]$ /etc/rc.d/init.d/mysqld stop
OR
[prompt]$ service mysqld stop
Documentation in /usr/share/doc/mysql-3.23.41/ (local file)
Create a database user:
mysql> CREATE USER david@'localhost' IDENTIFIED BY 'password';
or generate a user by adding them to the user table directly:
     [prompt]$ mysql -h localhost -u root -p
     mysql> use mysql;
     mysql> INSERT INTO user (Host,User,Password) VALUES('localhost','david',PASSWORD('supersecret'));
Note that the user is defined in the "user" mysql table.
Assign user privileges:
Security and database access is controlled by the GRANT tables. Access to connect to the database and access to process the transaction (table and column access, etc.) are both required. Privileges are searched in the following order:- user table
- db and host table
- tables_priv
- columns_priv
Use the user table to grant connection privileges to database by a user (host, user name and password). Grant database and table access for transaction access. i.e. grant "SELECT", "UPDATE", "CREATE", "DELETE", "ALTER" etc. permission for database, table, field (columns) or database server access.
Access can be granted by network permissions: GRANT ALL PRIVILEGES on bedrock.* to david@'192.168.10.0/255.255.255.0';
This grants access from nodes 192.168.10.0 - 192.168.10.255. Or the
network definitions can reference resolvable names: '%.domain.com'.
The host definition of '%' or '' (null) refers to any host.
(..according to the documentation. My experience is that in the mysql.user table
use only '%' for "Host" to refer to any host.)
     mysql> GRANT ALL PRIVILEGES on bedrock.* to david@'%';
     mysql> FLUSH PRIVILEGES;
or (be specific)
     mysql> GRANT SELECT,INSERT,UPDATE,DELETE on bedrock.* to david@'%' identified by 'david';
     mysql> FLUSH PRIVILEGES;
or (more promiscuous - global privileges rather than database specific)
     mysql> GRANT ALL PRIVILEGES on *.* to david@'%' identified by 'david';
     mysql> FLUSH PRIVILEGES;
or (be specific by direct assignment in the mysql "Db" table:)
     mysql> use mysql;
     mysql> INSERT INTO db (Host,Db,User,Select_priv,Insert_priv) VALUES('localhost','bedrock','david','Y,'Y');
     mysql> FLUSH PRIVILEGES;
Note that database specific privileges (eg. Select_priv, Insert_priv, etc) are defined in the "db" mysql table. The mysql "user" table can assign the same (Select_priv, Insert_priv, etc) but global privileges (usually all default to 'N').
Show privileges: SHOW GRANTS FOR Dude2@'%';
Network security: Use firewall rules (ipchains or iptables) to block internet access to port 3306. (default port used by MySQL)
Note: I have found that when adding access from "anywhere" ('%'), the MySQL database table 'user' requires two entries, 'localhost' and '%'. Also, it is typically safer to allow more privileges to those with 'localhost' access than to users from '%' ("anywhere").
Passwords and connecting to the database:
- Connect: [prompt]$ mysql -h host_name -u user_name -ppassword
- Using default blank password: [prompt]$ mysql -h localhost -u root -p
If a password is required, you will be prompted. Note, blank passwords are a security hole which has already lead to one mySQL internet worm. Change any default blank passwords. - Delete null/blank users: DELETE FROM user WHERE User = '';
- Beware of open access permissions from hosts '%': SELECT * FROM db WHERE Host = '%';
- Change a password:
[prompt]$ mysqladmin -u root -p password new-password
You will be prompted to enter the old root password to complete this command.
or:[prompt]$ mysqladmin -u root -pold-password password new-passwordor:mysql> SET PASSWORD FOR root@'localhost' = PASSWORD('supersecret');
mysql> FLUSH PRIVILEGES;
- As an added security precaution it is wise to delete any user id not used. i.e. any defaults generated for demonstration purposes.
- Note that the default port used by MySQL is 3306. This can be protected with firewall rules. See the YoLinux IpTables tutorial.
[Potential Pitfall]: Upgrade to 5.7.4 or using passwords generate in MySQL 4.1 or earlier:
The password encryption hashing algorithm was changed and thus old passwords generated with the old algorithm fail to authenticate correctly.
Backwards compatibility with the old scheme was eliminated in version 5.7.4.
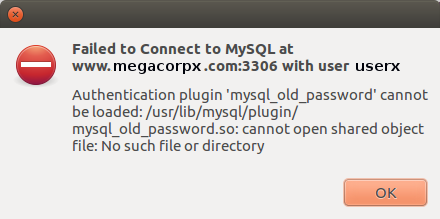
Authentication plugin 'mysql_old_password' cannot be loaded: /usr/lib/mysql/plugin/
mysql_old_password.so: cannot open shared object file: No such file or directory
Reseting the password will encrypt the password with the new hashing algorithm and authentication will work.
SET PASSWORD FOR 'userx'@'localhost' = PASSWORD('supersecretpassword');
For more details see password hashing docs
RHEL6/AWS (MySQL 5.5):
The installation script mysql_secure_installation is executed by the RPM upon installation to secure default passwords with the following dialog:
NOTE: RUNNING ALL PARTS OF THIS SCRIPT IS RECOMMENDED FOR ALL MySQL
      SERVERS IN PRODUCTION USE!  PLEASE READ EACH STEP CAREFULLY!

In order to log into MySQL to secure it, we'll need the current password for the root user.  If you've just installed MySQL, and you haven't set the root password yet, the password will be blank, so you should just press enter here.

Enter current password for root (enter for none):
OK, successfully used password, moving on...

Setting the root password ensures that nobody can log into the MySQL root user without the proper authorisation.

Set root password? [Y/n] y
New password:
Re-enter new password:
Password updated successfully!
Reloading privilege tables..
 ... Success!

By default, a MySQL installation has an anonymous user, allowing anyone to log into MySQL without having to have a user account created for them.  This is intended only for testing, and to make the installation go a bit smoother.  You should remove them before moving into a production environment.

Remove anonymous users? [Y/n] Y
 ... Success!

Normally, root should only be allowed to connect from 'localhost'.  This ensures that someone cannot guess at the root password from the network.

Disallow root login remotely? [Y/n] Y
 ... Success!

By default, MySQL comes with a database named 'test' that anyone can access.  This is also intended only for testing, and should be removed before moving into a production environment.

Remove test database and access to it? [Y/n] Y
 - Dropping test database...
 ... Success!
 - Removing privileges on test database...
 ... Success!

Reloading the privilege tables will ensure that all changes made so far will take effect immediately.

Reload privilege tables now? [Y/n] Y
 ... Success!

Cleaning up...

All done!  If you've completed all of the above steps, your MySQL installation should now be secure.

Thanks for using MySQL!
Debian/Ubuntu upgrades: Note that the Debian/Ubuntu distribution will have an additional file /etc/mysql/debian.conf. This file holds a password for the user "debian-sys-maint" which is used by the install tool dpkg to perform database upgrades. This can also be used in emergencies if you forget the root password. It is also a security hole if the file is available to others.
[Potential Pitfall]: It is very easy to
make mistakes which get entered into important tables. If you enter the
command twice you may have one incorrect and one correct entry. Look at the
table data after a mistake to see what happened in case it needs to be fixed.
Example:
mysql> USE mysql;
mysql> SELECT User,Password,Host from user;
+-------+------------------+------------+
| User  | Password         | Host       |
+-------+------------------+------------+
| root  | 99a1544eb571ad63 | localhost  |
|       |                  | localhost  |
| Dude1 | 81a10dba5f6f2144 |            |
| Dude1 |                  |            |
| Dude2 | 92b10dba6f7f3155 | %          |
+-------+------------------+------------+
5 rows in set (0.00 sec)
mysql> DELETE FROM user WHERE User='' AND Host='localhost';
mysql> DELETE FROM user WHERE User='Dude1' AND Password='';
mysql> FLUSH PRIVILEGES;
mysql> QUIT
User entries may also be found in the table mysql.db.
mysql> DELETE FROM db WHERE User='Dude3' AND Host='localhost';
[Potential Pitfall]: Any changes (UPDATE) to the user table will require a "FLUSH PRIVILEGES" before the changes will be effective.
mysql> UPDATE user SET Host='%' WHERE User='Dude2';This will allow a connection with mysql client from any host:
mysql> FLUSH PRIVILEGES;
[prompt]$ mysql -u Dude2 -ppassword -h node.your-domain.com
[Potential Pitfall]: If you can login to the database with a user account locally on the system with a localhost connection but not remotely (or vice-versa) you may be faced with the following anomaly:
Note that there will be two user entries, one for the user with localhost access and another with remote access and the two can have different passwords. Adding a remote access for a user database login will not apply the current user database localhost password to the remote access ("%") entry. You will have to assign a password.
mysql> use mysql
mysql> select * from user;
| Host      | User      | Password         |  ...
| 127.0.0.1 | user1     | 0bc23ff74fa72368 |  ...
| %         | user1     |                  |  ...
Note this shows that user1 has no password assigned for remote access.
mysql> select * from user;
| Host      | User      | Password         |  ...
| 127.0.0.1 | user1     | 0bc23ff74fa72368 |  ...
| %         | user1     | 0bc23ff74fa72368 |  ...
This example shows the same password assigned for both localhost and remote database access. Also note that MySQL encrypts the passwords.
MySQL root password recovery:
- As Linux system root user stop the database process: /etc/init.d/mysql stop
(or: service mysql stop) - Start MySQL in safe mode and skip the use of the "grant tables": /usr/bin/mysqld_safe --user=mysql --socket=/var/lib/mysql/mysql.sock --pid-file=/var/run/mysqld/mysqld.pid --datadir=/var/lib/mysql --skip-grant-tables --skip-networking &
- Reset the MySQL root password: mysqladmin -u root flush-privileges password newpassword
- Stop MySQL running in safe mode: kill `cat /var/run/mysqld/mysqld.pid`
- Start MySQL: /etc/init.d/mysql start
- The new MySQL root password can now be used: mysql -u root -p
Respond with the password: newpassword
Disabling networking:
If your configuration is a web server interacting with a mySQL database running on the same "localhost" then one may turn off network access to tighten security. Edit shell script:- /usr/bin/safe_mysqld (Fedora Core 3)
- /usr/bin/mysqld_safe (Red Hat Enterprise Linux 4 - MySQL 5.0)
..
...
  if test -z "$args"
  then
    $NOHUP_NICENESS $ledir/$MYSQLD $defaults --basedir=$MY_BASEDIR_VERSION \
                      --datadir=$DATADIR $USER_OPTION --pid-file=$pid_file \
                      --skip-networking --skip-locking >> $err_log 2>&1
  else
    eval "$NOHUP_NICENESS $ledir/$MYSQLD $defaults --basedir=$MY_BASEDIR_VERSION \
                      --datadir=$DATADIR $USER_OPTION --pid-file=$pid_file \
                      --skip-networking --skip-locking $args >> $err_log 2>&1"
  fi
...
..
Add the flag "--skip-networking" marked in bold.
Mysql 5.0 configuration: Networking is disabled by default on the default Red Hat and Ubuntu installation.
Red Hat/CentOS: To enable remote database access, add the "bind-address" with the public IP address to the file: /etc/my.cnf. To force local access only without remote access, set the "bind-address" to 127.0.0.1
[mysqld]
datadir=/var/lib/mysql
socket=/var/lib/mysql/mysql.sock
user=mysql
bind-address=127.0.0.1
Restart the database after making changes.
Ubuntu: To enable remote database access, comment out (or remove) the following line with a "#" in the file: /etc/mysql/my.cnf
...
...

bind-address           = 127.0.0.1

...
...
Restart the database after making changes.
A firewall rule can further restrict access to a single server (eg web server at 192.168.1.13):
/sbin/iptables -A INPUT -i eth0 -s 192.168.1.13 -p tcp --destination-port 3306 -j ACCEPT
or LAN only access:/sbin/iptables -A INPUT -i eth0 -s 192.168.1.0/24 -p tcp --destination-port 3306 -j ACCEPT
- Statistics: [prompt]$ mysqladmin version
- List database environment: [prompt]$ mysqladmin variables
- Show if database is running: [prompt]$ mysqladmin ping
- Show databases available:
[prompt]$ mysqlshow

+-----------+
| Databases |
+-----------+
| bedrock   |
| mysql     |
| test      |
+-----------+
ORmysql> SHOW DATABASES;
- Delete database: mysql> drop database bedrock;
- Show list of active threads in server:
[prompt]$ mysqladmin -h localhost -u root -p processlist +----+------+-----------+----+---------+------+-------+------------------+ | Id | User | Host | db | Command | Time | State | Info | +----+------+-----------+----+---------+------+-------+------------------+ | 15 | root | localhost | | Query | 0 | | show processlist | +----+------+-----------+----+---------+------+-------+------------------+ - Delete a database: [prompt]$ mysqladmin drop database-name
- Execute SQL from Linux command line interface:
[prompt]$ mysql -h localhost -u root -p -e "select host,db,user from db" mysql - Execute SQL command file from Linux command line interface:
[prompt]$ mysql -h localhost -u root -p database-name < text-file-with-sql-statements.sql
- Load test (benchmark) the system:
[prompt]$ cd sql-bench
[prompt]$ run-all-tests
or
[prompt]$ mysql -vvf test < ./tests/auto_increment.tst
SQL requests are either administrative or data-related. The following are sample SQL segments and are not necessarily pertinent to the previous example:
Create and use a new database named "bedrock":
mysql> CREATE DATABASE bedrock;   -- Comments follow a double dash
mysql> USE bedrock;
Create and populate table with data:
mysql> CREATE TABLE retired_employee (
                    Name char(20) DEFAULT '' NOT NULL,
                    Dept char(10) DEFAULT '' NOT NULL,
                    JobTitle char(20),
                    UNIQUE name_dept (Name,Dept)
                    );
mysql> CREATE UNIQUE index name_dept on employee (name,dept); -- avoids duplicate keys
mysql> INSERT INTO employee VALUES ("Jane Smith","Sales","Customer Rep");
mysql> INSERT INTO employee VALUES ('Jane Smith','Sales','Account Manager');
mysql> INSERT INTO employee VALUES ('Jane Smith','Engineering','Manager');
mysql> UPDATE employee SET dept='HR' WHERE name='Jane Smith';
mysql> CREATE TABLE pet (
                 name VARCHAR(20),
                 owner VARCHAR(20),
                 species VARCHAR(20),
                 sex CHAR(1),
                 birth DATE,
                 death DATE);
Add constraints to a table:
-- Use "auto_increment" integer column:
mysql> ALTER TABLE employee ADD EmpId INT NOT NULL AUTO_INCREMENT PRIMARY KEY;
mysql> ALTER TABLE employee DROP INDEX name_dept;  -- get rid of index
mysql>
Interrogate an existing database:
mysql> SHOW DATABASES;
mysql> USE bedrock;
mysql> SELECT DATABASE();  -- returns current database. eg. bedrock
mysql> SELECT VERSION();
mysql> SELECT NOW();
mysql> SELECT USER();
mysql> SHOW TABLES;
mysql> DESC employee;
mysql> SHOW CREATE TABLE employee;  -- show command used to generate table
mysql> SHOW INDEX FROM employee;
mysql> SELECT DISTINCT dept FROM  bedrock;
mysql> SELECT * FROM  bedrock WHERE Name  LIKE "B%y";  -- "%" match any char: Gives Betty and Barney
mysql> SELECT * FROM  bedrock WHERE Name LIKE "B___y";  -- "_" match space: Gives Betty but not Barney
mysql> SELECT * FROM  bedrock WHERE Name RLIKE "^Betty$";  -- "^" match beginning. "$" to denote end of string
mysql> SELECT COUNT(*) FROM employee;  -- Number of records returned
mysql> SELECT Name, COUNT(*) FROM employee WHERE Name LIKE "B%y";  -- Return Names and number of records returned
mysql> SELECT * FROM pet WHERE species = "snake" OR species = "bird";
mysql> SELECT * FROM pet WHERE species = "dog" AND sex = "f";
mysql> SELECT * FROM pet WHERE birth >= "1998-1-1";
mysql> SELECT name, birth FROM pet ORDER BY birth DESC;
mysql> SELECT * FROM pet WHERE name LIKE "b%";
mysql> SELECT * FROM pet WHERE name REGEXP "^b";
mysql> SELECT species, COUNT(*) FROM pet GROUP BY species;
mysql> SELECT MAX(article) AS article FROM shop;
mysql> SELECT * FROM employee WHERE name LIKE "%Sm%";
mysql> SELECT * FROM employee WHERE name REGEXP "^Ja";
Database cleanup:
mysql> DROP TABLE employee;
mysql> DROP DATABASE bedrock;
See section 3 of MySQL manual for more examples.
Tip: Execute a shell command from the MySQL client interface, use either option:
- system ls -l
OR - \! ls -l
Loading a SQL file into MySQL:
Import SQL file from MySQL client command line:- mysql> source file.sql
OR - mysql> \. file.sql
One may import data into the MySQL database from SQL files or "load" data from CSV or tab delimited files using the LOAD command:
Loading CSV or tab delimeted files into MySQL:
"LOAD DATA LOCAL INFILE" vs "LOAD DATA INFILE": The term "LOCAL" pertains to whether the file is local to the MySQL client. Without the keyword "LOCAL", the data file must reside on the same computer as the database server. The location of the client in this case would be irrelevant. The "LOAD DATA INFILE" has many file permission pitfalls and is thus tricky. In fact I have never been successful using this method with a user directory.
Load a tab delimited file into the database:
Command: LOAD DATA LOCAL INFILE 'file.dat' INTO TABLE employer;
Input tab delimited file: file.dat
Fred Flinstone  Quarry Worker   Rock Digger
Wilma Flinstone Finance Analyst
Barney Rubble   Sales   Neighbor
Betty Rubble    IT      Neighbor
Note:
- The number of tab delimited fields MUST match the number and order of fields in the database.
Load a comma delimited file (CSV) into the database:
Command: LOAD DATA LOCAL INFILE "/tmp/TableData.csv" INTO TABLE employer FIELDS TERMINATED BY "," OPTIONALLY ENCLOSED BY """" LINES TERMINATED BY "\r\n" (Name, Dept, jobTitle);Note:
- MS/Windows generated files will have lines terminated by "\r\n".
- Linux/Unix generated files will have lines terminated by "\n".
- File locations on database server must be absolute path names, relative path or relative to the mysqld process owner's home directory (typically /var/lib/mysql/). File locations on the client may be fully qualified or relative to the current mysql client directory.
- Fully qualified: /tmp/TableData.csv
- Relative to current mysql client directory: ./TableData.csv
(Verify current directory: mysql> \! pwd) - Database process owner home directory: TableData.csv
(Actual: /var/lib/mysql/TableData.csv)
- Text strings often are encapsulated by quotes so that the strings may contain a comma without representing a new field.
[Potential Pitfalls]:
- ERROR 13 (HY000): Can't get stat of '/tmp/TableData.csv' (Errcode: 13)
The file is local and you have not specified the "LOCAL" directive. - ERROR 29 (HY000): File '/var/lib/mysql/test/TableData.csv' not found (Errcode: 2)
Error from command LOAD DATA INFILE 'TableData.csv' INTO ... where the file is assumed to be read from the /database-process-home-directory/mysql-database-name/TableData.csv
(Note: Database name "test" is being used.) - ERROR 1045 (28000): Access denied for user 'user1'@'%' (using password: YES)
OR
ERROR 2 (HY000): File '/tmp/TableData.csv' not found (Errcode: 2)
Error from command LOAD DATA INFILE '/tmp/TableData.csv' INTO .... This is a common pitfall, trying to load a file located on the database server remotely from a client. Getting the file permissions correct is difficult. Avoid this method. Use the LOAD DATA LOCAL INFILE instead of the LOAD DATA INFILE method (it is so much easier).
Also look at the mysqlimport command.
The mysqldump command will read the mySQL database and generate a SQL command text file. This allows data to be migrated to other versions of mySQL (i.e. upgrade versions to a newer and more advanced mySQL) or to other SQL databases. SQL command file generated can create tables, insert data, ....
| Option | Description |
|---|---|
| -A --all-databases |
Dump all the databases. |
| -B --databases |
Dump the specified databases. |
| -h --host= |
Specify host to connect to. |
| -p --password= |
Specify password. If you do not specify a password, then you will be queried. |
| -u --user= |
Specify user. Defaults to current user logged in. |
| --opt | Same as: --add-drop-table --add-locks --all --extended-insert --quick --lock-tables |
| --add-drop-table | Add a "drop table" SQL statement before each "create" SQL statement. |
| --add-locks | Add "lock" SQL statements around "insert" SQL statements. |
| -a --all |
Include all mySQL specific SQL "create" options. |
| -e --extended-insert |
Allows utilization of the new, much faster INSERT syntax. Database you are migrating to must support this notation. |
| -q --quick |
Don’t buffer query, dump directly to stdout. |
| -l --lock-tables |
Lock all tables for read. |
| -? --help |
Display command line options. |
Examples:
- Dump database to a file:
- Dump specified database:
mysqldump --opt database > db-dump-file.sql - Dump specified table in database:
mysqldump --opt database table-name > db-dump-file.sql - Dump multiple databases:
mysqldump --opt --databases database1 database2 database3 > db-dump-file.sql - Dump everything:
mysqldump --opt --all-databases > total-db-dump-file.sql
mysqldump -u user-id -h host-name -p --opt --all-databases > total-db-dump-file.sql
You be asked for your password.
[Potential Pitfall]: If you experience the following error:mysqldump: Got error: 1016: Can't open file: 'Database-Name' (errno: 145) when using LOCK TABLESFix with the following command: mysqlcheck -r -u root -p Database-Name - Dump specified database:
- Import dumped file:
mysql database < db-dump-file.sql - Export from one database and import to another:
- Transfer specified database from one database to another:
mysqldump --opt database | mysql --host=host-name -C database
- Transfer specified database from one database to another:
Man Page:
Restore using dump generated by mysqldump above:
- mysql -h host-name -u user-id -psupersecretpassword < total-db-dump-file.sql
- mysql database-name -h host-name -u user-id -psupersecretpassword < db-dump-file.sql
[Potential Pitfall]: If you experience the following error while importing a large SQL dump file:
# mysql -h localhost -u user1 -p < totaldb-20160619.sql
Enter password:
ERROR 2006 (HY000) at line 6354: MySQL server has gone away
Fix by adding the following line to file under the "mysqld" section: /etc/my.cnf
[mysqld]
...
...
max_allowed_packet=64M
[Potential Pitfall]: If transferring a single database between versions (in this case MySQL version 5.0 to 5.5) and you get the following errors:
Query OK, 0 rows affected (0.00 sec)

Query OK, 0 rows affected (0.00 sec)

ERROR 1231 (42000): Variable 'time_zone' can't be set to the value of 'NULL'
ERROR 1231 (42000): Variable 'sql_mode' can't be set to the value of 'NULL'
ERROR 1231 (42000): Variable 'foreign_key_checks' can't be set to the value of 'NULL'
ERROR 1231 (42000): Variable 'unique_checks' can't be set to the value of 'NULL'
ERROR 1231 (42000): Variable 'character_set_client' can't be set to the value of 'NULL'
Query OK, 0 rows affected (0.00 sec)

ERROR 1231 (42000): Variable 'collation_connection' can't be set to the value of 'NULL'
ERROR 1231 (42000): Variable 'sql_notes' can't be set to the value of 'NULL'
One has the option to set the various variables before the data transfer so that they are not NULL, or, transfer all databases. I found that by exporting "--all-databases", these errors were avoided.
To set the variables, add the following to the beginning of the mysqldump file:/*!40103 SET TIME_ZONE='+00:00' */; /*!40014 SET @OLD_UNIQUE_CHECKS=@@UNIQUE_CHECKS, UNIQUE_CHECKS=0 */; /*!40014 SET @OLD_FOREIGN_KEY_CHECKS=@@FOREIGN_KEY_CHECKS, FOREIGN_KEY_CHECKS=0 */; /*!40101 SET @OLD_SQL_MODE=@@SQL_MODE, SQL_MODE='NO_AUTO_VALUE_ON_ZERO' */; /*!40111 SET @OLD_SQL_NOTES=@@SQL_NOTES, SQL_NOTES=0 */; ...
Quiesce Database:
When using enterprise storage with "snapshot" capabilities (eg Netapp, HP, EMC, ...), note that a "snapshot" of a database with transaction locks is a "snapshot" of a database in an inconsistent state. One should quiesce the database, to halt further changes, before taking the snapshot so that you have a transactionally consistent backup of mysql.Check Database Status:
Show process list (database activity):mysql> SHOW PROCESSLIST; +---------+-----------+-----------+------+---------+------+-------+------------------+ | Id | User | Host | db | Command | Time | State | Info | +---------+-----------+-----------+------+---------+------+-------+------------------+ | 1713762 | root | localhost | NULL | Query | 0 | NULL | show processlist | | 1713939 | user4 | localhost | SF | Sleep | 0 | | NULL | +---------+-----------+-----------+------+---------+------+-------+------------------+ 2 rows in set (0.00 sec)
Show the database status:
mysql> SHOW ENGINE INNODB STATUS\G
*************************** 1. row ***************************
Status:
=====================================
130505  9:20:52 INNODB MONITOR OUTPUT
=====================================
Per second averages calculated from the last 51 seconds
----------
SEMAPHORES
----------
OS WAIT ARRAY INFO: reservation count 1084680, signal count 1069717
Mutex spin waits 0, rounds 1777219, OS waits 4374
RW-shared spins 2163653, OS waits 1078122; RW-excl spins 7932, OS waits 113
------------
TRANSACTIONS
------------
Trx id counter 0 2656185
Purge done for trx's n:o < 0 2652578 undo n:o < 0 0
History list length 9
Total number of lock structs in row lock hash table 0
LIST OF TRANSACTIONS FOR EACH SESSION:
---TRANSACTION 0 0, not started, process no 17024, OS thread id 1092143424
MySQL thread id 1713762, query id 24061088 localhost root
SHOW ENGINE INNODB STATUS
--------
FILE I/O
--------
I/O thread 0 state: waiting for i/o request (insert buffer thread)
I/O thread 1 state: waiting for i/o request (log thread)

...
...
Flush table transactions and lock: Closes all open tables and locks all tables for all databases with a global read lock.
mysql> FLUSH TABLES WITH READ LOCK;
Query OK, 0 rows affected (0.02 sec)
This will temporary make MySQL read only. It also requires LOCK TABLES privileges.
Database activity:
One can then view database activity with the SQL command: SHOW PROCESSLIST;
If configured for replication in a master/slave cluster, the master node may have binary log files of changes for the slaves.
View status: SHOW MASTER STATUS/G
If backing up from a slave: SHOW SLAVE STATUS/G
Database activity should rapidly complete and when it has, this is the time to perform backups and snapshots.
XFS volume freeze:
Note file system considerations (XFS): (after the "READ LOCK" has been applied and the database has been locked)
Freeze from further modification, an entire file system volume on which the MySQL data resides: SYSTEM xfs_freeze -f /var/lib/mysql;
The backlog of write activity will complete and further file system modification will be denied.
Perform backups now.
Unfreeze filesystem volume: SYSTEM xfs_freeze -u /var/lib/mysql;
mysql> UNLOCK TABLES;
Query OK, 0 rows affected (0.00 sec)
[Potential Pitfall]: Ubuntu mysql 5.0 database migration - When migrating the mysql database by copying files from /var/lib/mysql/... and /etc/mysql/... from one system running Ubuntu 6.11 to 8.04, I got nebulous error message in /var/log/syslog. The root cause of the problem was apparmor. If turning off apparmor (/etc/init.d/apparmor stop) allows your database to start and function properly, then go fix your apparmor security rules in /etc/apparmor.d/usr.sbin.mysqld. Also note that you must use the newer script /etc/mysql/debian-start from release 8.04 after copying /etc/mysql/....
Note: Debian and Ubuntu distributions manage mysql package upgrades using a mysql user debian-sys-maint which has its information located in /etc/mysql/debian.cnf. If you ever forget your mysql root password, you can always get back into the mysql database using the user debian-sys-maint and its password held in /etc/mysql/debian.cnf.
Prerequisites:
- C compiler: 2.95.2 or later. (Check with the command: rpm -q gcc)
- Downloaded source from http://dev.mysql.com/downloads/mysql/4.1.html
- Expand tar file: tar xzf mysql-4.1.16.tar.gz
- cd mysql-4.1.16
- ./configure --prefix=/opt/mysql --sysconfdir=/opt/etc --localstatedir=/opt/var/mysql --with-unix-socket-path=/opt/tmp/mysql.sock
(Use the command ./configure --help to see all options.)
This should create an installation which will not clobber an existing RPM mySQL installation. - make
- make install
- Create mysql config file: cp support-files/my-medium.cnf /opt/var/my.cnf
- Create user/group mysql
- Test if user/group mysql already exists: groups mysql
- Create group: groupadd mysql
- Create user: useradd -g mysql -M -r -d /opt/lib/mysql -s /sbin/nologin -c "MySQL Server" mysql
- chown -R mysql:mysql /opt/var/mysql
- Install default database: /opt/mysql/bin/mysql_install_db --user=mysql
Since this command is run as root, specify the --user option to operate command as user mysql.
Creates help database with SQL script: /opt/mysql/share/mysql/fill_help_tables.sql - Start mySQL database: /opt/mysql/bin/mysqld_safe --user=mysql &
- /opt/mysql/bin/mysqladmin -u root password 'new-password'
- /opt/mysql/bin/mysqladmin -u root -h yoserver2 password 'new-password'
- See tutorial above for use and administration.
- Check defaults: (Defaults from config file: /opt/var/my.cnf)
- /opt/mysql/bin/my_print_defaults --config-file=my client mysql
--password=supersecret --port=3306 --socket=/opt/tmp/mysql.sock --no-auto-rehash - /opt/mysql/bin/my_print_defaults --config-file=my client mysql mysql_install_db
--datadir=/var/lib/mysql
--socket=/var/lib/mysql/mysql.sock
--password=supersecret
--port=3306
--socket=/opt/tmp/mysql.sock
--port=3306
--socket=/opt/tmp/mysql.sock
--skip-locking
--key_buffer=16M
--max_allowed_packet=1M
--table_cache=64
--sort_buffer_size=512K
--net_buffer_length=8K
--read_buffer_size=256K
--read_rnd_buffer_size=512K
--myisam_sort_buffer_size=8M
--log-bin
--server-id=1
- /opt/mysql/bin/my_print_defaults --config-file=my client mysql
- myisamchk - Check and repair of ISAM tables.
- myisamlog - Write info about whats in an ISAM log file.
- msql2mysql
- my_print_defaults
- myisamchk
- myisamlog
- myisampack
- mysql - text-based client for mysqld, a SQL-based relational database daemon
- mysql_config
- mysql_convert_table_format
- mysql_find_rows
- mysql_fix_privilege_tables
- mysql_install_db
- mysql_setpermission
- mysql_zap - a perl script used to kill processes
- mysqlaccess - Create new users to mysql.
- mysqlbinlog
- mysqlbug
- mysqlcheck
- mysqld_multi - Used for managing several mysqld processes running in different UNIX sockets and TCP/IP ports.
- mysqldump - text-based client for dumping or backing up mysql databases , tables and or data.
- mysqldumpslow
- mysqlhotcopy
- mysqlimport
- mysqlshow - Shows the structure of a mysql database (databases,tables and columns)
- mysqltest
- pack_isam
- perror - used to display a description for a system error code, or an MyISAM/ISAM table handler error code.
- replace - A utility program to replace changes strings in place in files or on the standard input.
- resolve_stack_dump
- resolveip
- mysqladmin - A utility for performing administrative operations
- safe_mysqld - Safely start a mysqld daemon on Unix.
- MySQL Workbench - Admin tool for the MySQL database (design and admin) - TUTORIAL
- SQL Workbench/J - Supports many databases (admin) (Java) - TUTORIAL
- Webyog
- phpMyAdmin - Web based
If one would like to generate a GUI interface to the database, I would recommend a web form to a PHP or Java servlet back-end or use a JAVA GUI program and JDBC. See the YoLinux tutorial on accessing MySQL with JDBC in a Tomcat servlet example.
- MySQL.com:
- GeekGirls.com: Database basics
- Devart: MySQL ODBC Driver - commercial ODBC database connector for Linux
 Books:
 |
"MySQL, Second edition"
by Paul DuBois ISBN # 0735712123, New Riders Publishing
|

|
 |
"Managing and Using MySQL"
by George Reese, Randy Jay Yarger, Tim King ISBN # 0596002114, O'Reilly
|
|
 |
"MySQL Cookbook"
by Paul DuBois ISBN # 0596001452, O'Reilly
|
|
 |
"High Performance MySQL"
by Jeremy D. Zawodny, Derek J. Balling ISBN # 0596003064, O'Reilly
|
|
 |
"The Definitive Guide to MySQL, Second Edition"
by Michael Kofler ISBN # 1590591445, APress
|
|
 |
"MySQL Certification Study Guide"
by Paul Dubois, Stefan Hinz, Carsten Pedersen ISBN # 0672326329, Sams
|
|