
Nasa WorldWind Java API is for building client applications which typically connect to a map server for image, vector and elevation data. WorldWind is a mature framework utilizing the JOGL 3-D OpenGL based API. The WorldWind API includes methods to create a 3-D globe of the Earth, interactive listeners, geometry generation (Path, Polygon, Ellipse, Circle, Quadrilateral, Square, ...), interface with various GIS data interfaces and various methods to display data.
One can try out various demos using Java webstart (JNLP: click on a URL link and the application is automatically loaded and run): WorldWind JNLP demos
While Java is truly portable to any JVM on any platform, JOGL is not. JOGL is the OpenGL interface and is compiled to a particular platform. JOGL JAR files contain native shared object libraries compiled from "C" for a given platform (MS/Win: ".dll", Linux/Mac/Solaris: ".so") and processor word size (64 vs 32 bits).
Download: official releases
Download the latest zip file from GitHub: worldwind-v2.1.0.zip
Run demo examples:
- mkdir worldwind-v2.1.0
- mv ~/Downloads/worldwind-v2.1.0.zip worldwind-v2.1.0
- cd worldwind-v2.1.0.zip
- unzip worldwind-v2.1.0.zip
- chmod +x run-demo.bash
- ./run-demo.bash
This requires that Java be installed on your system and that the appropriate paths are set. For more on installing Java, see our tutorial Java on Linux.
This requires that one add Java paths and environment variables to your ~/.bashrc file:if [ -d /usr/java/latest ] then export JAVA_HOME=/usr/java/latest export JDK_HOME=$JAVA_HOME PATH=$JAVA_HOME/bin:$PATH fi
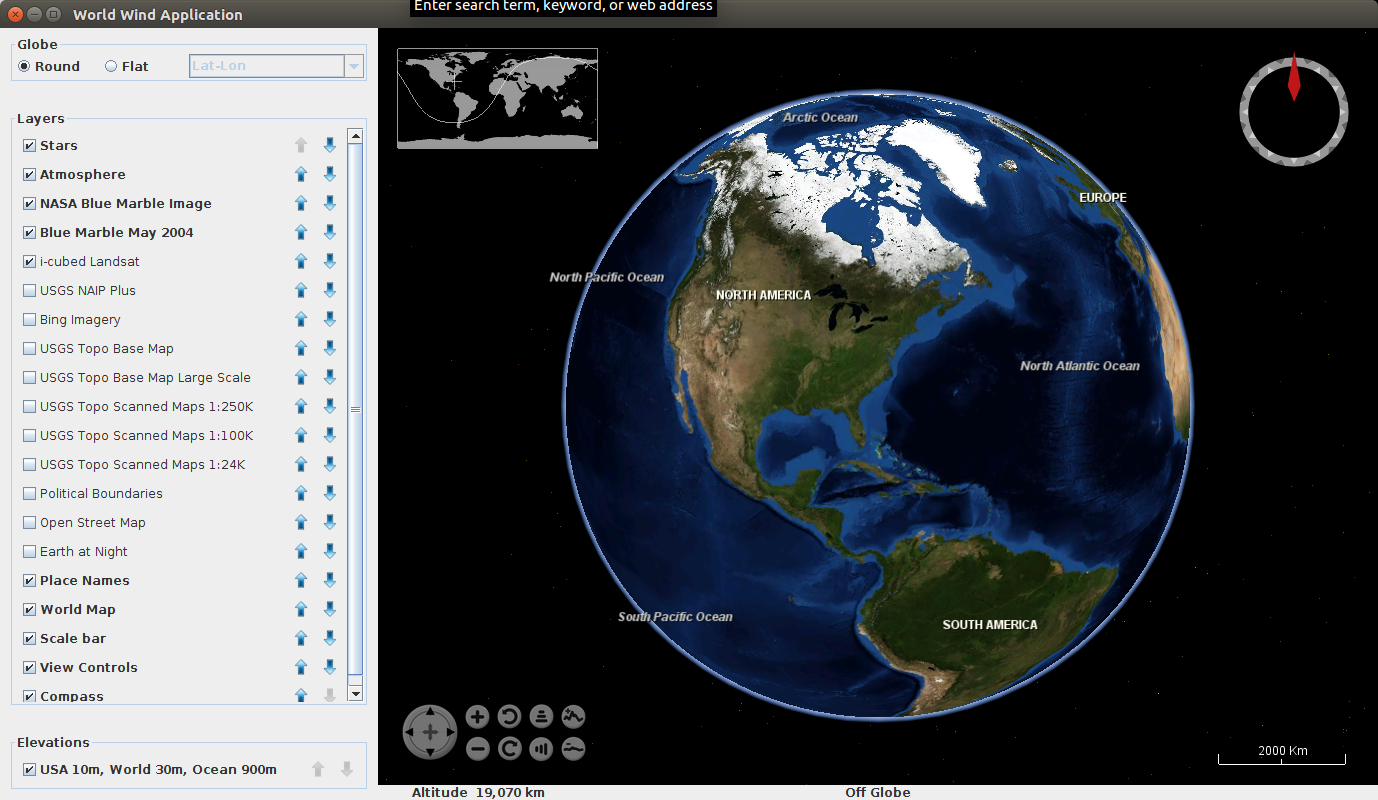
The result is a virtual globe with a panel so you can choose the map layer to display:
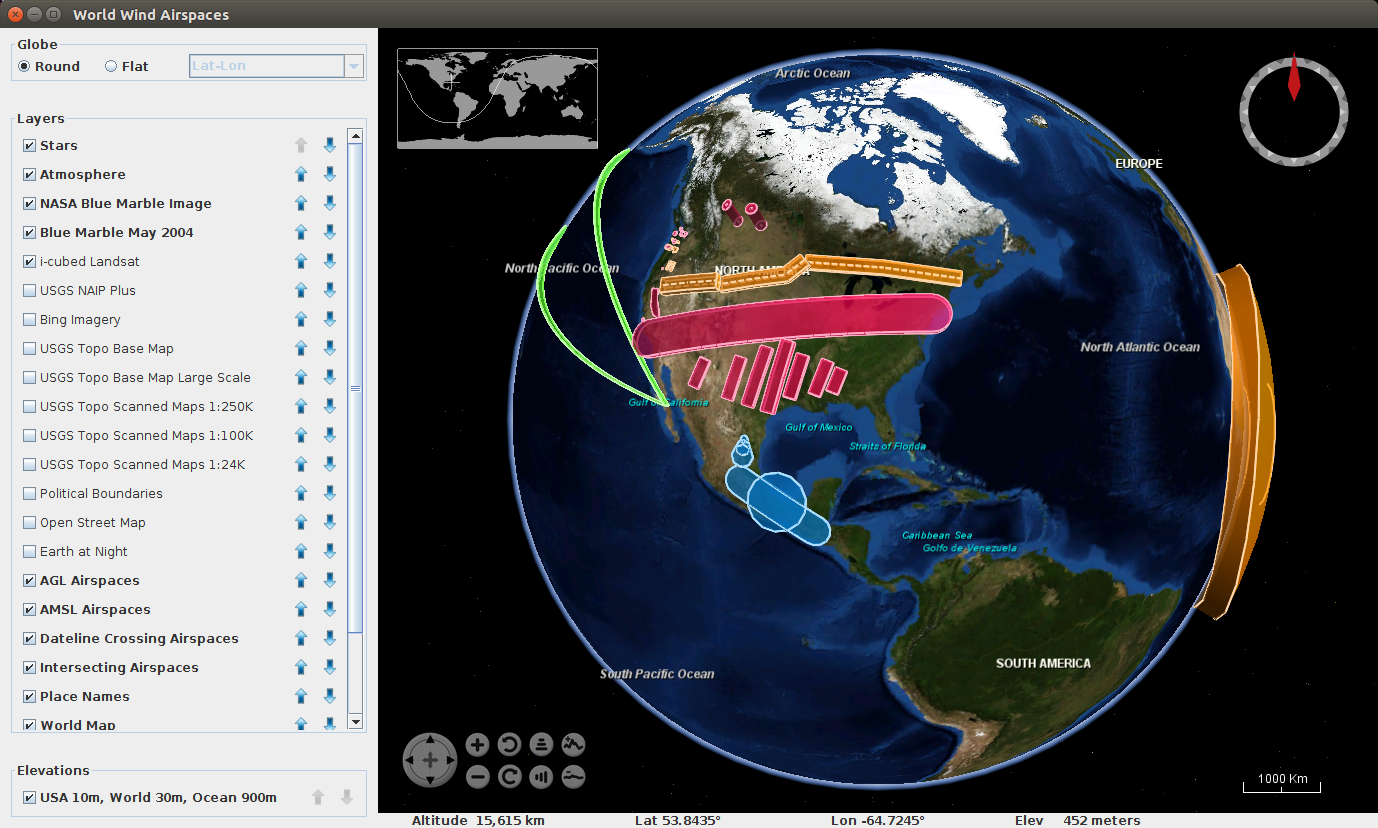
Alternative examples displaying the various WorldWind technologies and capabilities can be found in: worldwind-v2.1.0/src/gov/nasa/worldwindx/examples/
Run the airspaces demo: worldwind-v2.1.0$ ./run-demo.bash gov.nasa.worldwindx.examples.Airspaces
Full command line from WorldWind directory: worldwind-v2.1.0$ java -Xmx1024m -Dsun.java2d.noddraw=true -classpath ./worldwind.jar:./worldwindx.jar:./jogl.jar:./gluegen-rt.jar:./gdal.jar gov.nasa.worldwindx.examples.Airspaces
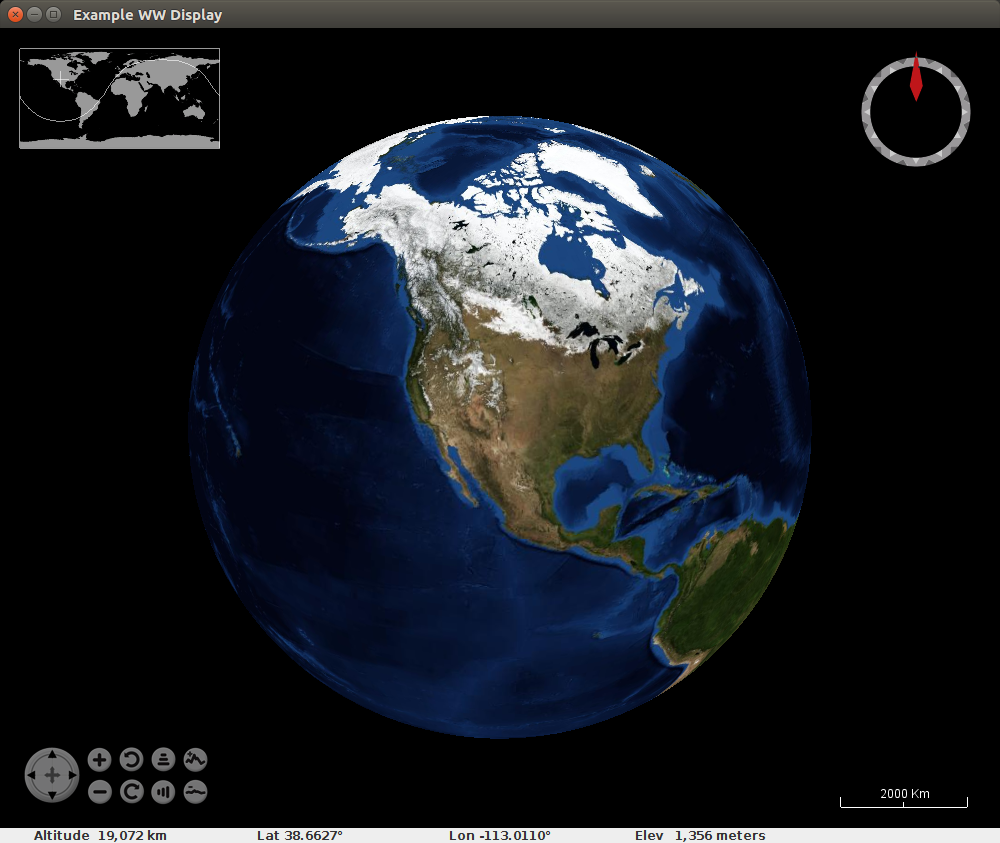
This generates a simple Java application to display a 3-D Globe.
File: src/MyApplication.java
package example;

import gov.nasa.worldwind.Configuration;
import gov.nasa.worldwind.Model;
import gov.nasa.worldwind.WorldWind;
import gov.nasa.worldwind.avlist.AVKey;
import gov.nasa.worldwind.awt.WorldWindowGLCanvas;
import gov.nasa.worldwind.avlist.AVKey;
import gov.nasa.worldwind.awt.WorldWindowGLCanvas;
import gov.nasa.worldwind.event.*;
import gov.nasa.worldwind.exception.WWAbsentRequirementException;
import gov.nasa.worldwind.layers.*;
import gov.nasa.worldwind.layers.placename.PlaceNameLayer;
import gov.nasa.worldwind.util.*;
import gov.nasa.worldwindx.examples.util.*;

import javax.swing.JFrame;
import java.awt.*;

public class MyApplication extends JFrame {

   private static WorldWindowGLCanvas wwd = null;

   public MyApplication() {

            wwd = new WorldWindowGLCanvas();

            ((Component) this.wwd).setPreferredSize(new java.awt.Dimension(1000, 800));
            this.getContentPane().add(wwd, java.awt.BorderLayout.CENTER);

            // Create the default model as described in the current worldwind properties.
            Model m = (Model) WorldWind.createConfigurationComponent(AVKey.MODEL_CLASS_NAME);
            this.wwd.setModel(m);

            this.add((Component) this.wwd, BorderLayout.CENTER);

            // Optional: add a status bar to show lat/lon/elevation
            StatusBar statusBar= new StatusBar();
            this.add(statusBar, BorderLayout.PAGE_END);  // Add to bottom of screen
            statusBar.setEventSource(wwd);

    }

    public static void main(String[] args)
    {
        //System.setProperty("gov.nasa.worldwind.app.config.document", "config/worldwind.xml");
        java.awt.EventQueue.invokeLater(new Runnable() {
            public void run() {
                JFrame frame = new MyApplication();
                frame.setTitle("Example WW Display");
                frame.setDefaultCloseOperation(JFrame.EXIT_ON_CLOSE);
                frame.pack();
                frame.setVisible(true);
            } // end of run()
        }); // end of Runable definition
    } // end of main()
}
File: build.xml
<?xml version="1.0" encoding="utf-8"?>
<project name="WW example" basedir="." default="jar">
  <property environment="env"/>
  <property name="home" value="." />
  <property name="src.dir" value="src" />
  <property name="build.dir" value="classes" />
  <path id="classpath">
      <pathelement path="${build.dir}" />
      <fileset dir="worldwind-v2.1.0" includes="*.jar" />
  </path>

  <!--compile Java source files-->
  <target name="compile" description="Compile all Java source files">
      <echo message="Compiling the java source files..." />
      <mkdir dir="${build.dir}" />
      <javac srcdir="${src.dir}" destdir="${build.dir}" debug="on" includeAntRuntime="false">
        <classpath refid="classpath" />
      </javac>
  </target>

  <target name="jar" depends="compile">
      <jar jarfile="example.jar">
          <manifest>
              <attribute name="Main-Class" value="example.MyApplication" />
              <attribute name="Class-Path" value="classpath" />
          </manifest>
          <fileset dir="${build.dir}">
              <include name="**/*.class" />
          </fileset>
      </jar>
  </target>

  <target name="run" depends="jar" description="Run the sample app">
      <echo message="Running the sample application..." />
      <java classname="example.MyApplication" fork="true">
          <classpath refid="classpath" />
      </java>
  </target>

  <target name="clean" description="Deletes all the generated artifacts.">
      <delete file="example.jar" />
      <delete dir="${build.dir}" />
  </target>
</project>
The Java classpath specified in the build.xml file (worldwind-v2.1.0) must be set to the WorldWind directory holding the JAR files:
- worldwind.jar: WorldWind API library
- worldwindx.jar: Only required to run the sample demos
- gdal.jar: GDAL (Geospatial Data Abstraction Library) GIS imagery and geometry manipulation routines
- jogl-all.jar: JOGL interface to the OS windowing system
- jogl-all-natives-xxxxx-yyyyy.jar: Java OpenGL (JOGL) platform specific shared libraries (eg: jogl-all-natives-linux-amd64.jar)
- gluegen-rt.jar: Gluegen tool used by JOGL to automatically generates the Java and JNI code necessary to call C libraries.
- gluegen-rt-natives-xxxxx-yyyyy.jar: Gluegen platform specific shared libraries (eg: gluegen-rt-natives-linux-amd64.jar)
- vpf-symbols.jar: PNG image files of symbols
Running this application will use the default WorldWind XML configuration files provided in the worldwind.jar file. This can be over-ridden as specified in the configurations shown below.
Build and run: ant run
At a systems level, WorldWind uses a client-server network architecture. Multiple WorldWind client applications can request GIS data from any number of GIS servers.
As an application, WorldWind clients are programmed best in an Object Oriented "Model-View-Controller" architecture:
- Model: the geometric items you want to control or display (eg icons showing places of interest or hiking paths) are expressed in "model" objects referencing WorldWind geometry objects such as a "PointPlacemark" or "Polyline" which can be rendered on the virtual globe. You can generate your own classes by inheriting from defined WorldWind renderable objects and adding your own information and characteristics. Each geometric item is tied to a WorldWind "Renderable" layer.
- View: the renderable WorldWind "layers" on which the model objects are displayed. Derive your own layers from WorldWind layer classes. For each layer, you will have to provide an overloaded "doRender()" method to reference the model objects to display. Derive your layers from WorldWind layer types which exist to render items on the virtual globe (RenderableLayer) or annotate (AnnotationLayer), etc. Some predefined and ready to use WorldWind layers have been generated to display a compass (CompassLayer), display a list of layers (LayerListLayer), display a scale bar (ScalebarLayer), display view controls (ViewControlLayer), etc (see our example above). Each layer is tied to the virtual globe instance.
- Controller: your mouse listeners (left/right mouse button press/release/drag) are developed to invoke a programmatic response to perform an action. Mouse interactions such as a selection of a geometric object allows one to then write actions against that object (eg display information associated to the object, change information about the object, etc).
Regular Java Swing or JavaFX GUIs which may support or embed a WorldWind display, are also typically programmed in a "Model-View-Controller" architecture.
Geometry:
| Geometry "Render" Item | Description |
|---|---|
| PointPlacemark | Point with an icon image and optional text |
| Path | line or curved path drawn between input positions |
| Box | box volume defined by a center position and three axis radii |
| Triangle | triangle from three counter-clockwise ordered vertices |
| Cylinder | cylinder volume defined by a center position, height and radius, or alternatively, by three axis radii |
| Sphere | sphere in three dimensional space given a center and radius |
| Polygon | polygon with multiple internal but not intersecting contours |
| Route | aviation route graphic |
| SurfaceBox | surface conforming shape |
| SurfaceCircle | surface conforming shape |
| SurfaceEllipse | surface conforming shape |
| SurfacePolyLine | surface conforming shape |
| SurfacePolygon | surface conforming shape |
| SurfaceImage | surface conforming image |
| Orbit | circular path |
| Pyramid | pyramid volume defined by a center position, a height, and two axis lengths |
| Quadrilateral | Four cornered shape |
| RadarVolume | volume defined by a near and far grid of positions. Radar volume having a minimum and maximum range |
| RigidShape | volume defined by a center position and the three axis radii |
| RubberSheetImage | image that can be arbitrarily positioned, scaled and warped on the globe's surface using control points at the image's four corners |
The map and elevation servers as well as control of some built-in layers can all be defined in XML configuration files shown below. (copy from worldwind-v2.1.0/src/config/...) Note that these configurations point to NASA map servers. This can be changed to point to Bing, ESRI or your own map servers.
File: config/worldwind.xml (default name)
<?xml version="1.0" encoding="UTF-8"?>
<WorldWindConfiguration version="1">
    <LayerList href="config/example.layers.xml"/>
    <!--Most configuration information is defined in attribute-value pairs-->
    <Property name="gov.nasa.worldwind.avkey.ModelClassName" value="gov.nasa.worldwind.BasicModel"/>
    <Property name="gov.nasa.worldwind.avkey.GlobeClassName" value="gov.nasa.worldwind.globes.Earth"/>
    <Property name="gov.nasa.worldwind.avkey.EarthElevationModelConfigFile" value="config/Earth/EarthElevations2.xml"/>
    ...
    ...
</WorldWindConfiguration>
File: config/example.layers.xml (specified in worldwind.xml with the "LayerList" directive)
<?xml version="1.0" encoding="UTF-8"?>
<LayerList>
    <Layer href="config/Earth/BlueMarble.xml"   actuate="onLoad"/>
    <Layer href="config/Earth/LandsatI3.xml"    actuate="onLoad"/>
    <Layer className="gov.nasa.worldwind.layers.WorldMapLayer"/>
    <Layer className="gov.nasa.worldwind.layers.ScalebarLayer"/>
    <Layer className="gov.nasa.worldwind.layers.CompassLayer"/>
    <Layer className="gov.nasa.worldwind.layers.ViewControlsLayer"/>
</LayerList>
File: config/Earth/BlueMarble.xml (specified in example.layers.xml with the "Layer" directive)
<?xml version="1.0" encoding="UTF-8"?>
<Layer version="1" layerType="TiledImageLayer">
    <DisplayName>BlueMarble</DisplayName>
    <Service serviceName="OGC:WMS" version="1.3">
        <GetCapabilitiesURL>https://worldwind25.arc.nasa.gov/wms</GetCapabilitiesURL>
        <GetMapURL>https://worldwind25.arc.nasa.gov/wms</GetMapURL>
        <LayerNames>BlueMarble-200403</LayerNames>
    </Service>
    <RetrievePropertiesFromService>true</RetrievePropertiesFromService>
    <DataCacheName>Earth/BlueMarbleCache</DataCacheName>
    <ImageFormat>image/jpeg</ImageFormat>
    <AvailableImageFormats>
        <ImageFormat>image/jpeg</ImageFormat>
        <ImageFormat>image/png</ImageFormat>
    </AvailableImageFormats>
    <FormatSuffix>.jpg</FormatSuffix>
    <NumLevels count="6" numEmpty="0"/>
    <TileOrigin>
        <LatLon units="degrees" latitude="-90" longitude="-180"/>
    </TileOrigin>
    <LevelZeroTileDelta>
        <LatLon units="degrees" latitude="36" longitude="36"/>
    </LevelZeroTileDelta>
    <TileSize>
        <Dimension width="256" height="256"/>
    </TileSize>
    <Sector>
        <SouthWest>
            <LatLon units="degrees" latitude="-90" longitude="-180"/>
        </SouthWest>
        <NorthEast>
            <LatLon units="degrees" latitude="90" longitude="180"/>
        </NorthEast>
    </Sector>
    <ForceLevelZeroLoads>true</ForceLevelZeroLoads>
    <RetainLevelZeroTiles>true</RetainLevelZeroTiles>
    <UseTransparentTextures>false</UseTransparentTextures>
    <RetrievalTimeouts>
        <ReadTimeout>
            <Time units="milliseconds" value="30000"/>
        </ReadTimeout>
    </RetrievalTimeouts>
    <!-- The following lines are included just to show how to set the values to other than their defaults -->
    <MaxAbsentTileAttempts>2</MaxAbsentTileAttempts>
    <MinAbsentTileCheckInterval>1000</MinAbsentTileCheckInterval>
</Layer>
- the zoom level range for which this low imagery resolution will apply: <NumLevels count="6" numEmpty="0"/>
- the image tile sizes: 256x256 pixels
- the image format: JPEG
- the map image coverage (lower left SouthWest to upper right NorthEast): full globe latitude from pole to pole (-90 to 90) and full globe longitude (-180 to 180 degrees)
- the layer name as defined on the server. NASA has all twelve months from BlueMarble-200401 to BlueMarble-200412.
File (4.1 TB of high resolution I3 Landsat imagery): config/Earth/LandsatI3.xml
<?xml version="1.0" encoding="UTF-8"?>
<Layer version="1" layerType="TiledImageLayer">
    <DisplayName>LandsatI3</DisplayName>
    <Service serviceName="OGC:WMS" version="1.3">
        <GetCapabilitiesURL>https://worldwind25.arc.nasa.gov/wms</GetCapabilitiesURL>
        <GetMapURL>https://worldwind25.arc.nasa.gov/wms</GetMapURL>
        <LayerNames>esat</LayerNames>
    </Service>
    <RetrievePropertiesFromService>true</RetrievePropertiesFromService>
    <DataCacheName>Earth/LandsatI3Cache</DataCacheName>
    <ImageFormat>image/jpeg</ImageFormat>
    <AvailableImageFormats>
        <ImageFormat>image/jpeg</ImageFormat>
        <ImageFormat>image/png</ImageFormat>
    </AvailableImageFormats>
    <FormatSuffix>.jpg</FormatSuffix>
    <NumLevels count="10" numEmpty="5"/>
    <TileOrigin>
        <LatLon units="degrees" latitude="-90" longitude="-180"/>
    </TileOrigin>
    <LevelZeroTileDelta>
        <LatLon units="degrees" latitude="36" longitude="36"/>
    </LevelZeroTileDelta>
    <TileSize>
        <Dimension width="256" height="256"/>
    </TileSize>
    <Sector>
        <SouthWest>
            <LatLon units="degrees" latitude="-90" longitude="-180"/>
        </SouthWest>
        <NorthEast>
            <LatLon units="degrees" latitude="90" longitude="180"/>
        </NorthEast>
    </Sector>
    <ForceLevelZeroLoads>true</ForceLevelZeroLoads>
    <RetainLevelZeroTiles>true</RetainLevelZeroTiles>
    <UseTransparentTextures>false</UseTransparentTextures>
    <RetrievalTimeouts>
        <ReadTimeout>
            <Time units="milliseconds" value="30000"/>
        </ReadTimeout>
    </RetrievalTimeouts>
    <!-- The following lines are included just to show how to set the values to other than their defaults -->
    <MaxAbsentTileAttempts>2</MaxAbsentTileAttempts>
    <MinAbsentTileCheckInterval>1000</MinAbsentTileCheckInterval>
</Layer>
File: config/Earth/EarthElevations2.xml
<?xml version="1.0" encoding="UTF-8"?>
<ElevationModel version="1" modelType="Compound">
    <ElevationModel version="1">
        <DisplayName>USA 10m, World 30m, Ocean 900m</DisplayName>
        <Service serviceName="OGC:WMS" version="1.3">
            <GetCapabilitiesURL>https://worldwind26.arc.nasa.gov/elev</GetCapabilitiesURL>
            <GetMapURL>https://worldwind26.arc.nasa.gov/elev</GetMapURL>
            <LayerNames>NASA_SRTM30_900m_Tiled,aster_v2,USGS-NED</LayerNames>
        </Service>
        <RetrievePropertiesFromService>true</RetrievePropertiesFromService>
        <!-- day month year hours:minutes:seconds timezone -->
        <LastUpdate>16 01 2014 20:00:00 GMT</LastUpdate>
        <DataCacheName>Earth/EarthElevations2Cache</DataCacheName>
        <ImageFormat>application/bil16</ImageFormat>
        <DataType type="Int16" byteOrder="LittleEndian"/>
        <DataDetailHint>0.20</DataDetailHint>
        <FormatSuffix>.bil</FormatSuffix>
        <ExtremeElevations min="-14380" max="8850">
            <FileName>config/SRTM30Plus_ExtremeElevations_5.bil</FileName>
        </ExtremeElevations>
        <NumLevels count="12" numEmpty="0"/>
        <TileOrigin>
            <LatLon units="degrees" latitude="-90" longitude="-180"/>
        </TileOrigin>
        <LevelZeroTileDelta>
            <LatLon units="degrees" latitude="20" longitude="20"/>
        </LevelZeroTileDelta>
        <TileSize>
            <Dimension width="150" height="150"/>
        </TileSize>
        <Sector>
            <SouthWest>
                <LatLon units="degrees" latitude="-90" longitude="-180"/>
            </SouthWest>
            <NorthEast>
                <LatLon units="degrees" latitude="90" longitude="180"/>
            </NorthEast>
        </Sector>
    </ElevationModel>
</ElevationModel>
File: config/DataFileStore.xml
<?xml version="1.0" encoding="UTF-8"?>
- This file defines the local image and elevation data cache. Typically this is found in:
- Linux/Solaris: $HOME/var/cache/WorldWindData/Earth/... or /var/cache/WorldWindData/Earth/...
- MS/Windows: C:\ProgramData\WorldWindData\...
- NASA WorldWind Java - home page
- WorldWind users and developers forum - message board
- WorldWind Central - message board and support site
 Books:
 |
"GIS Fundamentals: A First Text on Geographic Information Systems"
by Paul Bolstad ISBN # 1506695876, XanEdu Publishing Inc; 5th edition
|

|